+ Reply to Thread
Page 13 of 17 FirstFirst 1 2 3 4 5 6 7 8 9 10 11 12 13 14 15 16 17 LastLast
Results 181 to 195 of 252

Thread: I'm the new caretaker of Ariel-109

  1. #181
    Join Date
    Nov 2009
    Location
    Brooklyn, NY
    Posts
    467
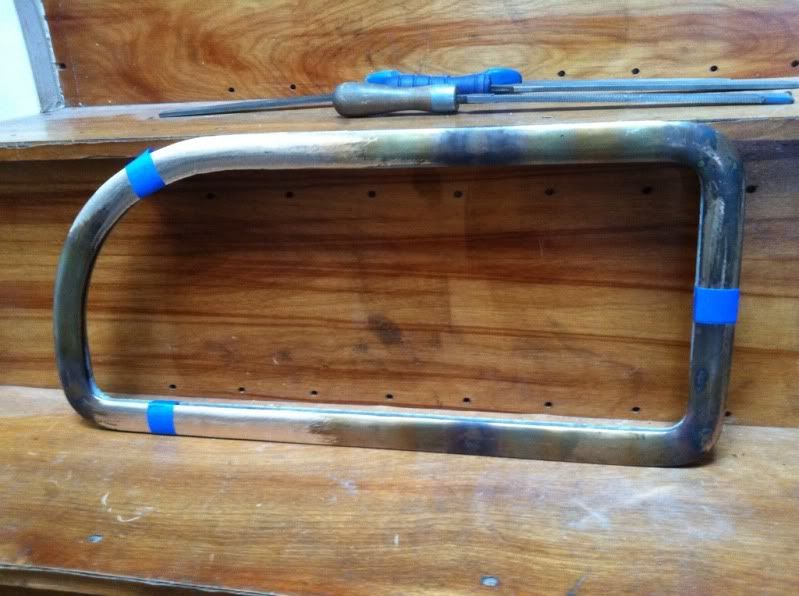
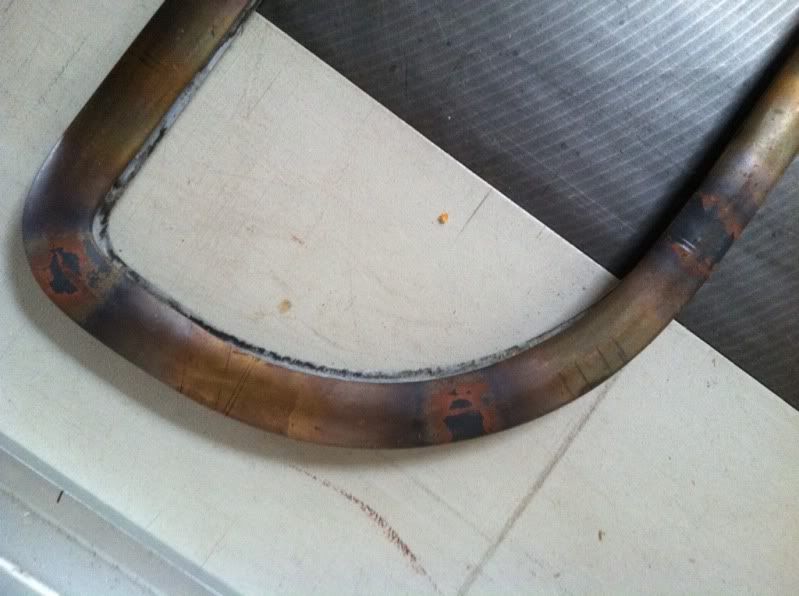
    Finally started on installing the bronze window / light frames on #109. Removed two of the aluminum frames sets on the boat. Brought them back to the shop to mate them up with the four bronze frames I got from Trader John Chandlery. At the shop I discovered the two types of frames were slightly different in size, drats!!! I set about solving this annoying dilemma by cutting the bronze frames, bending the curve slightly and welding them to nearly the same size as the original aluminum frames. They came out nice in the end, oh well. Still need to be finished and polished. Need to go find some abrasion resistant plexiglass acrylic for the new lights next.


    Last edited by Ariel 109; 03-20-2012 at 06:15 PM.

  2. #182
    Join Date
    Sep 2001
    Location
    Orinda, California
    Posts
    2,311
    See page 31 in the manual for a discussion of early vs later window frames.

  3. #183
    Join Date
    Nov 2009
    Location
    Brooklyn, NY
    Posts
    467
    Thanks Bill, guess it's time to join up and reap the rewards of membership. Although ignorance can be bliss. If I had known the frames were different sizes I would have likely not started this project.

    Sanded out the bronze frames with 150 grit sandpaper, and a foam sanding pad on a polisher. Best to use a slow speed and short burst of power. Next stop buffing wheel.


  4. #184
    Join Date
    Sep 2001
    Location
    Northern MN
    Posts
    1,100
    Hicarumba! you do great work. I wouldn't know they'd been through surgury if I hadn't seen it. Nice polisher too.
    My home has a keel.

  5. #185
    Join Date
    Nov 2009
    Location
    Brooklyn, NY
    Posts
    467
    Thanks Tony!

    I'm trying to get the deadlights done and move onto some other projects. Promised myself that #109 would sail the Wednesday night races at City Island this summer, they start up second week of May. I seem to have a crew lined up. Should be interesting, although we will be sailing quite a different course then the modern racing boats that are the majority in this series.

    Ben

  6. #186
    Join Date
    Sep 2008
    Location
    Brooksville, FL
    Posts
    720
    Ben

    You are good with metal or wood. I can only claim some minor talent with wood. I wish I had your skills with the metal working. Ariel 109 can be darn thankful she has you to care for her. Like Tony I am impressed with your work on the lite frames as much as he is. Nice job.
    JERRY CARPENTER - C147
    A man can succeed at almost anything for which he has unlimited enthusiam.

  7. #187
    Join Date
    Sep 2006
    Location
    NY
    Posts
    66
    Ben if your are looking for crew during the week at City Island, I would love to join you. Drinks are on me at the Crab Shack

  8. #188
    Join Date
    Nov 2009
    Location
    Brooklyn, NY
    Posts
    467
    Thanks Jerry! I gained my metalworking skills came mostly unintentionally. Really an outgrowth of customers requests and keeping work in shop. Many great books, videos, websites and workshops are available today for learning metalworking, mostly thanks to the custom car and motorcycle enthusiasts. When I started 18 years ago the only information I could find was from old industrial arts textbooks, which were incredibly dry and not very helpful. Here's a link to my metalworking hero Ron Fournier site. His "Metal Fabricator's Handbook" I think is the best introduction to metalwork out there!

    http://www.fournierenterprises.com/

    Jake, it would be great to have you along racing on #109 this summer. Can you PM me your contact information?

    Ben

  9. #189
    Join Date
    Nov 2009
    Location
    Brooklyn, NY
    Posts
    467
    Mission accomplished, new windows installed. Reused the aluminum frames on the inside, bronze frames on the outside. Strange to be able to look out of these windows, the old ones being so crazed.


    I'm sure the bronze will be well on the way to turning green next time I get up to the boat. One day I'm going to have to paint this boat.


    Got this new depth sounder, trying to figure out how to wire it up.


  10. #190
    Join Date
    Jan 2004
    Location
    Scarborough, Maine
    Posts
    1,440
    Quote Originally Posted by Ariel 109 View Post
    Got this new depth sounder, trying to figure out how to wire it up.
    Ha! You should put a BIG 3'7" flag on there!

    So, did you install the deadlights by yourself?? What did you use seal them? Did you just tap new screw holes in your "new" bronze frames?
    Mike
    Totoro (Sea Sprite 23 #626)

  11. #191
    Join Date
    Nov 2009
    Location
    Brooklyn, NY
    Posts
    467
    Mike, of course I did the work myself, didn't win the Mega Millions!

    Used several rolls of a grey butyl tape, purchased at an rv-trailer suppy, to seal the windows and frames. Certainly an easier method than using a tubed sealant.

    First I welded shut the old screw holes on the the bronze frames, they didn't match the aluminum frames. Then I drilled and tapped the bronze frames to match the holes with the interior aluminum frames. Making a blind hole tap thread in bronze is not too hard if you are careful.
    Last edited by Ariel 109; 04-02-2012 at 07:48 AM.

  12. #192
    Join Date
    Jan 2004
    Location
    Scarborough, Maine
    Posts
    1,440
    Quote Originally Posted by Ariel 109 View Post
    Mike, of course I did the work myself, didn't win the Mega Millions!

    Used several rolls of a grey butyl tape, purchased at an rv-trailer suppy, to seal the windows and frames. Certainly an easier method than using a tubed sealant.
    Ben, I just meant "on your own", i.e without a helping hand. Not sure how you could do it otherwise! My sailing buddy volunteered to help me - he's cheap, I just pay him with beer and a sail... And yes, the tubed sealant is quite messy! I'm looking forward to using butyl tape this time around on my stanchions.
    Attached Images  
    Mike
    Totoro (Sea Sprite 23 #626)

  13. #193
    Join Date
    Nov 2009
    Location
    Brooklyn, NY
    Posts
    467
    The nice thing about using the butyl tape is that you don't need to find a local layabout to help. Stick the window in the frame, stick the frame on the cabin and run down below and gently start attaching the inside frames.

  14. #194
    Join Date
    Mar 2006
    Location
    San Francisco - or Abroad
    Posts
    433
    Quote Originally Posted by Ariel 109 View Post

    Got this new depth sounder, trying to figure out how to wire it up.

    Hey Ben, You obviously do not know what you have there! - That depth sounder is not hard wired to the boat. It is one of those new-fangled battery powered ones. A fresh set of AA's will get it working right away! I can tell by the digital-display ribbon markers!
    (You have the fancy model - mine just feels for the bottom - it has no markings!)

    AND Very Nice work on the windows. They provide not a clue as to the skillful work that went into them... (A sign of good workmanship!)
    Last edited by Rico; 09-28-2013 at 08:21 AM.

  15. #195
    Join Date
    Apr 2007
    Location
    Grand Haven / Muskegon, Michigan
    Posts
    617
    Hey Ben,
    Any particular brand or size of butyl tape you used? My sealing job last summer was a miserable failure. We bashed around in fall waves on Lake Michigan - water squirting through the window frames - to the extent that Sadie and Lucas were certain we were sinking. I have some work to do. So if I remove it all, what do I do with the silicone remnants? I have a silicone removing wash that I used pre-paint, but I (MOST ASSUREDLY dont want to screw up my paint job!!) Details on the tape would be great!

    Speaking of: Hey Bill! What is the story on the hatch gaskets?

+ Reply to Thread

Posting Permissions

  • You may not post new threads
  • You may not post replies
  • You may not post attachments
  • You may not edit your posts