+ Reply to Thread
Page 26 of 32 FirstFirst 1 2 3 4 5 6 7 8 9 10 11 12 13 14 15 16 17 18 19 20 21 22 23 24 25 26 27 28 29 30 31 32 LastLast
Results 376 to 390 of 472

Thread: EBB's PHOTO GALLERY THREAD

  1. #376
    Join Date
    Sep 2001
    Location
    San Rafael, CA
    Posts
    3,621

    Dem Bones, dem bronze bones

    Hey Tony,
    THERE are those bronzes!
    How could you not like that 'mid rail chock/cleat' fitting?
    It would schmooze nicely into the new wood rail. On lit'lgull's rail there would even be some wood left UNDER the chock.

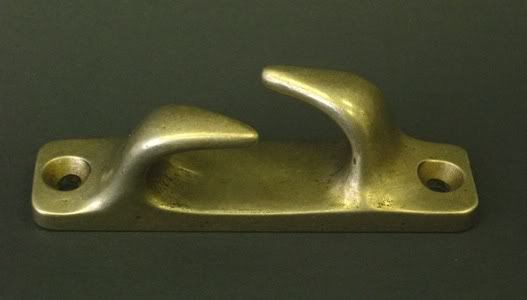
    Looking at the 'Bronze G Chock' you can't miss the hard edges. Imco this applies to the herreschoff midrail.
    I've not taken these but similar skene's and tried them on the transom with a natural lead from deck cleats. I could not find a fair lead through the skenes that imco didn't have chaffing problems.

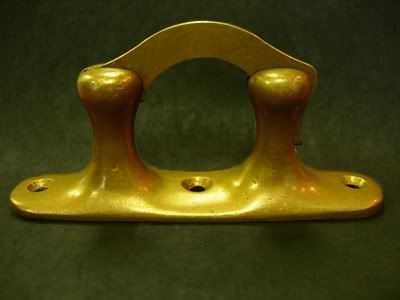
    I got a couple of those Panama Canal chocks from Spartan and tried them on the transom.
    (Can't locate them right now in the garage - time to do a complete inventory.)
    If I remember they seemed kind of GAWKEY - awkward - even though they'd be useful.*
    The fitting is tall for its base. If these were mounted to the curve of our transom and the cleats were in the usual place (in the middle of the space between the locker lid and the toes rail) the lead of the line through the horns would be across two corners of the fitting. The corners are rounded sort of but not enough for me. Could mount the chocks more in line with the cleat but imco that looks wrong and becomes a fastening problem inside the lazarette. I'm still looking for the right fitting. Something more rounded and plump and easy on rope.

    The fittings could be altered/rounded with files and burrs.
    But then it occured to me that these fittings are tight within the designer's concept and any rounding would possibly weaken it. Had to metally discard them. Even though I really liked that midrail......snif.

    We protect rope with chaffing gear. BUT chafe protection imco BEGINS with the chock or cleat.

    I got some well rounded stainless chocks at a boatshow once. They kind of leaned and were extreme deco - and you could figure eight a line across the horns like a cleat if you had to.
    When I got them to the boat they would barely fit on the transom rail and looked like they had been canabilized off a power boat. Couldn't stomach it.

    Hope the rail scupper pix are useful. Don't remember if I took any chop and slop pics of the process. But there must be enuf clues in the verbiage.
    __________________________________________________ __________________________________________________ ___________________
    *We've just had that Japan tsumami find its way ACROSS THE PACIFIC into a couple harbors here on the California coast that made the news. Crescent City harbor was mangled pretty bad. Santa Cruz harbor, which is essentially a marina, had a sudden two foot surge that sunk twenty boats damaged hundreds more and tore docking apart. Ariels apparantly OK. (See Discussion page for videos.)
    Murphey's law always applies to boats - if it can it will happen.
    All lines leading to a boat should be through CLOSED CHOCKS. One wave, One twist, turn, nod of the boat can panama a rope out of an open chock.
    Last edited by ebb; 03-12-2011 at 12:25 PM.

  2. #377
    Join Date
    Nov 2009
    Location
    Brooklyn, NY
    Posts
    467
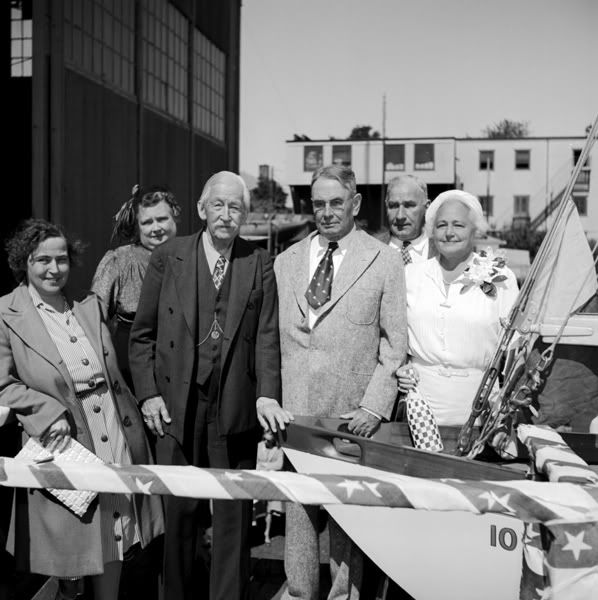
    Henry Nevins' boat Polly II had these beautiful chock. Cast at the Nevins foundry no doubt.


  3. #378
    Join Date
    Sep 2001
    Location
    Northern MN
    Posts
    1,100
    Owning your own foundry might help. How about having a size appropriate set of these made? They look good on the Formosa 51.
    Attached Images  
    My home has a keel.

  4. #379
    Join Date
    Sep 2001
    Location
    San Rafael, CA
    Posts
    3,621

    bollards

    That hardware installation looks bollocks to me.
    Stating the obvious: would anybody lead line overboard with knife edge like that? Tear the chaffing gear to shreds.
    It says alot about the designer, builder, and the idiot who buys it.
    Greenboatstuff shows a Davey and Co bronze version of this bollard. Smallest size is 12" and will set you back $578. Not including S&H.

    Davey has a beautiful open top horney cleat #1078 -chock/cleat - that comes in four reasonable sizes. Prices start at $33. They also have small well rounded bronze bollards #1126 in four sizes, starting at $47.
    Befor you order from greenboatstuff ask if they have it in stock, otherwise it'll be months. It happened to me. The web site takes a little getting used to, also.

    I can see these bollards being used at the bow and stern INSTEAD OF SKENE CHOCKS on our boats. Have not actually tried them.
    Lines in both locations, depending on the size bollard, would be 'corner to corner' through the bollard.
    The bollards posts are round - EXCELLENT! And the base is rounded - EXCELLENT!
    Have to allow for line size and chaffing gear.

    I haven't got one in my hands, BUT the question arises:
    can the bollard be drilled for a clevis pin across the top, or near the top, to capture the line?
    Being bronze it may be a reasonable alteration. And the loose pin used only when needed. Like going through the Panama. Or leaving the boat untended.

    Could fancy it up with one side of the bollard being threaded and the pin screwed into place. No cotters.
    It only takes more time and more money!
    Davey & Co. does custom work.....
    __________________________________________________ __________________________________________________ ______________________'
    Later edit:
    Brits being weird Brits, there is nobody in the UK including Davey that gives the dimensions or a dimensional drawing of these bollard/chocks -
    except that they are so many inches long and one assumes that refers to the base (rather than the opening between the posts, which it could be) - and the width of the base. One might extrapolate enuf data to make a somewhat acciurate drawing of the fitting. However fine tuning a size to the bow toerail (they'd have to be mounted somewhat inboard imco because of space limitations in the forepeak. The width of the base is an important consideration. The bollards are highly sculptural and making a model would be difficult. Greenboatstuff is no help either, better ask what their return policy is?
    Last edited by ebb; 03-13-2011 at 03:05 PM.

  5. #380
    Join Date
    Nov 2009
    Location
    Brooklyn, NY
    Posts
    467
    Last edited by Ariel 109; 03-13-2011 at 06:46 PM.

  6. #381
    Join Date
    Sep 2001
    Location
    San Rafael, CA
    Posts
    3,621
    Thanks Ben,
    Had forgot about the Rostand collection. Visited that Historical Arts site a couple times but don't find it too visitor friendly.
    But I think both fittings are worthy of further inquiry.
    Must say my first take of the SELF-LOCKING BOLLARD CHOCK was more like seeing a Victorian sausage making tool than a rope cradle.
    No. 2447 (comes in 5" and 6" length) the base of the larger one is 1 1/4" wide. Estimating:
    The height inside the chock is 1 1/2". It is just under two inches wide at the thinest point of the bollards, which are about 1/2" wide there. Stated rope size is 'UP TO 1". The blade keeper is 1/2" wide, but there is no way of knowing how thick it is or how it is closed and opened. Would assume 5/16" FHMS bronze fasteners. Imco this fitting is light to medium duty, kind of pretty but not robust.


    Ole fisheye wants to see the locking mechanism of the keeper befor even asking about the cost
    I mean if you bend the blade off a little nipple or somthing like a cabinet latch, it becomes problematic.
    I'm trying to imagine streaming a drogue off the stern in a howling storm.

    The bollard itself is beautiful. Looks like the pattern was lifted from an already well used original!
    Last edited by ebb; 03-15-2011 at 12:12 AM.

  7. #382
    Join Date
    Jan 2004
    Location
    Scarborough, Maine
    Posts
    1,439
    Hey Ebb, it looks like Deep Blue Yacht Supply carries chocks similar to Tim Lackey's. I got my mooring bit from them and was happy with the company. Buck Algonquin - you can get them in various sizes and bronze too.
    Attached Images  
    Mike
    Totoro (Sea Sprite 23 #626)

  8. #383
    Join Date
    Sep 2001
    Location
    Northern MN
    Posts
    1,100
    Geeze, Mike. I wish I had known about DBYS before I jumped... Those mooring bits look much more substantial than the one we bought. And now I'd feel bad selling it to someone else because I know there is a better piece at a better price out there. Who ever would have thought it would be this tough to have a conscience.

    Ebb it's dang near warm enough for me to break into deep storage. I'll take some close ups of the mid-rail chocks so you can get a feel on the curves. They are not as smooth as the locking/captive chock Ben posted above. Thems smooooth! I wonder, can one file and polish burnished bronze? That may be a way to 'soften' those edges (which are getting progressively knifeier with each passing minute in my mind).
    Last edited by Tony G; 03-14-2011 at 09:21 AM.
    My home has a keel.

  9. #384
    Join Date
    Sep 2001
    Location
    San Rafael, CA
    Posts
    3,621

    skenes with pains

    Mike, Good BuckAlgonquin source there. Thanks.
    Tony, imco you definitely can mess with bronze.
    Can file and grind hard edges rounder and buff them back without sneezing.
    I wouldn't try it with stainless.

    Thing I discover is it is too easy to think up an upgrade.
    When I get into the new project, IT takes over. I stop thinking. Little problems happen.
    And the unretrievable seconds disappear into months and years.
    Tim Lackey's skenes are almost perfect. All he did was get lucky and bolt them in place.
    There is nothing he had to do to make them better.

    The HA Rostand shenes are fine for casual tying up.
    Without a straight-on view of the fitting the dimensions can't be extrapolated. But they seem rather flat. (While Mike's Buckaroonie looks quite round inside like Tim's.) Casting looks strong and handsome.
    BUT there isn't much room in the Skene Bow Chock for a chaffing wrap on the line, maybe the 6" size has to be used.
    I'm convinced that warps and rodes should be at least 5/8" six or eight braid specific anchor line.
    And the type of chaffing stuff should be something that disapates heat and lets in cooling waterm - not sure what that stuff is.
    It isn't hard garden hose but something more porus and probably thicker.
    The bollard looks OK - in the straight on picture - but what happens to the space between the horns when you turn the fitting? If a line is coming off a cleat at an angle to the chock, how much
    of a twist in the chock cancels out the space for the line, wrapped line? The line can't make a jog through the horns. Has to be fair.

    I'm serious about decent leads off the boat and I may have to take the TIME
    to make a clay model from the photos because vendors don't ever give compleat dimensionss of fixtures. Probably because the manufacturer doesn't think e nwant it either.

    Have a picture on the kichen wall that came from the cruisersforum site years ago.
    http://www.cruisersforum.com/attachm...0/cleat_origin..
    That won't come up, but it is a cleat/chock combo that is attached at the RAIL.
    The cleat is on the inside, lower than the chock, and sideways, horizonal with the deck - the chock is on top of the rail. It is a single molded bronze fitting. The base of the cleat turns the corner up onto the rail and becomes the rounded throat of the chock. Nice. Sculpting coud be bollarde/rounded better.

    The rail on the A/C is probably too short for this fitting from a larger boat - but it's clever. If you are onboard with the concept,
    our rail (with maybe a wood cap) could have a nice rounded bronze skene-chock on it - and a strong cleat mounted somehow very close with the chock but bolted through the deck. Wanna try it? Problem is the pull is UP on the bolts rather than in shear as in the mystery dual fitting.

    The mystery fitting is shown with a rope eye around the cleat led thru the open chock.
    The plaits of the eye splice are overboard, free, and not rubbing on anything.
    No wad of chaffing gear is needed except for, say, leathering the eye maybe
    because there is no line to stretch and wear from mooring cleat to a rail chock like we normally have.
    What's great is that the line is instantly available by slipping the eye or undoing turns off the cleat.
    It's impossible to imagine the line crawling out of this fitting. Somebody was thinking here!

    The A/C bow could have nice rounded bronze chock/cleats if you can find them. Warps could alternately lead from inboard mooring cleats or samson post to opposite sides: EG port cleat to starboard chock, to get a better fairer lead off the boat.
    Last edited by ebb; 11-24-2011 at 08:22 AM.

  10. #385
    Join Date
    Jan 2004
    Location
    Scarborough, Maine
    Posts
    1,439
    Wouldn't the "fairest" lead be straight over the bow? Why not set up an anchor roller or something similar on your stemhead fitting to use for a mooring line? You could capture the line with a big enough u-bolt bolted through the deck for extra security. It could do double-duty to contain your anchor line when not on a mooring.
    Last edited by mbd; 03-14-2011 at 11:56 AM.
    Mike
    Totoro (Sea Sprite 23 #626)

  11. #386
    Join Date
    Sep 2001
    Location
    San Rafael, CA
    Posts
    3,621

    fairest lead

    Aye! It would be, Mike, the fairest lead.
    This boat may have another piece of lumber or aluminum up there on the bow. The lead could be from an inboard samson post. It's going to be complicated losing weight from the bow, but it's serious now! IE, litlgull will have drastic measures to remove weight from the bow.

    But I'm also prejudiced against using the anchor roller channel as a fair lead for rope. For anchoring.
    That's certainly what they have become, especially the longer ones that bolt to a good piece of the deck and become a short bowsprit. Strong enough to take the weight of the boat. O sure! But structural and load data for a ULB-3 doesn't exist.

    Really don't know, do I, but in a blow the only secure lead off the boat will be over a big bolted chock on the rail. not the anchor housing. Afterall it's only sheet metal
    Don't remember where I got convinced, but an anchor roller's only job is to launch and retrieve its anchor and lead chain. After the anchor is set its warp and chaffing gear moves over to a rail chock. Move the warp back into the launcher when bringing it back aboard. Should be able to reach over and pick it up and move it....no stanchions or pulpit tube in the way.

    And the anchor ought to be removed from the launcher whilst underway. Of this I've been persuaded. Is this a Pardey thing? Nope, it's a weight thing.

    That anchor and roller gear will weigh in at 35/45lbs out there on the nose. Plus the weight of a second anchor and any chain and rode in the forepeak.
    The mouth of the roller should lead rope fair but it doesn't. The bugle is only designed to retrieve chain and anchor from straight down or straight ahead. It's also possible to bend the roller especially if it is cantilevered without an added strut. More weight.

    There recently was a UTube video that showed an untended moored boat dipping and lifting its bow in a blow. The boat danced and dipped in a wave and came up with the mooring rode caught in the anchor fluke housed in the roller. Then the bow of the boat started tearing itself apart. And pulling the boat under. In this case the boat was moored and the anchor was the boat's anchor ready to be deployed.*
    Lesson one: It's nice and tidy to keep your anchor where any line off the bow can hook on to it. It can happen even in a marina. There was/is a picture that showed the very thing happened in a slip.

    I'm convinced that IDEAL leads from a chock off the rail should be universally fair, no sharp angles.
    Should lead fair at any angle: aft - forward - down. Down and to the side. sideways at any angle.
    UP?
    Of course, YES to that. That Rostand bollard with the blade closer would be hard, me thinks, on nylon surging in a rising Panama lock where lines lead up to the canal sides far above. Or a pier or a wall in a big tide harbor.

    If you are going to fair lead the painter through the roller, maybe the keeper loop over the channel should be better thought out and stronger than the flimsy looking bars and straps that came with store-bought rollers.


    *There is a strong case for anchoring - if we insist on keeping the rode/chain in the anchor-roller channel - by using a simple piece of gear called
    THE TURTLE.
    [Reese Palley, There Be No Dragons: How to cross a big ocean in a small sailboat. Sheridan House 1998, pgg 116/117]

    The Turtle is a short piece of nylon line with a chain hook at its outer end,
    connected to the boat AT OR NEAR THE WATERLINE to an eye or special strong bronze fitting.

    Take the tension off the anchor roller by hooking the chain or rolling hitch to the warp and have the turtle take the weight of the chain.
    No chafe on the nylon. As we might get if rigging a bridle at deck level.
    We've lowered the 'lever' effect of the anchor rode by taking it off the bow and putting it nearer the waterline.
    Thereby inncreasing the scope.
    And if we are using all chain rode, we've cancelled the noise the link makes in the roller.
    A decklevel BRIDLE can be used to take the weight of the warp away from the anchor roller. It, itself will have some chafe issues when leads are not symetrical. It is rigged too high on the boat to be really useful in worsening conditions.
    Last edited by ebb; 10-26-2011 at 02:49 PM.

  12. #387
    Join Date
    Sep 2001
    Location
    Orinda, California
    Posts
    2,311

    Post Removable bilge pump assembly

    Hey Bill et al,

    Here, finally, are some pics - in series - showing the boat's new pump board installation.

    A piece of leftover 3/8" Lexan with a shelf added to hold the high water Shurflo 1500 8Amp,
    and a couple small bronze screws (can't be seen) to hold the screen clip bracket on the small Shurflo 1000 3.75 Amp.

    The small pump is mounted on one side and at the very bottom with its hose pointing aft "through" a 'L' shaped hole in the pull-board.

    The pump and attached hose can be lifted off and removed from the unit.
    The large high water pump is fitted to the board with its hose also pointed aft and held on tightly with a nylon tie.

    Assume the small pump to be replaceable - and the large expensive pump never used.

    The WaterWitch digital sensors are screwed on to the board with their wires blue taped.
    There is no room in the Ariel's narrow bilge/sump for traditional float switches. At least not in what litlgull has behind her ballast.

    For the big pump WaterWitch has a high water alarm with a stand alone buzzer and mute fixture not shown.
    Attached Images  

  13. #388
    Join Date
    Sep 2001
    Location
    Orinda, California
    Posts
    2,311
    Following photos show the method of making a slide holder for the board with epoxy.

    The white rectangle mold is made with polyethylene sheet material.

    The bilge hull sides are prepped. The mold's two ridge shapes filled with epoxy mishmash and glued to the sides. Not much pressure is needed to hold the molds while curing. I used balled up plastic film, jammed down in!

    Because of the truncated mold shape the mold pops right off after the epoxy is hard.

    Turns out there is just enough space to set the board in its place
    It is held quite firmly when housed.

    Now we have to hook up the various wires and run the hose.

    Both pumps use same 1 1/8" Vinyl hose. Small pump hose will exit into cockpit.

    Large pump hose will exit high up on the hull, with syphon break loop. Not sure just where,
    but the hose for efficiency has to be as short as possible.
    Attached Images          

  14. #389
    Join Date
    Sep 2008
    Location
    Brooksville, FL
    Posts
    720
    Now that is a sweet setup.

    I was planning on the dual pump setup on Destiny and I really like the way that is set up. Easy to maintain which is something that will be an ongoing thing with the small pump.
    JERRY CARPENTER - C147
    A man can succeed at almost anything for which he has unlimited enthusiam.

  15. #390
    Join Date
    Apr 2004
    Location
    Pensacola, FL
    Posts
    725

    Very nice work!

    Ebb,

    Very nice work!

    You have the same system as I have... except;

    I use an Atwood 750 for the small pump
    I use a Rule 2000 (Gold) for the large pump
    My buzzer is mounted up near the companionway (it is loud enough to hear in a hurricane... you can test it and hear it from the parking lot in the marina).

    And (as usual)....

    Your install is about 100x neater, cleaner, and more photogenic then my install.

    For more discussion of this, and the thinking that lead me to the same system you have here see this thread.


    s/v 'Faith'

    1964 Ariel #226
    Link to our travels on Sailfar.net

+ Reply to Thread

Similar Threads

  1. A-228 - GEOFF's AUSSIE PHOTO GALLERY
    By Bill in forum Gallery
    Replies: 167
    Last Post: 05-10-2017, 05:31 AM
  2. Portrait Gallery
    By ebb in forum Gallery
    Replies: 5
    Last Post: 10-09-2005, 08:51 AM
  3. MALISZEWSKI'S PHOTO GALLERY
    By Bill in forum Gallery
    Replies: 7
    Last Post: 07-25-2003, 08:56 AM
  4. Photo Attachments - Bigger isn't always Better!
    By Dan Maliszewski in forum General/Off-Topic
    Replies: 2
    Last Post: 01-06-2003, 09:13 AM

Posting Permissions

  • You may not post new threads
  • You may not post replies
  • You may not post attachments
  • You may not edit your posts