


I finally got around to installing a proper shuts off for the cockpit drains. I should have done it last year before the repower but put it off instead. Of course last spring when I launched one of the hoses leaked and I had to haul her had replace both hoses for the season. The job is a lot trickier with the engine in place but I managed it anyhow. First thing I realized was that the angle of the hull prevented me from simply installing a seacock. It would run straight into the engine if I tried to locate it in the same spot as the old drain hole. Also it is important to align the fitting with the drain tubes under the cockpit floor. The solution was to cut away the old tube from the hull and replace it with a new threaded fiberglass fitting that is aligned correctly. I found some nice extra heavy duty fiberglass threaded couplings from a company that manufactures these type of fittings for applications where fiberglass pipes are used to conduct corrosive liquids. Think chemical factory. They are really heavy duty, carefully machined, provide maximum flow and are cheap.
To cut away the old tube I made a guide by using a hole saw to cut the correct sized hole in a piece of plywood. I then taped the plywood to the hull and cut around the old stub from the outside. The hull is so thick that once you get the hole saw started in the hull you can gradually guide the blade to cut in at an angle toward the upper drain stub and produce an oblong hole that fits the coupling closely.
Once the old stub is gone from the hull I used a 4" grinder to expose fresh glass round the hole on the inside of the boat. Next step is to align the tube in the hole so it pointed at the upper stub. I wedged in some shims on the inside of the boat and laid a fillet of polyester filler on the outside of the boat to hold the tube in place. I laid in an epoxy fillet around the tube then glassed the tube to the hull. After this was dry I cut the tube flush on the outside and filled and faired with epoxy.
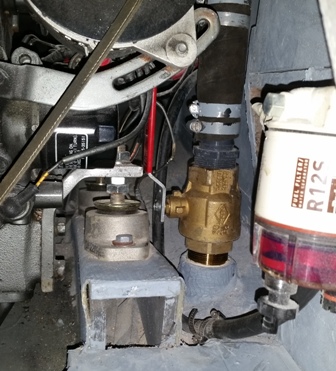
I coated the fresh tabbing on the inside with epoxy paint and installed a threaded nipple, 1 1/2" bronze ball valve, a pipe to hose adapter and a 6" piece of hose. I can easily reach the valve from the access doors in the cockpit floor and the interior. It was a pain in the ass but worth the piece of mind.

 Reply With Quote