+ Reply to Thread
Page 29 of 33 FirstFirst 1 2 3 4 5 6 7 8 9 10 11 12 13 14 15 16 17 18 19 20 21 22 23 24 25 26 27 28 29 30 31 32 33 LastLast
Results 421 to 435 of 492

Thread: rudder discussions

  1. #421
    Join Date
    Feb 2013
    Location
    Oklahoma City, OK
    Posts
    101

    Rudder Apart

    Well I have taken the rudder apart somewhat and put back together a little bit. Thanks Ebb for that advice, I'll be buying a manual soon and using your advice to build a new rudder. I am going to keep the old for a spare and restore it as best I can. The third board (trailing board) had three drift pins in it and wood screws at each end. Its solid so I'm leaving it alone.Name:  DSC05656.jpg
Views: 31540
Size:  37.1 KB Name:  DSC05658.jpg
Views: 31786
Size:  44.5 KB The top fastener on the bronze rod is a machine thread that goes to this nut and washer holding the first board to the rudder shaft.

  2. #422
    Join Date
    Feb 2013
    Location
    Oklahoma City, OK
    Posts
    101
    Name:  DSC05653.jpg
Views: 31905
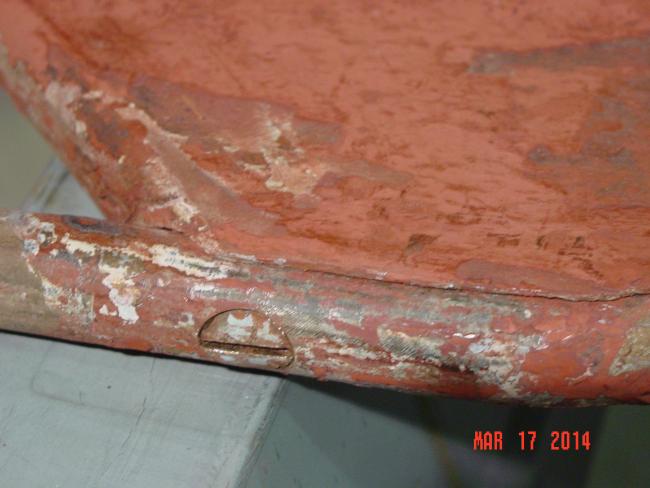
Size:  31.0 KB The second fastener is a wood screw holding the first board to the rudder post, the third fastener is a machine thread bolt the same length as the first but going beyond the first board into the second board (pencil is pointing to the area where nut and washer are still buried under paint) I was able to tighten that bolt a quarter turn after first removing it and cleaning it. I also cleaned bottom paint out of the crack between board 1 and board 2. The wood plug was only attached with the short straps and two short wood screws at an angle.

  3. #423
    Join Date
    Feb 2013
    Location
    Oklahoma City, OK
    Posts
    101
    Name:  DSC05652.jpg
Views: 31614
Size:  32.2 KB Showing the wood screw

  4. #424
    Join Date
    Feb 2013
    Location
    Oklahoma City, OK
    Posts
    101
    Name:  DSC05666.jpg
Views: 31862
Size:  59.5 KBName:  DSC05667.jpg
Views: 31911
Size:  58.8 KB Pearson plastic in the holes?

  5. #425
    Join Date
    Feb 2013
    Location
    Oklahoma City, OK
    Posts
    101

    Still Stripping

    Name:  DSC05661.jpg
Views: 31837
Size:  48.5 KB The Wood Rudder is slowing appearing.

  6. #426
    Join Date
    Apr 2015
    Location
    Chicago, IL
    Posts
    133

    Some Days You Just Get Lucky

    I am just about done with rehabbing the hull and deck and about to start with the repower project. I am going to install a Yanmar 2GM. The boat was originally powered with an outboard so I figured I would start to poke around and see what was involved with cutting the window in the keel and rudder, installing the shaft log and building an engine bed. When I started to sound the keel where the window should be I noticed a decidedly different sound. It sounded like a different laminate schedule than the rest of the keel so I cut a bit out and discovered that the boat was built for an inboard and they glassed over the window. A little cutting and a few minutes with a pry bar and viola. I have my keel window. I was prepared for a fairly involved glass job and now all I have to do is clean up a little tabbing and install the shaft log. I hope the rudder is as easy. It appears the stock is set up for a window too. I'll keep my fingers crossed.

    Name:  2016-01-04 17.49.30.jpg
Views: 31897
Size:  67.5 KB

    Name:  2016-01-04 17.50.12.jpg
Views: 31607
Size:  87.0 KB

    Name:  2016-01-04 18.03.43.jpg
Views: 31625
Size:  77.8 KB

    Name:  2016-01-04 18.03.31.jpg
Views: 31977
Size:  64.4 KB

  7. #427
    Join Date
    Sep 2001
    Location
    Orinda, California
    Posts
    2,311
    Yes, the rudder has a cutout for the prop . . . unless it was changed by an earlier owner.

  8. #428
    Join Date
    Apr 2015
    Location
    Chicago, IL
    Posts
    133

    Rudder Window

    Looks like I have the original rudder. lucked out again. Not much room for a prop.

    Name:  2016-01-05 18.53.40.jpg
Views: 31581
Size:  73.4 KB

  9. #429
    Join Date
    Sep 2001
    Location
    San Rafael, CA
    Posts
    3,621

    Shaft seals

    Maybe not exactly time for that.
    But I happen to be in an email discussion with a lady whose taken the time to look up the
    Pearson Ariel, understand it's challenges and dimensions... in regard to the Finnish OceanVolt
    electric motor system I happened upon.
    They have a saildrive and a horizontal, I call it, option. Remove your Atomic 4, trade it for an
    OceanVolt electric inboard, add 15.000..... Find places for the lithiums, and >BOP< happy
    sailing forever!

    Once you get past the brochure, imco, we are left one problem that really never has been
    solved. That is: how do we seal the shaft that the propeller turns on where it goes thru the
    hull? There certainly is a need for visual inspection and, of course, maintenance to keep both
    the newer bellows dripless face seal type stuffing box happy... and the good oldstyle lip seal
    using cutlass bearings. Both require perfect installs to remain dripless for any length of time.

    We live in an age of synthetic rubbers and amazing metal alloys, yet manufacturers still use
    naval bronze (brass) for the bodies and unsophisticated rubber (nitril) for sealing. Their
    systems still depend on miniature set screws that are buried inaccessible in their installation.
    Victorian technology in an age of space craft and Gun Boats.

    In our Ariel/Commanders, access to that bearing 'box', after the motor is installed, is, as I
    understand it, impossible. Except from outside.
    If the motor is removed, I don't fit anyway under the cockpit where the stuffing box lives...

    If we are setting the boat up for seasonal use, being close to haul out facilities, will give us
    peace of mind. If the boat is going foreign, cruising, and constantly in water ... or if like
    most of us we'll be forgetting about the damn thing... that last thing we want is a hole in
    the hull that can't be reached immediately....once we figure out where the leak is coming
    from... to fix. Ya sure by golly!

    That's why I've always thought our OB option was the perfect answer.
    Can't imagine a damp oily foul smelling bilge that has to be
    constantly pumped out by equally unreliable electric pumps and warning systems.
    Even a constant bitty drip is a leak that can escalate into disaster.

    Also take exception to rudders with holes in them, both from rudder strength and steering
    control.... Well, that's the way I see it....

    How are you going to approach yours???
    Last edited by ebb; 01-07-2016 at 11:32 AM.

  10. #430
    Join Date
    Apr 2015
    Location
    Chicago, IL
    Posts
    133
    I like the electric but I want a little more range. I have a Yanmar 2GM that I think will fit the bill. I was going to use a dripless stuffing box. PYI sells the PSS stuffing box and they work pretty well however they need to be burped after launch. http://www.shaftseal.com/en/categories/300000001. I am pretty sure that I will be able to access the stuffing box and burp it by climbing into the lazerette and laying on my side. I am not so worried about holes in the boat as many seem to be. They just need to be installed correctly and maintained. I plan to install a shaft log http://catalog.buckalgonquin.com/ite...hort/10slw1002 and attach the stuffing box to that. I plan to cut out the cockpit floor above the engine so I can lay up a proper engine bed with a lip that will catch any oil leaks and/or the fuel drips. I have a jig to line up the engine bed so i pretty confident that I can get the alignment right. I did not recore the cockpit floor when I did the other deck work in anticipation of this install. The floor comes out this weekend.

  11. #431
    Join Date
    Apr 2015
    Location
    Chicago, IL
    Posts
    133

    Rudder Modification

    I am thinking of making a couple of modifications to my rudder this winter. I would like to open up the aperture a bit so I can install a feathering prop and adding a little more surface area (10% of so) to the trailing edge. After removing the corrector weight from the boat I have a little more weather helm than I would like. Any thoughts?

  12. #432
    Join Date
    Nov 2010
    Location
    Sunnyvale, CA
    Posts
    104
    Quote Originally Posted by Bisquit View Post
    I am thinking of making a couple of modifications to my rudder this winter. I would like to open up the aperture a bit so I can install a feathering prop and adding a little more surface area (10% of so) to the trailing edge. After removing the corrector weight from the boat I have a little more weather helm than I would like. Any thoughts?
    Presuming you are not a fanatical racer who has cut the handle off your toothbrush to reduce laden weight, have you considered adding ballast to compensate? I added 150 pounds of leadshot in 25 pound bags (#8 buckshot purchased at a gun shop for $2 per pound). After much experimentation, I placed the leadshot ballast in the bilge under the forward inspection hatch. Leadshot bags conform nicely to the shape of their surroundings, with no pressure points. Your situation, and location of ballast, will be different of course. But adjusting the longitudinal center of gravity by adding ballast seems to be a far simpler approach to making fine adjustments in trim than modifying the rudder. Just an idea...
    Last edited by pbryant; 10-24-2017 at 01:01 PM.

  13. #433
    Join Date
    Apr 2015
    Location
    Chicago, IL
    Posts
    133
    Quote Originally Posted by pbryant View Post
    Presuming you are not a fanatical racer who has cut the handle off your toothbrush to reduce laden weight, have you considered adding ballast to compensate? I added 150 pounds of leadshot in 25 pound bags (#8 buckshot purchased at a gun shop for $2 per pound). After much experimentation, I placed the leadshot ballast in the bilge under the forward inspection hatch. Leadshot bags conform nicely to the shape of their surroundings, with no pressure points. Your situation, and location of ballast, will be different of course. But adjusting the longitudinal center of gravity by adding ballast seems to be a far simpler approach to making fine adjustments in trim than modifying the rudder. Just an idea...
    I think that would probably work I should have given it a try before I hauled for the season. I like the performance I am seeing since I removed the extra ballast. In moderate to heavy air (over 15 knots) is when it becomes a problem. I think a lot of things are contributing to the extra helm. I have an over sized main and my jib is a 170%. I should probably address it there but since I was thinking of modifying the aperture I thought adding the extra surface area to the trailing edge would not be too much extra effort.

  14. #434
    Join Date
    Jan 2004
    Location
    Scarborough, Maine
    Posts
    1,439
    Quote Originally Posted by Bisquit View Post
    ... I have an over sized main and my jib is a 170%. ...
    Good lord that is a lot of sail area! When the wind got over 12 MPH or so, I would tuck in a reef and change to my %100 jib and A-414 would sail beautifully and balanced AND up to hull speed no problem - and no weather helm at all. That was my favorite sail configuration for the Ariel. Of course I'm not a left coast sailor, but hull speed is hull speed.
    Mike
    Totoro (Sea Sprite 23 #626)

  15. #435
    Join Date
    Sep 2001
    Location
    Orinda, California
    Posts
    2,311
    Above 18 knots, SF Bay sailors use a 110 jib. Above 25 knots, we "might" put a reef in the main

+ Reply to Thread

Similar Threads

  1. Upper rudder shaft bushing replacement.
    By Jerry O'Sullivan in forum Technical
    Replies: 12
    Last Post: 07-07-2014, 07:44 AM
  2. Zinc me before they sink me.
    By Scott Galloway in forum Technical
    Replies: 5
    Last Post: 09-04-2004, 11:44 PM

Posting Permissions

  • You may not post new threads
  • You may not post replies
  • You may not post attachments
  • You may not edit your posts