+ Reply to Thread
Page 3 of 17 FirstFirst 1 2 3 4 5 6 7 8 9 10 11 12 13 14 15 16 17 LastLast
Results 31 to 45 of 252

Thread: I'm the new caretaker of Ariel-109

  1. #31
    Join Date
    Nov 2009
    Location
    Brooklyn, NY
    Posts
    467
    Quote Originally Posted by carl291 View Post
    Could you be persuaded to fabricate another pair????
    Carl
    Oh man, I've got so much work to do on my boat. I'm dying to fix my deck and go sailing. All I need is some free time, temperatures in the high 40's, and sunny weather.........

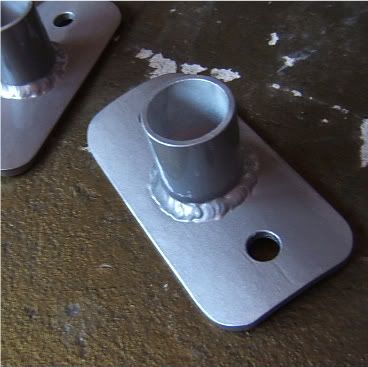
    But if you have some older cast spreader bases that are cracked it may be possible to weld and repair them. The ones on my boat are beyond repair and missing chunks.

    Ben

  2. #32
    Join Date
    Sep 2001
    Location
    San Rafael, CA
    Posts
    3,621

    Sockets

    Awesome aluminum welding, Ben, really impressive!
    Ole 109 has a right handy skipper and must be happy with ya.

    Maybe I'll give it a try. We got the MIG here. All that's needed is courage, right? Damm, where'd I put that rawhide mallet?

  3. #33
    Join Date
    Nov 2009
    Location
    Brooklyn, NY
    Posts
    467
    Quote Originally Posted by ebb View Post

    Maybe I'll give it a try. We got the MIG here. All that's needed is courage, right?
    Thanks EBB. I used a TIG welder on these spreader bases. MIG welding is great in situations where you need to quickly make large welds. But MIG welding aluminum can be really frustrating without the proper technique and set-up, usually very expensive. TIG is intimidating at first but really versatile and it's hard to beat the control over the weld it give you. You can also gas weld aluminum and produce beautiful welds. Remember that electric welding of aluminum wasn't wide spread until after WW2.

    Small inverter type TIG welders the size of a lunch box are becoming popular and can run off a 110V extension cord. These are great to bring to jobs sites or maybe taking to the dock.

    Ben

  4. #34
    Join Date
    Mar 2006
    Location
    San Francisco - or Abroad
    Posts
    433
    Beautiful Brackets Ben!

    I was of the same mind as Carl... I was going to place an order of my own!
    C-187 (my rescue boat) has the cast brackets and they are turning to powder...

    I think a nice coat of primer / paint will go a long way on your new brackets... For both looks and longevity. Even 6061 Aluminum (Not anodised) tends to pit and create a oxide/gunk coating in a salt environment. Might be a real issue on the contact surfaces.

    You have no contact info on your profile - I'll be looking to replace the Coambings on C-187. I'm not familiar with 'sepele'. Can you tell me what your experience / expectations are for this type of wood - relative to Teak or Mahogany? Thanks!
    Last edited by Rico; 01-15-2010 at 02:46 PM.

  5. #35
    Join Date
    Nov 2009
    Location
    Brooklyn, NY
    Posts
    467
    Rico, now you've got me mixing up some PPG epoxy primer!

    Sepele is considered a suitable wood to build boats from, which seems to be the case with most tropical timbers. But my experience with it is limited to furniture. You'll find it machines easier than mahogany, less splintering. Denser than mahogany, more like teak or rosewood, but not oilily. The quality and value of the what's available is so much better than current mahogany or teak supplies. And it's very pretty.

    Ben

  6. #36
    Join Date
    Nov 2009
    Location
    Brooklyn, NY
    Posts
    467
    After some epoxy primer and silver single stage acrylic urethane. I'm waiting to drill the cotter pin holes on the boat. Anyhow I'm going up to City Island to try and install them today.

    Ben


  7. #37
    Join Date
    Sep 2008
    Location
    Brooksville, FL
    Posts
    720

    Ben are you going to install them with compression pipes?

    Rico did a really nice job on his. Check out post 87 of Mephisto Cat's gallery.

  8. #38
    Join Date
    Nov 2009
    Location
    Brooklyn, NY
    Posts
    467
    Here are some shots from today's installation up at City Island. The existing spreader bases crumbled like Chip's Ahoy cookies as I removed them. Everything worked out nicely on this beautiful day.

    Commander 147, Thanks, I did see how Rico installed his with the compression tube. Something to think about maybe in the future when the mast gets pulled.

    Ben


    Last edited by Ariel 109; 01-17-2010 at 03:41 AM.

  9. #39
    Join Date
    Apr 2008
    Location
    Forsyth GA
    Posts
    396

    Very Nice.

    Looks like you had a beautiful day to mount the bases, The disintegrating bases are very common after 40 + years. something else to think about when you visit this area when you lower the mast is it appears in the photo your bolts are short and don't engage the lock nut completely. I think it would be good to have a plastic gasket ( maybe just a couple layers of electrical tape) between the mast and the S. base to seal out any moisture which may collect there. Nice work .

  10. #40
    Join Date
    Nov 2009
    Location
    Brooklyn, NY
    Posts
    467
    Carl, the nyloc nuts seemed to fully engage the bolts threads. The bolts are fully (just barely) through the nuts. But you have successfully planted in my head that there could be a problem, thanks.

    I'd like to recommend the Werner Multiladder I used for climbing up to the spreaders. It's wide legs fit snugly between the sliding hatch glides of the Ariel. Felt very safe to work on after I strapped it to the mast. And we did attach some temporary (truck straps) shrouds to support the mast while changing the spreader bases. I should have taken a picture.
    Last edited by Ariel 109; 01-17-2010 at 04:24 AM.

  11. #41
    Join Date
    Sep 2001
    Location
    San Rafael, CA
    Posts
    3,621

    spreader sockets

    Great fittings.
    The base plate is very robust and should spread side loads to the mast very well. The top bolt with this heavy plate can be seen as supporting the hard working lower bolt with the tangs for the lower shrouds.

    Looking at lit'lgull's mast after DEcommisioning you could see the tang bolt had elongated its hole in the mast. The bolts had originally been installed without compression tubes. Imco it's a good thing to have at least the lower one done, not so much for 'compression', but because there is a larger bearing surface on the edges of the hole with the bolt in a tube.
    Get 6061T6 tubing from online metals by the foot! Tubing means you can drill regular sized larger holes.

    IN THEORY you can imagine the crystalline structure of old cast aluminum sockets being cracked by the lower bolt pulling down on it while the upper one, without load, holds on unmoved.

    For what it's worth, riggers isolate all metals including the same metal when they bear on each other. When I took the mast apart some original cleats AND the sockets had no corrosion under the fittings, with no discernable isolating material.. This was not true for all the attachments. Small ones created serious corrosion on the mast where attacht. Plastic pipe or electric tape was used to install the track, which shows NO visible corrosion.

    It seems simple to 100% isolate fittings on the mast with pipe tape. The stuff is made with polyethylene and will last one to four decades. That's what Pearson must have used. Lanocote or anhydrous lanolin is another fairly easy to apply isolator.

    Running a 1/2" s.s bolt through a compression tube seems problematic. What protects the aluminum tube and mast from rapid galvanic action?
    Maybe the size difference of the metals keeps the corrosion somewhat in check. But I won't use any rubber - it's more important that the system can be taken apart easy.

    One of the spreader socket bolts that came out of lit'lgull's mast was rusted, the other was still bright. I think that it was a later replacement. What is the answer for these bolts? Regular replacement? Make absolutely sure they are 316. What happens with a s.s. bolt stuck in an aluminum tube for a decade? Even the tube where it bears on the mast extrusion in the drilled hole should be isolated with tape and grease. MY two aluminum cents!.
    Last edited by ebb; 01-18-2010 at 10:13 AM.

  12. #42
    Join Date
    Nov 2009
    Location
    Brooklyn, NY
    Posts
    467
    The two long Sepele boards are all cut up. It took all the wood from one of those boards to make the winch and coaming blocks. I guess it's still cheaper than buying those bronze winch stands from Rig-Rite. I'm going to try and shape the blocks tomorrow on the big belt sander.

    When I went up this past week to the Bronx to take the old coamings off the Ariel it was low tide and dead calm. The water was clear to the bottom and I could see the boat cowl that got knock off the deck about two months ago. With a long boat hook I was able to retrieve it. Made my day!


  13. #43
    Join Date
    Nov 2009
    Location
    Brooklyn, NY
    Posts
    467
    Here's one of the new coaming blocks (in the rough) with the angles "reverse engineered" from the existing old block. Quite a puzzle of compound angles.


    Last edited by Ariel 109; 01-24-2010 at 08:26 AM.

  14. #44
    Join Date
    Nov 2009
    Location
    Brooklyn, NY
    Posts
    467
    The rough cut winch blocks, ready to radius. These were cut on a big bandsaw which made things easy. Next time I have to be more careful about the gluelines. Off to the sander.


  15. #45
    Join Date
    Nov 2009
    Location
    Brooklyn, NY
    Posts
    467
    After about ten minutes on the old Crouch belt sander. Watching my fingers!


+ Reply to Thread

Posting Permissions

  • You may not post new threads
  • You may not post replies
  • You may not post attachments
  • You may not edit your posts