Casey's plan (attached PDF is a smidge blurry, but at a nicer resolution, it was a huge file!)
Looks very straightforward to me.

Casey's plan (attached PDF is a smidge blurry, but at a nicer resolution, it was a huge file!)
Looks very straightforward to me.
Kyle
C-65 Lucky Dawg
When Casey hijacked that idea from me he didn't tell us how
fun it would be to have that wheel and pedestal in the middle
of the starry bunk.
Nice drawings.
TOP slats can be placed closer (you need to provide slots for the boards to swell when soaked)
if you hinge them they and the bottom of the cockpit can dry out. and not get funky.
Also the drains are visible when you arrive back at the boat after being away.
Don't know about cutting the floorboard in half the short way
So how will you support this? Two citizens on the starry pallet is a bit of weight.
And you might even be walking on it.
If the floorboard is in two halves the long way, the wood on the long sides can be beefed up to take that extra suspended weight.
This could also be planned so that drainage is clear under the boards.
But the boards being nearly six feet long will still need a prop in the middle to make sure nothing can bend and crack. Simple enough.
We'd still have a bit of interesting framing to do around the vertical tiller, and slanted rudder tube.
I believe the boards should cover the whole surface of the sole, from end to end. They should go to the back.
A cleat is needed across the back of the cockpit so that the perimeter of whatever you want elevated gets good support.
If two boards swing up from the sides the hole for the tiller can be minimized.
I think what I'm trying to say is that if you choose to split the floorboards, each half is a stand alone.
Can't just make a single floor cover and then casey it in half. Short or long.
I also would NOT make this from soft wood, or any wood that will raise splinters.
Some woods Casey recommends will drive a splinter into your foot, knee or hand without trying.
But at least it's not a pedestal and wheel in your bed.
You know, the slat design as Casey has it is not really correct.
You got these bearing pieces crossing all over the floor of the cockpit impeding the flow of water and dirt.
My immediate reaction to this is put long pieces under short pieces.
So imagine slats crossing side to side on 1 1/2" under pieces. Possible!
It would make it easier for water to leave the scene.
Ipe hardwood* would make a good substitute. It is dense strong stuff and could be made thinner: 3/4" rather than 1 1/2.
We will be raising the floor level of the cockpit. Something to consider.
Floorboards that will be used only on the sole can be lighter construction.
Those used for bunking will probably have to be heavier.
ARIEL COCKPIT WELL: width at bridge deck: sole 26.75" - at seats 27.875
Width aft sole: 22.75" - aft seats: 24". Length of cockpit at sole: 62.5"
Height of seat from sole at bridge: 16.5". Aft: 15".
Sorry, don't have length of well at seat height.
It looks like if the boards or the grate will be used double duty,
a cleat of some sort will have to be put around the well just below seat height.
That will will have to make up for the floorboard/grate being a bit smaller in width and length.
__________________________________________________ __________________________________________________ __________________
* IPE was heavily marketed worldwide and has now become scare and expensive. It was marketed as sustainably harvested, unlike Burmese teak, but who knows? The wood needs no coating, won't raise a splinter, doesn't raise grain or get hairy - on the decks I've seen cracks very little. Imco could easily live in the bottom of the cockpit. It is heavy (also called ironwood). Without a coating it turns into a very respectable smooth grey color. It is too hard to make grating - and it produces dirty sticky dust when milling. It'll last 100 years minimum in your cockpit. Non slip when not coated. Doesn't get moldy, doesn't rot.
Last edited by ebb; 01-24-2011 at 06:05 PM.
Teak is such an amazing wood to use outdoors. This is picture of the address plate on the Lockwood de Forest house in Greenwich Village just above Washington Square Park. Built in 1887 the carved teak exterior trim of this beautiful home is still in such great condition.
http://www.nyc-architecture.com/GV/G...orestHouse.htm
Amazing that the teak exposed to NYCity summers and winters kept such sharp detail.
Apropos beautiful woodwork:
I've always been astonished at Green & Green teak and mahogany bungalows - the ulitimate in Arts & Crafts.
If you want some inspiration look at Darrel Peart's Green & Green furniture.
www.furnituremaker.com
Now there is a style that the filty rich could design into a DAY SAILER.
Perhaps a modern ChoyLee in Green&Green!!!
Last edited by ebb; 01-28-2011 at 09:01 AM.
I find it amazing too! Lockwood de Forest moved to California and lived out his final decades as a painter and garden designer in Santa Barbara. Here's a sketch by him.Originally Posted by ebb

The Greene brothers work I've admired for years having visited the Gamble House in Pasadena many times. I gave my nephew a book titled "Greene and Greene for Kids" for Christmas. And the Met Museum has a few nice objects of theirs in it's collection, we make do. Don't forget the Hall brothers who built Greene and Greene's best stuff, furniture included.
A golden time, way back then, to have lived in California. A least for people with some means and the those who catered to their needs. Still a beautiful place to live, although sadly not so wide open.
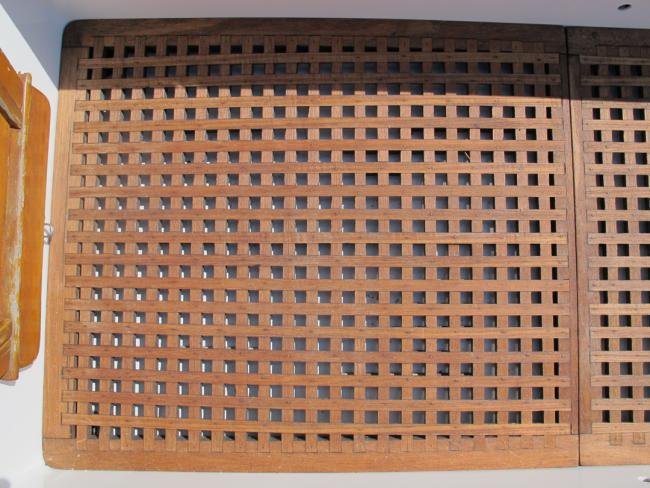
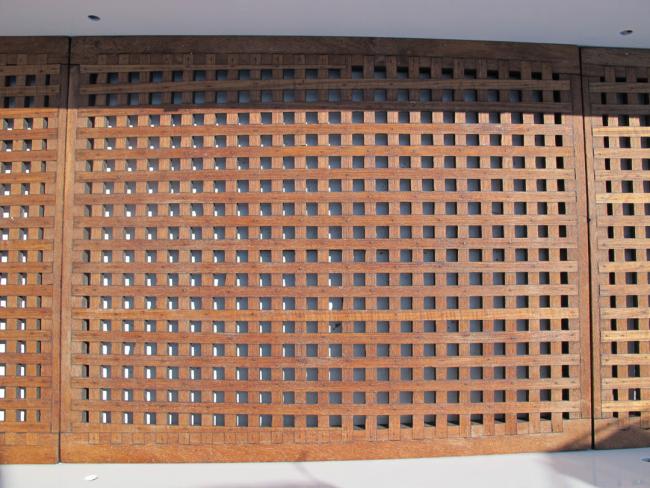
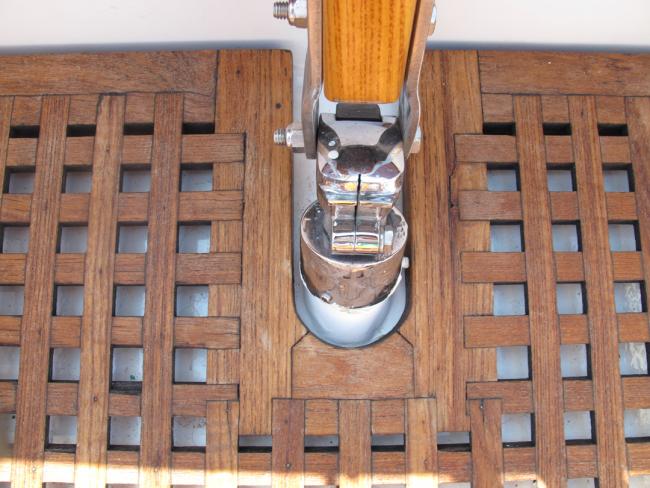
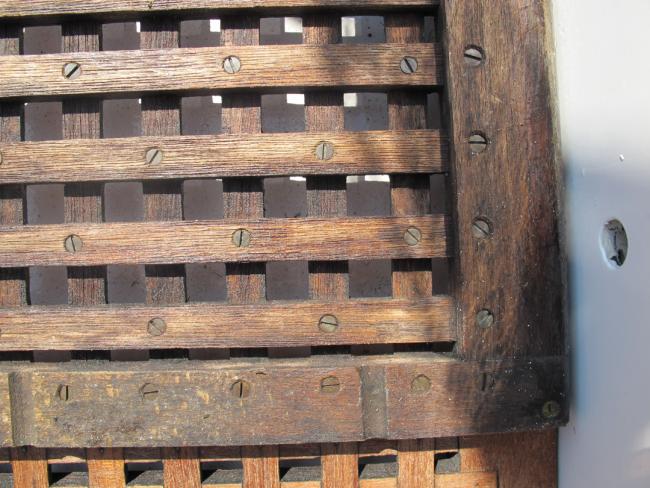
So Jerry asked for photos of Lucky Dawg's teak cockpit grate. There are full sized images at https://picasaweb.google.com/100988960116603858412/Teak# (You can view them there, but you'll need the Picasa program on your computer to download them. If that is a pain, feel free to PM me and I can send you the lot of them via email.)
What is remarkable to me about this grate (which was constructed while I was still in diapers - circa mid 1960's) is that though the commander cockpit tapers fore-to-aft, the symmetry of the lines barely reflects this. The transition is very subtle. Complimentary to Alberg's beautiful work on these boats.
Last edited by Lucky Dawg; 09-12-2011 at 07:05 PM.
Kyle
C-65 Lucky Dawg
Upside down pictures
-------------------
Last edited by Lucky Dawg; 09-11-2011 at 07:00 PM.
Kyle
C-65 Lucky Dawg
Kyle,
Thanks for the detailed, high resolution photos of Lucky Dawg's teak grate. That piece of work (I would venture) would cost well over $1,200 dollars to have crafted today.
Respectfully,
Chance Smith
(Formerly) Sea Sprite 23 #760 (Heritage)
(Formerly) Commander #256 (Ceili)
I not so sure Mike (C227) will want me to make him one while I make mine when he sees how much it will cost in materials alone not counting many many hours of labor.
And just in case you did not see my thanks for the pictures in your other post thanks again Kyle.
JERRY CARPENTER - C147
A man can succeed at almost anything for which he has unlimited enthusiam.
You're welcome. T'wernt nothin'. I'll be excited to see you master carpenters duplicate (and likely improve upon) the design. Randy, the 2nd owner (of 5) of Lucky Dawg said his shop in the Wisconsin Dells would charge close to $3000 to make it!! As I mentioned earlier in this thread, he recommended finding a retired carpenter to take it on as a project. My grandfather who was a skilled carpenter and finisher probably would have loved the challenge. You guys could knock it out in a weekend!
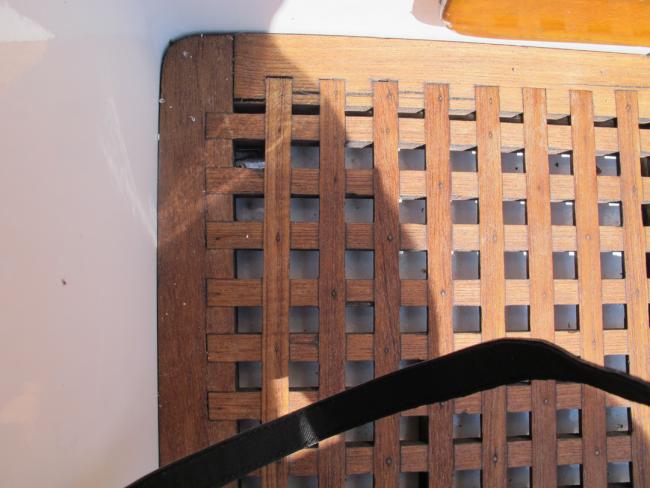
Yes Jerry. I'll be happy to measure the slats and perimeter pieces. Sailed today before I got your post - will be back again before week's end. I'm guessing the perimeter was made of 5/4 and sawn down to fit the edges. The slats are a couple different thicknesses - latitudinal has "teeth" and longitudinal is just flat.
Last edited by Lucky Dawg; 09-12-2011 at 07:12 PM.
Kyle
C-65 Lucky Dawg
Jerry - at long last, I remembered to measure the slats in the grate. The outside edges are slightly under an inch (I sure they're actually a full inch, but slightly worn at the edges), the crossbeams are 1/2" and the fore to aft slats are 1/8". If it were up to me, I might nest them together so that 1/8" material isn't part of the plan. Granted, the grate is 45-ish years old, but that is where my weak spots are. I updated the photos on Picasa with some additional details re some of the more complicated joinery - https://picasaweb.google.com/100988960116603858412/Teak#
Kyle,
Thanks for the expose`on Lucky Dawg's grate. I never would have imagined 1/8" material anywhere in the design. It sure looks healthier than 1/8".
I, for one, did not look that good at 45 years old!
My home has a keel.
I always envisioned both the Lats and longs to be datoed and nestled. I never thought of making the longs thinner w/o a dato. That knocks the work in half as well as the precition needed. This is a project I think I would love to take on, but know I never will. Cutting a sheet of Marine plywood out to fit the cockpit sole and drilling a grid of half inch holes would be more my speed. I'd be done in a couple of hours but somehow I doubt I'd get the same effect.
Last edited by Commander227; 12-18-2011 at 06:25 AM.
Kyle
First let me say thanks for the update. I really appreciate you taking the time to provide the info to me and anyone else interested in such a project. I will have to admit I also did not think any of the parts were only 1/8" thick with the perpendicular pieces. And per your thoughts I'm not sure I would want anything that thin. But when the time comes I will need to play with the design some and see what works the best. Perhaps making the perimeter pieces thicker will be the key. At any rate having the information on how yours was made is VERY helpful so thanks again Kyle.
JERRY CARPENTER - C147
A man can succeed at almost anything for which he has unlimited enthusiam.
Back to post 16 in this thread, you could knock this one http://www.pearsonariel.org/discussi...2614#post22614 out in an afternoon.
And no problem Jerry. I'm just looking forward to someone refining and recreating it at some point.
Kyle
C-65 Lucky Dawg
 Posting Permissions
 Reply With Quote
")