+ Reply to Thread
Page 3 of 4 FirstFirst 1 2 3 4 LastLast
Results 31 to 45 of 55

Thread: Deck hardware plan, and

  1. #31
    Join Date
    Sep 2001
    Location
    San Rafael, CA
    Posts
    3,621

    Question fitting the Spartan midrail cleat/chock to an Ariel?

    Thanks Tim!
    Here's my take, for what it's worth.
    Course you'd need two of'em. The tariff starts getting unreasonable after that! Probably need strut bolts too. $$ Imco the bolts should be US made as they should have a solid shank with threads only at the bottom.

    Guy on Cape Dory site says something real important when discussing backing plates for this Spartan chock. That is, the fastenings be very close to the hull. Maybe closer on the Ariel. You'll be lucky to be able to slip washers on the bolts. (Of course I'm assuming the cove on either side of the cut you're making in the rail will be filled so you can see the bolt ends and nuts of the flanges down below.

    With 338's new wood toerail many times I slanted the bolts in at a real generous angle - I thought - and often there was barely enough room to turn the nut on. Though the situation is different in that the coves in 338 were already filled and level with the deck inside - more depth. Was lucky I didn't get into more trouble than I did! Have to keep in mind that the hull is turning inward the deeper a hole is drilled from the rail. Also the factory buildup of matt over the hull/deck joint was thicker in some places than others in 338. That made the hull overall thicker at the seam. Hard to judge the angles. (Had to grind into the hull at times where the bolt came thru to put a washer on. Nope, didn't grind thru the hull. These Spartan fittings are amidships so making allowance for hull thickness it should be straight forward. It always was a surprise on 338 - about 50 of them!)

    But, also pointed out on the C.D. site, there isn't much in the way of redundant strength in the way this narrow Spartan fitting has to be installed. All the fastenings are right at the edge of the boat and in a straight line. The load can be spread out some by building up the deck underneath inside imco - a super built-in-place backing plate.

    Suppose you built a long and wide pad up of about 3/8" thickness..... Five thru bolts into that and it'd be hard to imagine the fitting will ever pull out. With bronze bolts I'd add some plywood too to build in some give for the softer metal. When you cut the rail out where the fitting will be, there will be a hole that requires a new bottom to it. Just won't be able to tab in a whole lot of fabric and still have room for nuts and washers on the bolts.

    There is the problem of tieing back the hull to the deck in way of the cut. Because the bolts will be so close to the hull I'll make an assumption that there will be no way to tab the deck to the hull where the cut is made in the rail - right there where it's needed. One or two layers of fabric for waterproofing, that's it. The hull/deck tie-in might be made with MULTIPLE STRIPS from deck to hull BETWEEN the bolts (and over the backing pad.) Could work! Once the rail is cut and a fitting is in hand, it will become clear what the solution will be. Hard to imagine what this rather unusual installation will entail. Visually, the bolt ends and nuts will appear to be in little coves, if built up as suggested. It's hard to visualize without the seeing the fitting.

    Awrahhht, whose guuna do it?
    __________________________________________________ __________________________________________________ _
    [Might have talked myself out of it for 338's wood rails. I like the fitting, BUT have an innate problem with a working cleat that far outboard - and on a wood rail. Imagine what forces there would be on the fitting with a 90 degree pull on it from the dock. It's strength comes only when the pull on it is more fore and aft -as with spring lines.

    Mentally I saw the fitting palled up with two widely spaced cleats on deck. That is, for me the fitting would serve better as a double fairlead chock, and the center cleat hardly ever used. And then forgot about it because it was getting complicated.

    Also given the narrow angles of the spring lines coming aboard thru the fitting, I thought the hard edges at the ends of the chock pretty severe. But could they be filed rounder? The cleat base is nicely rounded, they might have done the same with the ends! Maybe it's not an issue. Haven't actually held these guys, first hand.]
    Last edited by ebb; 03-06-2007 at 10:59 AM.

  2. #32
    Join Date
    Apr 2004
    Location
    Pensacola, FL
    Posts
    724
    Saw these real nice chocks at Bacon & Associates (the place most folks know as a great sail loft also does marine hardware consignment.)

    The size looked pretty good for a toe rail cut-away install.


    Not a great picture, but here is the 10" bronze cleat on the bow. It is pretty much centered between the bases for the bow pulpit;


    s/v 'Faith'

    1964 Ariel #226
    Link to our travels on Sailfar.net

  3. #33
    Join Date
    Apr 2004
    Location
    Pensacola, FL
    Posts
    724

    Update on the mid ships cleat.

    After almost a month's cruising the mid-ships cleats are a great asset. Our Ariels don't back against a current, and I have not really got room for a bow thruster.... 
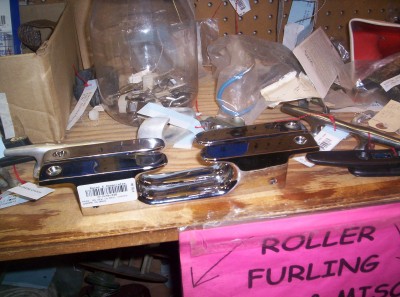
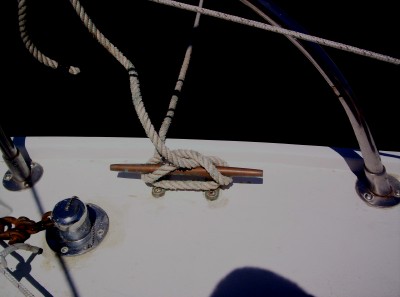
The mid ships cleats are working out pretty nicely.
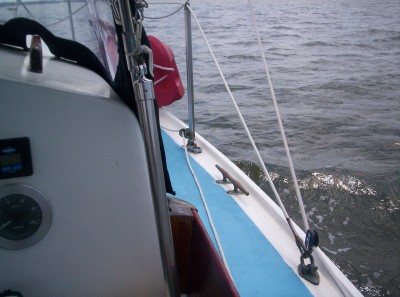
    Here is a picture;


    THis was taken off shore headed into Charleston, it was a calm day.

    Having cruised full time for almost a month, and lived aboard for the month before that neither I nor the 1st mate have stubbed toe on it (yet)

    10" looked so big compared to the smallish (IMHO) original hardware, but it is nice to be able to tie both ends of a fender and a spring line to the same cleat.


    s/v 'Faith'

    1964 Ariel #226
    Link to our travels on Sailfar.net

  4. #34
    Join Date
    Jan 2004
    Location
    Scarborough, Maine
    Posts
    1,439
    Atta boy Craig!

    Now, being the originator of this thread, you should feel duty-bound to post lots of pics of your completed deck hardware layout, including comments of what worked and what didn't on your now cruise-tested hardware placement.

    Then start another thread and fill us all in on your cruise.
    Mike
    Totoro (Sea Sprite 23 #626)

  5. #35
    Join Date
    Apr 2004
    Location
    Pensacola, FL
    Posts
    724
    Quote Originally Posted by mbd View Post
    Atta boy Craig!

    Now, being the originator of this thread, you should feel duty-bound to post lots of pics of your completed deck hardware layout, including comments of what worked and what didn't on your now cruise-tested hardware placement.
    Covered much of this on this thread;

    Anchor Roller thread

    I have to say that the 3 sets of bronze cleats worked out better then I could have hoped. I love being able to make a line fast, and a fender on any cleat. The placement was pretty good, I still have all my toes intact. I remember when I was installing them, I got teased about applying for a job with sea tow... Well, Rose and I met James and Mei Baldwin (of Triton Atom fame, multiple circumnavigations super knowledgeable and all around great folks... well James Baldwin liked my cleats..

    Then start another thread and fill us all in on your cruise.
    Read all 10 pages of that here;

    S/V 'Faith' on SailFar.net


    s/v 'Faith'

    1964 Ariel #226
    Link to our travels on Sailfar.net

  6. #36
    Join Date
    Apr 2004
    Location
    Pensacola, FL
    Posts
    724
    Had a PM about the Bit, I deleted it trying to reply and now filled my box again so I am just posting my reply here.

    I looked online and Yes, it is the ABI unit. I put it up on a raised pad, but I like the way this guy did it better (although I might not have gone quite as high as he did.)

    The welding on the ABI Bit was good, but I would have liked to have found one like Tim put on Glissando.


    I think it is funny he did his backing plate just like I did mine (his is much more pretty...).

    Gotta love that bronze... not soo sure about the square though, not a bug fan of corners. Probably rounded off well enough... sure is purdy...


    s/v 'Faith'

    1964 Ariel #226
    Link to our travels on Sailfar.net

  7. #37
    Join Date
    Sep 2001
    Location
    San Rafael, CA
    Posts
    3,621
    Your friend did a fronting plate for his mooring bit - which looks like a Whitecap stamped 304 stainless. The joint (what joint - looks like a press fit) between the plate and the post would bother me. He filled the space inside the base with epoxy, if salt water ever gets in it's curtains for the fitting.
    Imco the backup plate for a mooring bit should be twice the area and underneath.* There and with the deck, it will add a lot of stability and pull out resistance to a fitting that at times will be under heavy load.

    Tim's bit looks like a BuckAlgonquin cast Bronze 7X7. The largest size.
    Beautifully proportioned! The generous radius sweep of the base into the post is the give-away.
    B.A. also makes a cast 316 stainless version of each of the four bronze sizes with a smaller radius transition base to post.
    Hamilton does not catalog the bronze anymore. Except for a 6X6 plain bronze for purists like me. ($147.99.)
    Both 7X7 cast models are about $200.
    Deep Blue Marine carries the range with prices about the same as H.

    Perko makes chromed bronze similar pattern with what looks like knife edged square post. (6X6" $270 Jamestown)
    The photos of BuckAlgonquin cast stainless look pretty SHARP CORNERED to me in their catalog.
    Probably doesn't bother modern cordage this kind of thing. But it bothers my aesthetic sense. Would have been a snap to chamfer the corners of the mold! There are round post mooring bits but usually larger pattern and expensive.
    Shouldn't ask why we don't have a choice, in the smaller versions, between square and round post? What's goin on???

    Jamestown has an extensive range of B.A. stuff: thruhulls, oarlocks, seacocks, and deckpipes - but no mooring bits - go figure!
    Defender has a Whitecap on line, but nothing in their print catalog.
    W.M. has a single small chinese door-stop in their print.
    And Bristol Bronze, who you'd think would have mooring bits, casts a paper-weight sized bronze one that stands 2 1.2" tall !!!! Go for it!
    __________________________________________________ __________________________________
    *Ariels have a 4" wide 3/4" ply strip embedded in the composite running down the center of the deck. Core on either side. Pearson attached the original marinum mooring cleat thru this.
    Last edited by ebb; 08-16-2009 at 07:45 AM.

  8. #38
    Join Date
    Jan 2004
    Location
    Scarborough, Maine
    Posts
    1,439
    I got my bronze mooring bit from Deep Blue Yachts a couple of years ago. It's a Buck Algonquin 5x5 (Part No. 00MB5X5 on the website). I've been very pleased with it.
    Attached Images  
    Last edited by mbd; 08-16-2009 at 08:34 PM. Reason: fix image
    Mike
    Totoro (Sea Sprite 23 #626)

  9. #39
    Join Date
    Sep 2001
    Location
    San Rafael, CA
    Posts
    3,621

    Buck Algonquin mooring bit

    Mike,
    Looks like plain bronze. Is it a trick of light?
    I'd rather have the plain, and it sure looks like your 5X5 is the right size for our deck.
    Last edited by ebb; 08-17-2009 at 06:11 AM.

  10. #40
    Join Date
    Jan 2004
    Location
    Scarborough, Maine
    Posts
    1,439
    It's not polished, but cast bronze, if that's what you mean. The 5x5 is just right IMHO. In practice, it's plenty big enough to hold whatever I put on it (2 mooring pennants or an anchor rode), and it's small enough where it doesn't get in the way too badly. I think the price has gone up like 20 bucks since I got mine though.
    Mike
    Totoro (Sea Sprite 23 #626)

  11. #41
    Join Date
    Sep 2001
    Location
    San Rafael, CA
    Posts
    3,621
    Hey Mike,
    (getting too old for this game...)
    Deep Blue Yacht Supply lists 'cast bronze plain' but shows what looks like a CHROMED bronze model in the single pic on their mooring bit page.
    Chromed would add I guess at least half as much more to the cost!
    No pic of the stainless mooring bits.
    [A Perko sharpy from Jamestown sets you back $232.91 for a chromes 5X5!]


    Currently a plain 5X5 B.A. is $91 plus shipping.

    Bronze used to come either 1) right out of the mold,
    2) cleaned up with casting marks removed and smoothed,
    or 3) highly buffed. You paid for the blinging.
    If you have access to buffing wheels it's not all that difficult to really shine up a plain bronze fitting.
    Personally really like the non-shiney mooring bit in Mike's photo.

    Has anybody contemplated putting a couple smaller ones in the stern quarters?


    Is the cross bar
    part of the casting or added later?
    Last edited by ebb; 11-13-2009 at 01:37 PM.

  12. #42
    Join Date
    Jan 2004
    Location
    Scarborough, Maine
    Posts
    1,439
    Quote Originally Posted by ebb View Post
    Currently a plain 5X5 is $91 plus shipping. ...Is the cross bar part of the casting or added later?
    That's the one - 00MB5X5 - just plain bronze, not polished. I've may have a more recent picture of the bitt I can post tonight if you're interested.

    The cross bar was added later.
    Mike
    Totoro (Sea Sprite 23 #626)

  13. #43
    Join Date
    Jan 2004
    Location
    Scarborough, Maine
    Posts
    1,439
    You can see it here amidst the foredeck crew. It doesn't seem to get in the way of their duties in the slightest...
    Attached Images  
    Mike
    Totoro (Sea Sprite 23 #626)

  14. #44
    Join Date
    Sep 2001
    Location
    San Rafael, CA
    Posts
    3,621
    Hard working crew there Mike!

    Know that modern line is extremely tuff and strong,
    but that painter your using on that nicely patinated morring bit looks a bit small!

    And what's that third bump in the deck there - your bow light?
    Just kidding.

    Keep up those training sessions.

  15. #45
    Join Date
    Jan 2004
    Location
    Scarborough, Maine
    Posts
    1,439
    Heh! That "painter" is to keep my silver painted nicro or whatever-it-is cowl vent on the deck - my spiffy bronze (painted nicro or whatever-it-is) cowl one took a dive a couple of seasons ago.

    Yes, and that "bump" is a classic Pearson original deck pipe fitting, as I'm certain you know.

    All awaiting the time when I can afford to cough up the boat bucks for more "proper" deck bling.
    Mike
    Totoro (Sea Sprite 23 #626)

+ Reply to Thread

Similar Threads

  1. Replacing Deck Tread Pattern
    By Theis in forum Technical
    Replies: 10
    Last Post: 02-07-2012, 09:07 PM
  2. All those wires inside my mast gotta go!
    By Scott Galloway in forum Technical
    Replies: 26
    Last Post: 07-04-2007, 07:40 AM
  3. Re-bedding Hardware
    By commanderpete in forum Technical
    Replies: 28
    Last Post: 02-20-2007, 08:24 AM
  4. Replies: 11
    Last Post: 08-18-2005, 05:33 AM
  5. PEARSON HARDWARE
    By Bill in forum General/Off-Topic
    Replies: 10
    Last Post: 01-11-2005, 07:15 PM

Posting Permissions

  • You may not post new threads
  • You may not post replies
  • You may not post attachments
  • You may not edit your posts