+ Reply to Thread
Page 1 of 2 1 2 LastLast
Results 1 to 15 of 55

Thread: Deck hardware plan, and

Hybrid View

  1. #1
    Join Date
    Apr 2004
    Location
    Pensacola, FL
    Posts
    724

    Arrow Deck hardware plan, and

    Deck hardware

    As you have no doubt gathered from my last few posts I have quietly started dismantling and (at times I fear) doing irreparable harm to my beloved Ariel ‘Faith’. I know it always looks awful when you are working on it, and it is hard to leave her all torn up like she is right now.

    I knew there were some issues to deal with, but put off all summer, then through the fall and finally gave in when I blew my headsail. I am now in maintenance mode.

    I removed the deck hardware aft of the cockpit. Removed the stern light, and flag staff mount. (going with LED tri-color mast head light)

    CARVED out the silicone (see other thread) and filled in the holes with glass and epoxy.

    I have used the heat gun and stripped the layer of resin that had been poured in on top of the paint in the lazarette. I then sanded the edges and re-tabbed the deck edge in and glassed new backing plates in (approx 6” x 9”) under both sides where the cleats will mount.

    On to the point of this thread.

    My deck hardware plan

    Aft;

    Two 6” 316 stainless chocks about where the originals mounted.

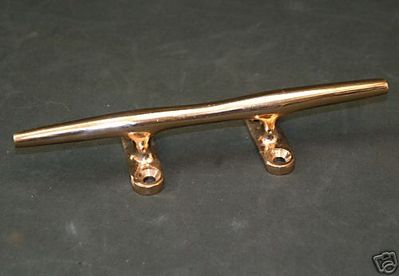
    Two Hershoff style 316 stainless Cleats mounted over the glassed in plates. These will have 1” stainless fender washers in addition to the backing plates. I bought 8” cleats, but these do not seem large enough to me, so I have ordered a set of 10” cleats.


    Going to re-use the pad-eyes for the chute, don't have one but that does not mean I never will.

    Amidships;

    New stainless for the Jib sheets, 8" stainless.

    The 8” stainless cleats will go amidships, near the rail. I know most folks use the stanchion, but I want a cleat there for when I need a amidships spring. I currently tie to the stanchion base, and it is a pain at times.

    Foredeck

    I have a 25lb CQR that I am mounting on the bow on a roller. It is going stbd, parallel to the centerline right up next to the head stay plate. (where the stbd chock is now).

    I will replace the port chock with a stainless chock, and add a set approx 18’ aft on the toe rail.


    I am looking to mount a Samson post (centerline of course) about 1/3 of the way back on the foredeck. My thinking is that I can make up the lines through the aft chocks when tieing up, or through the roller when anchoring and through the foreward chock when using the secondary anchor.


    I am debating on mounting a second set of cleats up forward, maybe just inboard of the aft chocks. That way I would have more then one point on the bow to make up to in storm preps.

    I have another set of 12” Hershoff cleats I can use, that I was going to place in-line like the cleats are now.

    Thoughts?

  2. #2
    Join Date
    Sep 2001
    Location
    Asst. Vice Commodore, NorthEast Fleet, Commander Division (Ret.) Brightwaters, N.Y.
    Posts
    1,823
    Cool. I always wanted a Samson Post. I wonder if it would tend to snag the jib sheet when tacking?

    The two additional cleats up forward may be over-kill. They would also be going through cored deck. Might want to beef up the deck from underneath if they're going to get hard use. You'll see how Pearson glassed in a piece of wood on centerline for the cleat.

    Chocks. Some of them are real line-cutters. The ones they sell all seem to have fairly sharp edges. I'd like to see them more rounded on the inside.

    Seems to me that boats rarely get loose because the deck hardware fails, or the rope is to weak. Its always chafe cutting the line.

  3. #3
    Join Date
    Apr 2004
    Location
    Pensacola, FL
    Posts
    724

    Question a couple questions

    As I start to re-install the hardware, I have a couple questions.

    Looking at the manual, pg 148, I see the 'spin cleat' located 2' aft of the Jib sheet cleat (which is 17" aft the winch).

    #226 had a pair of square pad eyes there, which I figured were for a chute. (maybe in place of the cleats in the drawing)

    The only padeyes the manual shows are at end of the Genoa tracks labled "Lifeline eye plate".

    Adding more confusion is the fact that #226 also had a second set of cleats, FWD of the winches

    So........

    As I posted I am planning the 10" cleats aft(with a 6"x9" 1/4"aluminum backing plate) with 6" chocks for mooring (& the drogue).

    Then, of course there are the 8" jib sheet cleats, which will go back about the same place 17" aft the winch was orig, I guess I will go about 17". What is the rule of thumb about the angle of the cleats?

    Then there are the 4" square padeyes approx even with the end of the cockpit. I will re-install these, even though I don't have a chute. I want to be able to run one, and they are good jack line tie off points if not needed for the chute (I admit being pretty much in the dark on this one).

    I am not planning on putting the third set of cleats back on, that were just forward for the winches. I don't really understand what these were there for...

    Any guesses?

    Do you need a second set of cleats for a chute? It seems like the Jib sheet cleats would be unused when you would be flying it

  4. #4
    Join Date
    Sep 2001
    Location
    Hampton Roads Va.
    Posts
    821

    Post Samson Post?

    Do you really want a Samson Post ?
    If so what are you going to do with the bitt in that photo?

    A samson post is part of the crane or derrick on a cargo ship , the vertical part , often seen in pairs and reffered to as "goalposts" when the booms are housed for going to sea.
    In very old sailing lingo it was a temporary post erected on deck to help in shipping an anchor to the cathead.

    Arrrgh matey, you guys are getting too lubberly during the long cold winter of no sailing!

  5. #5
    Join Date
    Apr 2004
    Location
    Pensacola, FL
    Posts
    724

    a 'bit' of correction

    Thanks Mike,

    I guess I needed a 'bitt' of correction there.

    Any clues as to the third set of cleats? Or suggestions about the cleat angles?


    I have tried to look at pictures of others boats, but have found few clues.

  6. #6
    Join Date
    Sep 2001
    Location
    Asst. Vice Commodore, NorthEast Fleet, Commander Division (Ret.) Brightwaters, N.Y.
    Posts
    1,823
    I really don't know anything about spinnakers, but I think you first have to figure out where to put the turning blocks or track and maybe even another set of winches.

    Those cleats on the deck don't seem too good to me. The line would have to be flat to the deck before they would even work. How could that work with the line coming off the winch?

    With a spinnaker, you might even want cam cleats to blow the chute quickly.

    There's a little something on the Harken website

    http://www.harken.com/rigtips/spinnaker.php
    Last edited by commanderpete; 03-30-2005 at 06:31 AM.

  7. #7
    Join Date
    Apr 2004
    Location
    Pensacola, FL
    Posts
    724

    Update

    As I wander through my projects list, I have found my way to the bow.

    I am very happy with the 10" cleats aft, and now plan to upgrade the midships cleats to 10" also.

    The 'Stainless' cleats have been a bit of a disappointment in the sense that they are not only mostly stainless.

    Now thinking about changing over to bronze..... have already sold most of the other stainless ones I had planned to use.

    Latest plan includes the removal of the pair of original alloy chocks on the bow and adding a roller on a raised platform (not hanging very far over the bow, with big ole backing plate).

    The original dorade is going away (no way to secure it against ingress of water), and a capped deck fitting will go somewhere where it makes sense.

    Pair of cleats about 12" aft from the stem fitting will serve for mooring, while the bit will take the anchor rode.

    That's the plan anyway, I will post pictures of how it all works out.

    OBTW, I am making pads on the deck to mount the bow pulpit, and other hardware on. My hope is that having these areas that are vulnerable to leaks less so.

    Anyone know where I can get a good deal on 6 10" bronze cleats?


    s/v 'Faith'

    1964 Ariel #226
    Link to our travels on Sailfar.net

  8. #8
    Join Date
    Sep 2001
    Location
    Orinda, California
    Posts
    2,311
    Quote Originally Posted by c_amos View Post
    Anyone know where I can get a good deal on 6 10" bronze cleats?
    What about post #25 at http://www.pearsonariel.org/discussi...3247#post13247
    ??

  9. #9
    Join Date
    Sep 2001
    Location
    Asst. Vice Commodore, NorthEast Fleet, Commander Division (Ret.) Brightwaters, N.Y.
    Posts
    1,823
    Mid-ship cleats are a good thing. I'm going to install some larger ones

    The cowl vent can be a water scoop when its rough out.
    Most of the time I have it turned around.

    I just picked up this 4" dorade box with baffle on sale for $80. The plan is to remove the cowl vent and mount a nicro solar vent on top of the dorade box.

    http://www.marinershardware.com/OrdDorChes.php

    If you're going to have an anchor roller platform, that might be a good place to have a tack fitting for an Asymmetrical spinnaker

  10. #10
    Join Date
    Apr 2004
    Location
    Pensacola, FL
    Posts
    724

    Post

    Quote Originally Posted by Bill View Post
    Thanks Bill,

    If I were going back with the original 6" cleats that would work. I have decided to use 3 sets of 10" bronze hershoff cleats. I am enjoying to larger cleats I have put on the stern, but not enjoying the little bits of surface rust I have had to polish off.... I guess they were 304 and not 316....

    My slip faces out to the river, and it can get rough so I like 5/8" lines, and the 10" cleat easily accepts the stern line, and the after spring.


    s/v 'Faith'

    1964 Ariel #226
    Link to our travels on Sailfar.net

  11. #11
    Join Date
    Apr 2004
    Location
    Pensacola, FL
    Posts
    724

    Oh yea.

    Early on in this thread I posted;

    I have another set of 12” Hershoff cleats I can use, that I was going to place in-line like the cleats are now.

    Thoughts?
    I wanted BIG cleats... 10" is perfect (IMHO). The 12" cleats looked SO MUCH bigger, and were WAY too large for an Ariel. I sold them to a guy with a 45' powerboat.


    s/v 'Faith'

    1964 Ariel #226
    Link to our travels on Sailfar.net

  12. #12
    Join Date
    Jun 2002
    Location
    Portsmouth, Virginia
    Posts
    142
    Recent view of the chocks on my Commander, Njord. I like these, lines have never chaffed even in our recent Nor Easters which damaged lines on my Pearson 26 and the lines never slip out. Note the solar garden stern light, we still do not have electrical power on the dock from three years ago, will remove it when we get electrical sometime next week. Light helps boarding at night.
    Attached Images  
    Last edited by Robert Lemasters; 01-20-2007 at 10:26 AM. Reason: miss spelling

  13. #13
    Join Date
    Sep 2001
    Location
    San Rafael, CA
    Posts
    3,621

    Thumbs up midships cleat

    Thanks for the cool visual, C'Pete.

    Is there any further discussion here?
    We see two alternatives for spring lines.
    I favor the first example because very often you don't have the one or two dock cleats as diagramed. (And the springs would be too long if taken to the dock's bow and stern cleats.)

    If I saw a sailboat tied up as shown in the second example, I would be looking at a temporary solution, as I imagine one line is tied off to a sheet winch at the cockpit and another to maybe a shroud plate or turnbuckle. Right?

    Also, what is happening to the spring lines as they cross at the rail? Here would I mount a chock rather than a cleat? Don't know that a line friendly chock is available that would take even one line at a fair angle?

    The first example shows what has to be a midship tie-off cleat. Where do we mount such a cleat on the Ariel? On the rail or next to the cabin?
    A tie-off point on the rail would take some real installation finesse. An inboard cleat would be a tripper and a cusser. And a midships cleat or chock can run afoul of a rail stanchion.

    You have these lay-down and pop-up cleats now, but they would require you make a deep unsightly pocket for them in the middle of the cabin! It looks like a cleat on the rail is the only option?

    Be great to see a photo if somebody has figured this out.

    Anybody have an idea, or more?
    Last edited by ebb; 03-04-2007 at 07:03 AM.

  14. #14
    Join Date
    Dec 2006
    Location
    Massachusetts
    Posts
    230

    Midship cleats

    Not cheap and designed to fit nicely on a Cape Dory toerail, these Spartan Marine beauties might solve a lot of problems such as the spring line rubbing against a stantion or worse a foot injury from an awkward-placed cleat on the sidedeck. I do not know how they might fit on the glass toerail on the Ariel, but my friend has them on his CD-27 and they are SWEET! The last thing I want is a speed bump to the foredeck.


  15. #15
    Join Date
    Jan 2004
    Location
    Scarborough, Maine
    Posts
    1,439
    Those are gorgeous! They'd look lovely on Ebb's new toe rails!

    This location works just fine for me. It's out of the walkway and I really like having the mid-ship cleats.
    Attached Images  
    Mike
    Totoro (Sea Sprite 23 #626)

+ Reply to Thread

Similar Threads

  1. Replacing Deck Tread Pattern
    By Theis in forum Technical
    Replies: 10
    Last Post: 02-07-2012, 09:07 PM
  2. All those wires inside my mast gotta go!
    By Scott Galloway in forum Technical
    Replies: 26
    Last Post: 07-04-2007, 07:40 AM
  3. Re-bedding Hardware
    By commanderpete in forum Technical
    Replies: 28
    Last Post: 02-20-2007, 08:24 AM
  4. Replies: 11
    Last Post: 08-18-2005, 05:33 AM
  5. PEARSON HARDWARE
    By Bill in forum General/Off-Topic
    Replies: 10
    Last Post: 01-11-2005, 07:15 PM

Posting Permissions

  • You may not post new threads
  • You may not post replies
  • You may not post attachments
  • You may not edit your posts