-
Those voids look all too familiar. The ones that didn't open with the 4 1/2" angle grinder got punctured with a dremel tool with a burr bit. The toerail cavity was attacked with a 4 or 5 inch diameter wire wheel that I mounted on a 6 inch length of all-thread and chucked the mighty power drill. That pretty much chewed out any unsaturated glass in the cavity. Before I taped the seam each of the voids were dabbed with straight epoxy and while still in a green state filled with thickened epoxy. Then the whole seam got another pass with the grinder with much less aggressive grit before washing. That helped the tape lay flat (as possible) to avoid replacing the original voids with more voids of my making. Hope that makes sense and helps you out a bit.
My home has a keel.
-
You know you might get good info from Commodore Triton his self. Rob knows more about Tritons than anyone, and works on them for a living.
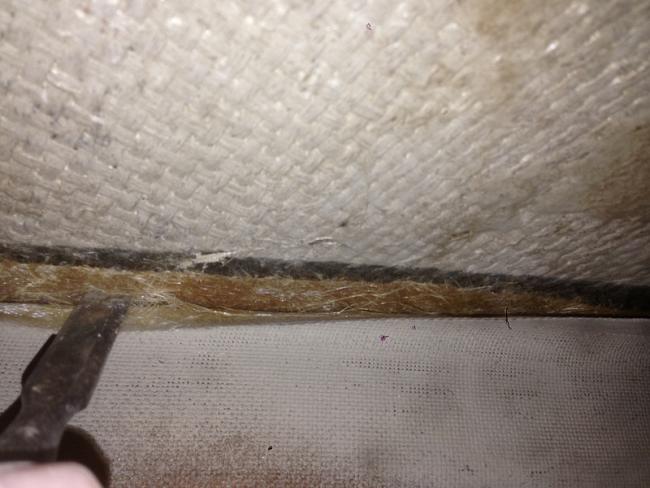
Photos show a fine job of prep and the what-looks-like impromptu tabbings look pretty solid and attached pretty good.
Still think that if any of these bandages look suspicious to you, test their adhesion by trying to slip a sharp Stanley chisel under an edge and gently pry on it....see if it wants to lift off. If you can follow the 'seam' with the chisel, I would assume a bad bond and remove it.
When you see those obvious empty white glass flaps (you show a patch of small ones) I'd use the same chisel or a utility knife with a Lenox blade (Irwin has decent bimetal blades) and just core them out. See what they covering up. Fill them with epoxy gell with chopped strand.
The deck in our boats were laminated upside down in a mold. Most of that lamination is OK.
After it was turned right side up and glued to the hull, any additions (by anybody) had gravity and access going against it.
Tabbings overhead might very well sag and make a 'bubble'. I found unsaturated white roving in A338.
Tap any suspicious area, if it sounds hollow cut it out, especially if there is a possible leak. Might have water in it.
You can fill a deep overhead cavity in stages with structural filler, so that the goop doesn't fall out. Fill it a couple times until flat and maybe add a piece of cloth to blend it in.
If you have to do it all at once, this I've done for vertical repair with structural gel.
Have a piece of plywood roughly the size of the repair, with a piece of mylar stapled on in. (Mylar is a 'stiff' film. Backed by ply, it'll makes an absolutely flat surface when braced over a repair.)
Prop this against your freshly gooped depression, press firmly to squeeze the filled cavity flat thereby forcing epoxy into cracks & holes (and extra filler out from under the edges of the ply persuader. If done conservatively, it'll cut your grinding time.)
The trick is to brace it in place with one or more 'spring battens'. Bendy pieces of fir lumber that are just a little longer than any opposite bulkhead, or stringer, or the hull itself...that you are able to bend the batten slightly between the plywood and a hard place....to create firm compression. You want to hold and put some positive pressure on the ply pad... without breaking the battens. More battens , more pressure. Pressure is stronger coming from sticks that are just about to straighten out, but can't.
When set, disassemble - mylar peels away - and you have a glass smooth mirror surface of the filler you used.
You can do this with many repairs, and not just flat (use thinner ply or polyethylene sheet against the hull, for instance). Big diameter coves can be made with pieces of pvc tube, covered with seranwrap or mylar Thin ply can be bent and twisted - using spring battens.
The technique (if it can be called that) compacts the bandage/repair, squeezing fillers and fabric, making a bond as good as your prep.... and you get an almost too perfect surface as reward.
I've added epoxy and glass cloth and biaxial any where I thought the hull could use it.
A338 has a consistently thin hull.... that Pearson did NOT make progressively thicker as they laminated from sheer to keel.
The Ariel hull is mostly 5/16" thick in the turn of the bilge and keel where the 2500lb lump of lead is encapsulated. Quality control problem.
We know polyester is not water-vapor proof. Certainly gelcoat is not water proof. A338 has at least one coat of some sort of 2-part epoxy everywhere on the hull from the water line down around the keel. Much of the interior is epoxy coated up to the sheer.
Awlgripped topsides were prepped and filled with epoxy. The bottom extensively epoxied from waterline down.
Coating olde raw polyester with epoxy will seal and help support the historic polyester. Imco it's the best present you give your classic plastic.
Naturally there will be someone who says polyester needs to 'breathe'.") Prefer the boat to purrrrrrs.
Prefer the boat to purrrrrrs.
A nice shiney white 'tank coating' will make those diffricult areas of the boat (forepeak/lazaret) easy to keep clean, easy to sponge, easy to illuminate, easy to find sttuff. AND easy to forget those cheap-shots & blemishes that once stared you down.... when its all shiney white.
However, that is another kettle of....epoxy.
Last edited by ebb; 11-23-2013 at 12:30 AM.
-
toe rail cove
To go along with Tony's post.....here's my two feet of electric cord.....
I've had success with SANDING SLEEVES, the ones that slide over a 1/4" shank rubber drum
that you expand by tightening a nut (the wrong way) on top. Not all sanding sleeves are created equal.
You want best quality mahogany-colored aluminum oxide sleeves in coarse grit, like 80 or 60 grit.
So far, I trust Klingspor* abrasives. www.woodworkingshop.com + 800-228-0000
Find the correct diameter drums and sleeves. So that you can clean out both sides and 'bottom' of the cove inside the toe rail with the same effort.
Looks like you can use a range of widths. Ariel toerail cove was quite even, clean and open, probably due to stingy laminations -and a rediculous attempt at bonding the seam with a stingy layer of fiberglas mat..... that worked!
Shorter drums are probably more manuverable, and cheaper to replace.
If you jam them the covers can tear apart....so loose fit is best.
Get more than you think you need, because it's rough going for even a well made sleeve.
Imco your best bet tool for this project is an ANGLED DRILL.
I've nearly wore out my old special order 3'8" chuck Milwaukee angle.** And 100s of sleeves, nearly all coarse grit.
Klingspor catalog has a generic for $59.95 (TZ20000) that maybe's worth trying.
This 55 degree angled design is perfect for boats.
You grasp the body of tool in one hand, it becomes a bionic extension with the working end at an ergonomic slant.
-And the angled gear part of the tool is relatively tidy, allowing you to get IN close and personal anywhere,
including the tight cove up in the corner against the hull.
Don't believe a right angle drill has anywhere near the versatility of a half angled drill.
.................................................. .................................................. .................................................. ............................................
Have never figured out how to freehand a stone bit. They clog or dull or disintergrate immediately.
Equally useless are the conical rasps of different profiles. Too short and dangerous, they come already dulled.
There are carbide coated disks & burrs. Wouldn't use them where I couldn't keep an eye on them. $$$ and wear quickly.
.................................................. .................................................. .................................................. .............................................
The Klingspor has other helpers:
3" wide rolls of 80 grit aluminum oxide with cloth backing (like SANDING BELT.)
Make yer own sanding blocks with plywood pieces. Stick the two together with 2-sided fiberglass carpet tape.
Make reach-in paddles with thin ply and sanding belt on both faces. (Keep yer fingers out of the cove!)
You lightly score the cloth side with a utility knife and snap the piece off the roll.
.................................................. .................................................. .................................................. ............................................
Another great tool used on both wood and glass is a Nicholson CABINET RASP #49.
This is a versatile 7/8" wide half-round rasp-file with staggered teeth on both sides, about 12" long OA with about 9" of teeth.
I use it without a handle for every little task. It's a shame to use it on fiberglass..... but sometimes you have to.
This is a treasured woodworking tool. Expensive. A joy to use, doesn't make much noise, and it's always ready to get you out of trouble.
Don't know who has them right now. Have to find them 'on sale' to afford one.
Get three.
.................................................. .................................................. .................................................. ...........................................
A Fein type oscilating MULTITOOL would be a safer power tool to use. There are mutiple brands. Not one of the idiot imitators has come out with a more versatile angled design. Right angle tools are OK in a right angle habitat, like house or shop. but have limited use on a boat. (Exception is the dogleg plunge cutter)
Some have a carbide rasp attachment. But I found (the Fein rasp) too coarse to be useful. An imitator may have a mo'betta rasp for the cove. I've really used few attachments that came with 'multimaster kit'.
Haven't tried this: For some of your what-looks-like very narrow coves - maybe carpet taping a loop of sanding belt over a 'dog leg' plunge blade might get into those narrow places. Possible !
[Elsewhere here I've put down the Fein as being WAY W A Y too expensive for what you get, not only the power head but its sanding and cutting attachments have insulting prices. I'd try Harbor Freight. And then look for better bimetal cutters on the internet. You can see what Fein has in the Klingspor catalog. Then look elsewhere. Most after-market blades (Imperial) fit all mutitools. Ocilating multitools are held by the body which quickly get too HOT to handle. Source: forums.]
If you have a Bosch multi and want a plunge cutter, try their new Carbide Blade OSC114C - actually cuts metal ! 
.................................................. .................................................. .................................................. ...........................................
*Klingspore are the progeny of Klingons
** McMasterCarr has a Milwaukee 3/8"chuck 3.5Amp 55degree angle drill (0370-20) = $132.50
[Brutilized my 15yearold, never replaced anything, altho the cord at the tool is leaving - dislike gear chucks that have to have keys attacht to the cord.
Last edited by ebb; 04-23-2014 at 09:54 AM.
-
I stopped by Blossom this evening to test the fit of the Tide's Marine Strong Track I received yesterday. I will post the installation of the strong track and Code Zero furler in a separate thread once I am done with them. Anyway, it was blowing 20-25 knots gustting to 30-45 in the marina when I got there. The marina is situated in the Oakland Estruary on Alameda Island. It certainly was not an auspicious night for working on the hull deck joint. But ever since I read Ebb's suggestion I have been wanting to test the soundness of the bonding of the hull deck tabbings with a sharp chisel. One reason I feel this is important is that when I looked at Vento Dea's hull deck damage I can see that the fiberglass tabbings appear to have been ripped clean off the hull, indicating a very poor state of bonding.
As you can clearly see from the pitctures below the tabbings between the anchor locker bulkhead and deck on Blossom are also not well bonded. I could almost tear off the outer layer the entire length of the bulkhead by hand. The tabbings between the bulkhead and hulll are in better shape. However, I still would not know if they will survive a knock down by a freak wave. So my plan is to cut out the entire bulkhead and make a new one. I will then reinstall the new bulkhead in a ring of foam cushion between the bulkhead and the hull and deck. In addition, I also intend to install two longitudinal stringers that run the entire length of the v-berth and the anchor locker. As I mentioned before, when I painted the hull a few years ago I noticed stress cracks in the gelcoat all the way around the hull where the bulkhead is. I suspect the lack of the stringers to support the forward hull and the tabbing of the bulkhead directly to the hull are the main reasons for the stress cracks.

Last edited by Triton106; 11-21-2013 at 10:18 PM.
-
detab
That's amazing.... and instructive!
If those tabbings are factory, ie original, then it's textbook that polyester is not a glue.
And therefore you cannot expect a bond when using polyester resin to tab a cold seam.
If the tabbing was 'after market', and the resin used was epoxy.... then prep, or DFO, or resin, can be to blame.
May have had a discussion on a thread here once about bulkheading (Tony G?).....
The main aguement for 'floating' a bulkhead is that you (hope to) avoid point loading.
In other words, if you install a plywood bulkhead tight to the hull,
you're going to create the problem (like Pearson did), such as you describe with gel coat grazing on Blossom's hull.
The bulkhead is 'photographed' on the exterior hull.
Textbook technique is to space the bulkhead off the hull by, say, 1/2" and attach it floating to the hull with tabbings. To avoid the hollow, you'd use 1/2" foam rubber strips to get form fit....and tab away. But running fillets on foam gasket could be problematic.
This may be good for major bulkheads. It definitely spreads the point load. And would work.....but I'm not total on that.
I'm an egg crating fan, (mostly persuaded by what I considered is the starved hull on Ariel338) and therefor worked in a number of minor 90degree web intersections with the hull - lockers, mostly in the galley and accommodation.
It seems unneccessary to offset all these minor bulkheads.....with foam. Because one could argue that there are multiple sharing point loads spread out over an area of the hull.
The hull would have to be very thin indeed to photograph web construction thru the hull. Depends on your definition of egg-crating!
Imco the crazing on your hull comes from the hull being unsupported on either side of the bulkhead.
LittleGull's hull had horizontal hollows on either side of the STRINGER - a mahogany 2X2 tabbed to the hull about 15" down from the sheer - the stringer stopped abruptly at the main bulkheads: mast and cockpit. I added 'extensions' to this stringer running into the V-berth forward to the bow - and aft from c'way blkhd to the lazaret blkhd behind the cockpit.
litlgull also had vertical hollows on the hull forward of the mast blkhd, where there were no stringers. - extending below the waterline.
Wanted to even the stresses of the stringer's obvious pointload out to the ends of the hull. Wasn't going to remove them.
A338 topsides hollows became evident when I spent two months endlessly filling, fairing and long-boarding prior to painting. [Ebb'sGallery pg7#126 & pg10#126.] However the 'bumpouts' on A338 didn't show any gelcoat crazing per se'. But long-boarding removed gelcoat on all the highpoints.....bulkheads and stringers.
The hull's permanent topography happened when it was being laminated. But it's fixable cosmetically if you go to the trouble of arduously filling and fairing. They are, perhaps, more unsightly than dangerous. Original blkds now have added tabbing, and all furniture is tabbed or filleted in web or box like constructions.
Could argue that a line of gelcoat crazing showing up on the hull is a sign of stress....of glass laminate in the hull stressed continuously, and might act as a zipper and open the boat up....on a dark and stormy night. VientoDeo's hull zippered open, not at the seam, but above the seam where glass was forced into a radical angle to make a flange.....obviously broken strands of glass there. They broke during layup 50 years ago.
Cove fillets are called for where glass lay-up changes direction.
And stopping the tabbing on the hull is done gradually...tabbing is always stepped to the hull.....espeially at major bulkheads.
It's plausable that a Triton or Ariel rigged and loaded for cruising, punching through waves where it experiences dynamic forces on its quarters, on its mast and rigging - or yanked by mooring loads - grounding on shore....... can TWIST and zipper open hidden and unintentional construction seams.
Didn't remove major bulkheads in the Ariel , some sloppy tabbing came off easy, tite stuff I left on.
But both cabin bulkheads in A338 were substantially altered.... the main under the mast (and the lower shroud 'knees')... and at the companionway where nearly half was removed to create a quarter berth (but with an added wide 'rib' constructed where the blkhd had terminated.
The cheat was to add wide fillets and mutiple tabbing on either side of the original bulkhead. Thinking is that would spread the pointload of the original that was glued in hard (without a space.)
This is where bialial tape, or strips, was used. Did it backwards from norm by filliting first,
then laying in a narrow strip, then wider strip, then finishing with the widest....thereby ending with fairly smooth super tabs. If you can't do it all at once, dry edges can be reduced/faired - easily if still green - with BACHO 625ergo carbide scrapers. "Don't go down to yer boat without them!"
They come with belt holsters too!
SUGGESTION for a new major bulkhead:
I think, altho didn't have the opportunity in A338, that pointload from a new hard plywood bulkhead can be reduced or eliminated
by first laying down graduated biaxial strips on the hull where the bulkhead is going. Eg: 2"/4"/6"/8".
In other words strengthen and support the hull and spread the load befor a nicely fitted ply blkd goes in. Finishing off with similer graduated tabbings from bulkhead to hull. Imco strapping the hull like this might enable the hull to resist twisting. Of course, this is all opinion.
Using biaxial will allow neat work on compound shapes because you can tease the material ... into neat straight lines of buildup.
Neat enough anyway, so that grinding is kept minimum. "This ain't no grand piano..." as a carprenter once said to me.
Aye know...aye know...but it is..... Blossom!
Last edited by ebb; 12-14-2013 at 09:42 AM.
-
Been away for a while.
I did make some progress in the meantime. I finished retabbing the hull deck joint in the lazarette. After grinding out the joint I filled the low spots (especially the cavities in the toerail) with thickened epoxy. I then retabbed the joint over with two layers of 5" and 8" biaxial tape. I did not take any pictures as I was rushing to get it done but I did spot a couple of white spots which indicate to me air bubbles under the tape. I am a little disappointed by that but overall the joint is much stronger than it was before. I hope I will never have to find if it is strong "enough".
In the anchor locker I likewise ground out and then retabbed two spots under the deck that had been poorly tabbed at factory that I mentioned in my ealier post (see pictures in that post). That was straight forward. On the other hand, the bulkhead deck joint was a little more interesting. I was able to pull large pieces of outer tape (weaved cloths) off by hand and was able to easily chisel out the remainer. The inner tabbing was made from fiberglass matt most of which were not properly wetted out (much like the pictures in Vento Dae). I was able to chisel that out fairly easily. For the most part the tabbing came off cleaningly, only a small piece of plywood came off with the inner tabbing. It was so clean that I had a second thought about replacing the bulkhead.
Thanks Ebb for the detailed treatise on proper bulkhead installation. A lot of timely and good ideas to think about...
Last edited by Bill; 12-13-2013 at 10:33 PM.
Reason: Off Topic
-
Dang
Don't know if the old adage 'looking a gift horse in the mouth' works here. It's not about how rotten the boat is. Maybe it's about which end of the horse we're looking at.
Knees in the Ariel were pieces of exterior plywood (thick lams with voids in the middle - but nicely tabbed) at right angle to the hull which brings the plates up thru the deck also at a right angle to the toerail.
Found that to be backarseward and ended up with macho plates slapped on outside the hull, parallel with the toerail and loads on the bolts.
Read once that the weight of the boat should be able to be supported, HUNG, by the rigging.
Took that as gospel and way overbuilt what littlgull has now. Probably too much.
Just heard this one...
There were these three guys going to the quillotine during the French Revolution:
a priest, a drunkard and an engineer. "Any last wish," asks the guillotinair to the first.
"I'd like to go face up to God in heaven, where I'm going," says the priest. The great
knife falls.... but stops short of slicing his head off. "It's a miracle!" yells the crowd,
"Set him free! Set him free!" So he is let go. The drunkard is next, and he says,
"I wanna go to heaven too, face up for me." Same thing happens, the knife stops
just befor it chops off his head. It's a miracle! It's a miracle! set him free! So he's let go.
Now, it's the engineer's turn. "I want to go face up, too..!" Just as the executionor is
about to pull the lever, the engineer yells, "Wait, wait, I think I see what the problem is."
Last edited by ebb; 12-14-2013 at 11:54 AM.
-
LOL... Ebb, that's a good one. Being an engineer myself I admit us engineers love to solve problems regardless if the problem needs to be solved or not, who will benefit, how the solution will be funded, etc, etc... I also admit in many ways I approach boat projects the same way - solve problem first, define goal later, if ever. Sad isn't it? But you live and you learn. I am getting better at defining goals first and then finding solutions.
I think someone must be eating my postings. For two days in a row now I have posted new postings and verify that they are posted only to find later in the day they are deleted for some reason. Maybe they were not posted correctly. This will be my test posting to see if it will disappear again.
-
T106, the subject here is hull to deck, not the restoring of a particular yacht. Please search to find an appropriate thread for other subjects.
-
Peter Theis (Solsken, A-82) wrote the following Email in response to a notification that there were new posts to the deck joint thread. I believe he wanted this conversation posted to that thread Peter is asking for comments.
-Moderator
>>>>>>>>>>>>>>>>>>>>>>>>>>>>>
Here's a comment from one of my sailing friends. The crew dropped his Renegade off the hoist as I recall. That is the fall he is talking about. He got a new boat out of that disaster.
Peter
-------- Original Message --------
Subject: Re: Reply to thread 'Deck joint-Who, What and When'
Date: 03 Dec 2013
From: Rex Miller
To: Peter Theis
Not having seen the joint on your boat it is hard to assess the applicability of the thickness. On my Renegade the hull turned in and the deck was epoxied to the top of the turn. Not super thick. It was thru bolted through a hollow toe rail but the bolts did not go through the deck lip as I recall. No amount of tightening would stop leaks at the through bolts. The jib sheet car track was on top of the toe rail, compounding the problem. The hollow had been filled with a goop that dried over time. Tightening the bolts just collapsed the toe rail. I fixed the problem by making stepped aluminum blocks with a 1/4 inch step 1/2 and inch wide to address the thickens of the deck section.
The major damage to the Renegade when it fell was at the deck to hull joint splitting for over 8 feet. Within one inch of the outboard edge the deck became cored and was substantially thicker until it reached the coach house turn. The stability of the monocoque hull relies on the hull to deck joint so relying on a small surface area, of less than a inch wide, of contact area, which to boot would have be a secondary bond. It was in my opinion a poor and inherently weak design at that critical junction. The failure described below does not surprise me in adverse conditions.
Had the joint been shoe box joint it would have supplied much greater strength.
The Ariel, Renegade and the Triton were similar designs and had much in common and much to commend them, but not the construction of the hull to deck joint. The 5200 would add some strength to the joint as it is primarily an adhesive.
On Mon, Dec 2, 2013 at 1:23 PM, Peter Theis wrote:
I'd be interested in your thoughts on this disaster. When I rehabbed my Ariel, the baby brother to the Triton, I used a Dremel tool to establish a groove outside of where the deck and Hull were joined. I had had leakage through that joining but never a clear break. I filled the groove with 5200 to join the deck and hull and close any leaks when the boat was healing. It seemed to have worked, at least so far. The deck overlay creating the gunwale where they join is very thin and there is not much for the epoxy or the 5200 to adhere eight at the juncture.
-
Ok, that explains the disappearing posting mystery. I commend the Forum for its discipline. At the same time it would be nice to get an explanation or at least a note to the effect. I literally posted the same postings three or four times thinking that I must have done something wrong in the posting process.
-
Wow, another case of a torn hull deck joint albeit from an accident. I don't know the details of the fall but can imagine that the force of the impact from the side of the hull deck hitting the water must be similar to the force created from a slamming by a freak wave. The bottom line is this Renegade hull deck joint was not strong enough to survive the fall. The natural question is then could any Triton/Arial/Commander/Renegade survive such a fall. I don't know the answer. The bottom line for me is that they need to if you intend to take the boat offshore, which is the reason why I am going to process of adding additional tabbings internally to the hull deck joint. If you are just daysailing or racing around the boyd then all you should care is if the hull deck joint is leaking or not, unless your boatyard drops your boat from the travel lift in that case you might be lucky and get a new boat.
-
disappeared postings
EBB HAS TO ASSUME THAT THIS POST IS NOT ON SUBJECT
Postings don't just disappear here without some notice from the owner
of where ho put them.
Sometimes things like pictures disappear when the owner finds them in poor taste.
But I for one have not been aware that what anybody is saying
EVEN IF IT'S INAPPROPRIATE TO THE STATED SUBJECT OF A POST
has just been summarily erased. So, the missing posts have been moved to a more appropriate THREAD......
WHERE?
Last edited by ebb; 12-17-2013 at 08:41 AM.
-
Renegade flawed hull deck joint
173 Renegades - designed by Bill Shaw - were built by Pearson between 1967 and 1969 after they replaced Carl Alberg with Shaw.
The boat has quite different underbody than an Alberg A/C or Triton in that the keel is more fin-like and the rudder is detatched from the keel, in a free standing spade.
The Shaw design represents a departure from Alberg/Pearson keel hung wooden rudders to fiberglass.
Leaves the inboard Atomic 4 propeller completely exposed.
Ballast ratio is different also. While the Ariel/Commander ratio of ballast to displacement is about 50/50 - the ratio of the R. is 1/3 ballast to 2/3 disp.
Renegade is 27L - 21 LWL - 8.5B - 4.25D. Ballast 2100lbs. Displacement 6500lbs.
However, Pearson's hull-deck join - evidently after thousands of these boats alone - never was engineered or upgraded correctly during these three different model runs. It's a Pearson thing.
While all of them were sold as bluewater capable boats, it's obvious now when these old glass boats are involved in accidents that test the mettle of Pearson construction methods
that this most important connection, hull to deck, of these boats is seriously FLAWED.
And just as seriously not usually recognized by restorers, renovaters, and owner-voyagers.
Maybe the age of these boats has something to do with the serious destruction of the fiberglass seam in these recorded accidents.
Maybe it's new. Or maybe it's showing up more as we ask more of these boats. Imco age has something to do with it.
Maybe these starved seams - with fiberglass strands turned at crushing angles - are getting tired?
If there is TWISTING of the boat as it's being sailed or
stored improperly braced on the hard....perhaps both passive and active stress can weaken these minimalistic hull-deck seams?
There are some solutions discussed here in this thread that Rex Miller might be made aware of.
But it looks like he has another boat.
Sincerely hope that Theis is well and enjoying life. Very much miss his input here on Pearson Ariel dot org.
.................................................. .................................................. .................................................. .....................................
An overall easy solution for these flawed hull-deck seams wants further discussion.
First, it has to be recognized through example and discussion that this is (or is becoming) a dangerous problem.
Rex talks about the Pearson monoque fiberglass design as seriously flawed at the hull-deck seam. Put that way, it shows how weak and meager
the seams are on these three class models.
Better in all cases would have been a simple lap joint, 'shoe box' joint, one over the other. Glued & bolted. No ifs, angles, or butts at all.
The laminate schedule on A338 left a thickness of 1/8" toe-rail BUTTED to a 1/8" hull. Seam covered with casual thicknesses of matt ! ! !
Any fix is going to take time and money.
Have a feeling that a fix for our boats that physically bonds toerail/deck to hull - from the outside -
maybe wraps up and over the toerail....
is the easiest and best way to approach it......
for everybody rehabbing a Pearson Alberg or Shaw cruiser for bluewater sailing.
Be great if there is even more input on the subject here.
Last edited by ebb; 12-17-2013 at 03:29 PM.
-
Well put Ebb!!!
I don't know the primary culprit for the Pearson A/C/T/R hull deck joint weakness discussed here. I don't know if that really matters. The bottomline is that they are not strong enough to survive a freak wave or a fall from a travel lift. I am much more interested in efficient and effective ways to address the issue. I think the three basic solutions as well as any permeatation of the these solutions are all acceptable. The optimal solution depends on the specifics of each boat. Just to be clear, the three solutions discussed are (1) adding internal tabbings to the hull deck joint, (2) adding external tabbings, and (3) using machenical fastners (machine screws and nuts, not pop rivits).
If I remember it correctly there are at least three A/C owners (Ebb, Tony, and someone else) mentioned that they used internal tabbings in this thread. I have also chosen this approach. The advantages of this approach is that it does not have to be faired smoothly and painted perfectly as external tabbing would require. It just has to be strong. The disadvantage is that grinding existing tabbing inside a small cabin or cockpit lazarette is a nasty job that no one should have to endure. And it can only be done after you tear down all of the existing shelvings and cabinetries.
I don't remember reading anyone in this thread using the external tabbing approach but Hal Roth famously described his external tabbing experience in his books (obviously he had a different boat). I also know another east coast Triton owner (Steve Cossman) used external tabbings to strengthen his hull deck joint (I think it was done by a local boatyard - Svendsens in Alameda.) The advantage of this method is that it is much easier to grind and apply fiberglasss tabbings from the outside. One point that makes the east coast Tritons easier to apply external tabbings is that the hull deck joint is a butt joint AND the toerail is rounded off on top which makes it a lot easier to fit the biaxial tapes over the contours. The disadvantage is that it is more demanding to fair and paint the new tabbings since they are external.
I only know one Triton owner used mechanical means to fastern his hull deck joint. That was done on a west coast Triton which has externally turned lips on both hull and deck. So the owner drilled quarter inch holes and fasterned hull deck joint with machine screws and nuts. He then capped the whole joint over with a hollow rubbing strake. The advantage of this method is the machenical means are easier to see and it just feels more solid because you don't have the issue of not knowing how well the new tabbings are bonding to the old fiberglass. The disadvantage is that you need overlapping hull deck joints to be apply the screws to. The butt joint common on east coast Triton and A/C are not condusive to this method of fixing.
In addition to these three basic solutions some owners have used combination of two approaches. Ebb's idea of adding internal tabbing and then bolt the new tabbings down to both hull and deck on each side of the joint is a great example. It wil certainly create an extremely strong joint. The disadvantage is that it is a lot of work and it will introduce more holes in the hull. I have also read other people adding additional tabbings internally and externally which would also create a very strong joint. Again the disadvantage is that it is a lot of work. I am sure that there are many other potential solutions and combination of these various solutions. I would be very appreciative if more experienced people can show me other possibilities that are more efficient and easier to apply.
 Posting Permissions
- You may not post new threads
- You may not post replies
- You may not post attachments
- You may not edit your posts
Forum Rules


 Reply With Quote