


Seadated,
I just posted some pictures of my new rubrail.
See the last page of Commander227 in the gallery.
Mike

Seadated,
I just posted some pictures of my new rubrail.
See the last page of Commander227 in the gallery.
Mike
Commander227: That's a pretty elegant solution - it looks a lot more like a rubrail and a lot less like an afterthought than just the plain stainless rail.
Unfortunately, I missed my chance at the commander for sale here in the SF Bay. Now I'm all hung up on these things, so I guess I'll be on the lookout...
I realize this is a dormant thread but I hope to revive the interest in this topic as the Pearson Ariel/Triton hull to deck joint maybe more vulnerable than we realize. Like most Ariel/Triton owners I held strong convictions that Pearson/Aero Marine (west coast builder of Tritons) built strong boats. Strong enough that many Ariels/Tritons cross oceans and at least one has successfully circumnavigated twice (that being Atom owned by James Baldwin). Many owners have chosen Ariel/Triton because of Pearson's reputation.
However, my conviction started to wane as I dove deeper and deeper into restoring my 1960 Triton 106 Blossom and outfitting it for the blue water. First I noticed that Blossom's hull is not nearly as thick as people say they are. When I replaced several of the thru hulls in the head, under the cockpit drain and the speed log the hull thickness is only approximately 1/4" to 3/8" depending on the location. I also noticed stress cracks all the way around the hull where the anchor locker bulkhead is tabbed to the hull. Still whenever hull deck joint or other similar topics come up in conversations the common comments you hear from the Ariel/Triton owners are usually "yeah the hull deck joints in Ariel/Triton are not perfect but no Ariel/Triton has ever been lost as a result..." That maybe true until I read the loss of another west coast Triton (Vento Dea) recently. Now my conviction in Pearson's construction quality is almost completely shattered. You can read about Vento Dea's story here http://3-knots.com/2013/07/10/staring-into-oblivion/.
The short version is that Vento Dea was lost due to hull deck separation sustained as a result of a freak wave slaming it down on its port side which openned up a 4 foot long and 1 foot wide gaping hole. The pictures that the owner posted on his blog (which are reproduced here) clearly show that the hull deck tabbings are grossly inadequate. You can see that the separation is really a clean break between the hull and the deck as if there were no tabbings there at all. You can see that what the fiberglass mat tabbings there were are no match for the violent force of the wave.
I don't know exactly how many Ariels/Tritons have made accross the Atlantic or the Pacific but let's assume that number is 20 give or take a couple and the average distance travelled in those 20 blue water voyages is 5,000 KM (approximately a round trip accross the Atlantic or from the west coast to Hawaii) that puts the total distance under sail at 100,000 KM. My concern (which is not the same as conclusion) is that the reason we have not lost that many Ariel/Triton's is not because of the construction quality BUT because Ariel/Triton's just have not crossed that many ocean miles. To put in relative terms 100,000 KM is less than what the Pardeys or Hal Roth travelled by themselves. In addition, almost half of the 100,000 KM is attributable to James Baldwin's two solo circumnavigations which were completed in a very customized Triton. Sure, I don't think Pearson/Alberg designed and built Ariel/Triton's for the blue water. They are probably designed and built for club racing or coastal cruising. That being the case I think it is imperative that we don't over look issues like hull deck joint when preparing an Ariel or a Triton for the blue water.
I looked at my own Triton hull deck joint at several locations (in the V berth and in the cockpit lazarette) and can see that the tabbings are very suspect although I have not openned them up for a closer inspection. After seeing what happened to Vento Dea I definitely want to open it for a closer inspection and potentially redo the hull deck joint using the ideas proposed here by Ebb, C'Pete and others. I am not looking forward to this dreary job but there is no choice in this matter for me.
Last edited by Triton106; 11-14-2013 at 10:58 PM. Reason: Add photos of Vento Dea damage
Guess more than a few tons of wave caved in that hull.
The Triton has a flange join that many other frp production boats copied.
Maybe it could have been more substantial.
But extraordinary force did cause it to 'zipper'.
This thread has a number of ideas that can be used to come up with a solution.
If you are crossing oceans and not removing most of the interior to access the whole seam,
you will be adding something to the exterior.
Might decide to add a vertical build-up of epoxy and glass in a controled molded shape, spanning the seam.
Depending on width over the seam, it probably wouldn't have to be more than 1/4"-5/16" thick.
And then dress it up with a nice mahogany or teak or plastic rail - that is bedded not glued on.
Add mechanical fastenings thru the built-up rail into both toe-rail AND the hull, clamping and gluing it together.*
Imco just sticking it on to a well-prepped surface is not good enough on an old glass boat.
You'll barely get the gelcoat off and discover you haven't much boat left!
Engineer it to be as light as possible, because beefing up sheer can get heavy.
Using a wood like ipe (ironwood) might seem good because of its strength and low maintenance - but it's extreemly heavy. Fiberglass gets heavy too. However, honduras came with our boats - it's a beautiful wood - and it's still available.
Imco, if you are changing the furniture inside, you can design the new built-ins in an eggcrate fashion. Looking at the damage in your photos, I think if that part of the hull had 90 degree partitians, in the form of lockers or shelves, whatever,
the hull might not have been so willing to be bent inward.
I've been playing around with thin sheets of meranti and glass - and believe very strong
(and attractive) interior support for our thin hulls can be made by 'eggcrating' lockers, shelves, mini bulkheads, along the hull.
I would also take an awl to the seam - to see if it's punky. You might also find resin starved areas on your early Pearson, I did on the Ariel.
I wonder if this was behind the problem that VentoDea experienced - and may be an anomaly - rather than a common weakness of design or manufacturer.
.................................................. .................................................. .................................................. ............................................
*If going with the redundant clamping idea:
you'll need access to the machine screws inside for nuts and wrench. Won't be able to create a mechanical clamp in many places.
These fastenings will never be removed (or if they are, it'll be part of a major overhaul or resoration.)
So, imco, it's ok to epoxy them in, cover them up. Where no access exists, instead of sheetmetal screws, I'd try tapping holes (in cured epoxy) and driving in 316 machine screws dipped in liquid epoxy! They won't leave a sharp point inside the toerail for a finger to find someday.
And pre-threaded holes make a cleaner maybe stronger connection.
Last edited by ebb; 11-16-2013 at 01:14 PM.
I read the above referenced blog. That was a bone chilling story. It would be interesting to know whether the damaged boat was an East Coast or West Coast built Triton. The West Coast Tritons I have seen seem to be built somewhat differently than the East Coast Tritons. To my knowledge, all Ariels were built on the East Coast.
On page 1 of this thread, I wrote:
"... I subscribe to the idea that the decks on blue water cruising boats should be through bolted (not screwed) to the hull along an overlapping flange and also sealed with a flexible bond like 3M 5200. ...The Ariel was probably not intended to be a blue water cruising boat. There is no such flange on Pearson Ariels through which bolts can be passed, and that mystifies me, ... Those who choose to attempt to strengthen the seam will still be dependent on what amounts to a chemical bond, with no fasteners connecting the hull to the deck."
After restating that opinion, I have to add that the animal population of the Galapagos arrived on those Islands on floating logs, and that floating coconuts colonized the tropical islands of the world. And so, sailors may venture across oceans in any craft that they choose regardless of whether or not that craft boat was designed for blue water sailing.
John Vigor includes the Pearson Triton, the Bristol 27, The Cape Dory 25, the Cal 20 and the Catalina 27 in his "Twenty Small Sailboats to Take You Anywhere," but not the Pearson Ariel. I suppose that those boats were included in John Vigor's book because some people have actually made incredible voyages in those boats. Not saying that sailors should, but only that some sailors have... and that would be true for the Ariel as well.
Scott
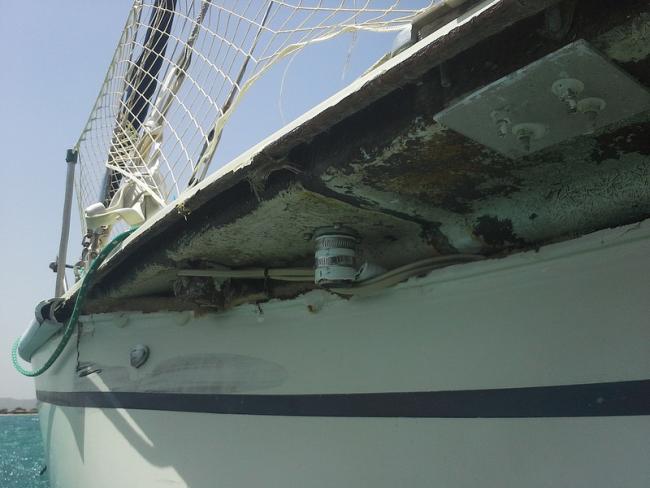
The hull to deck seam on West Coast Tritons have approx 3/4" protruding lips - top lip the deck - bottom lip the hull.
I don't know Tritons, and didn't notice. But have search some and found that these lips sometimes were or were not
thru bolted at the factory. Tritons have a history of problems with the joint. On both Coasts.
The ones I've seen on the SFBay have a rubber rail that covers the joint.
I've seen one that has a nice custom-made beige polyethylene deck material (or starboard) cap on it that looks pretty good.
There may also have been Tritons with in-turning lips.
Here, I believe, bolts were thru-fastened from the top, under the wood trim toe rail. Seems like a better way.
Here is Ray Alsup's (National Triton Assoc) essay on his renovation: (maybe somebody can make the direct blueline connection for us?)
google: Alberg Sailboats - Rubrails
albergsailboats.org/about-the-triton/...triton.../hull.../667-rubrails.html
[in case I'm misuderstood, I also believe in mechanically bolting the top of the boat to the bottom.
In my post above, I'm trying to say that on a VERTICAL fiberglass over-the-seam reinforcement of some thickness (like 1/4"-5/16")...
there ought to be bolts thru the buildup on top of the seam AND below the seam.
There still could be fasteners thru the flanges, indeed there probably ought to be.
But I was thinking of bolts going sideways into the hull
and what I see in the photos now... as a short toerail.
If I had a choice, and I had a problem with the joint, I'd use silicon bronze machine screws - and epoxy them in!
Then finish it off with a cosmetic wooden rub-strake plus toerail.
If you go with Ray Alsup,
I'd also consider using Chemlink's Polyether tube adhesive sealants
which bond to more surfaces, probably better UV resistant than 5200,
and won't loose resiliency, no solvents, no out gassing, won't shrink, alcohol cleanup.
And cost about 1/3 of the boatstore stuff]
There are many ways to do this. All of them are going to take some beers.
.................................................. .................................................. .................................................. ...............................................
Another way to view the damage, is to imagine that the boat didn't only get caved in,
but the that the whole boat for a few seconds was TWISTED by the comber........ and that popped the seams.
Last edited by ebb; 11-16-2013 at 01:19 PM.
Ebb, I am adding the link to Ray Alsup's write-up on how he strengthened his west coast Triton hull deck join here - http://albergsailboats.org/about-the...wcrubrail.html. Ray did an admirable job and it certainly sounds strong enough BUT I am not sure if it would be strong enough if slamed by the same freak wave. The reason I harbour my doubts is because the externally turned lips that are typical of west coast Tritons are very narrow. At best it is only 1/2" wide. You can imagine how much holding power there might be if you drill a bunch of 1/4" hole in the middle of this lip. That's why it is probably not the route I would take. Certainly I am not saying it is wrong to take that approach, just not as strong in my opinion as some of the other ideas proposed in this thread. If you really want to get into the theory behind strenghth of machine fastened vs. fiberglassed hull deck joints you can read David Pascoe's article "Screw It" here - http://www.yachtsurvey.com/Screwit.htm.
Scott, to answer your question Vento Dea is a west coast Triton just like Ray Alsup's and mine. I have a drawing of the hull deck joint here. For the reason I stated above (ie. the lip being too narrow) I did not end up using machenical fasteners. I also consulted Tim Lackey before making my decision. Tim also advised using internal tabbing approach to strengthen the joint. I fabricated and clamped "C" shaped mahogany rubbing strakes (I know the drawing says teak but I could not afford it) from stem to stern on the external lip with a ton of 5200 after sanding and cleaning the external joint. For a while, and as long as I only sail inside the SF Bay, it is probably strong enough. I don't imagine that a freak wave could come inside the SF Bay.
However I do plan to venture out eventually. I have been vaguely planning a solo voyage down to Los Angeles or Orange County as a starter and then Hawaii and back down the road. For these voyages I need something stronger. I am going to first investigate the existing internal tabbings and then decide what to do next. I am reasonablly certain that I would have to redo the internal tabbings. I have been thinking along Ebb's eggcrate idea or something similar to what C'Pete and Tony have proposed here. More to come on this topic.
Last edited by Triton106; 11-15-2013 at 03:37 PM. Reason: To correct bad grammer, writing, spelling errors.
OK, so when you look at the photos,
the lips coming together wasn't where the separation occured.
In this case it tore apart at the angle where the deck flange turned. Easy to see that it was the
flange turn that zippered. Probably because the deck is not as strongly laminated as the hull.
So can we agree... the weakness in the join is not where the two flanges come together -
but where the two flanges are forced to make hard right turns.
One thing we know is that fibeglass doesn't like point loads and doesn't like sudden changes
in thickness. The glass fibers in the apex of thse tight turns might be broken.
If this is correct, then the sudden out turn of the deck and hull flanges are a weak construct.
The way the boat came apart is the clue.
So is there maybe a fix for this?
Get some 1/2" polyethylene sheet and cut it into 3/4" wide strips. Epoxy doesn't stick to this, so you'll use the strips as dams,
using double sided carpet tape as a stickum.
Maybe you put them on the boat about 3/4" above and below the pursed lips.
Intent is to increase the overall width across the flanges to say 1 1/2" (or a little more) and about as 'deep' as the lips stick out.
This might create the width needed to drive 1/4" holes thru the toerail and the hull for bolts.
How does this tie the lid onto the jug?
Puttty knife a fairly stiff mix of epoxy/cabosil/chopped-strand into the grooves on either side of the lips
Let it set, remove the dams. Round over the new edges, maybe 1/4" - 3/8".
Tape on a skirt of masking paper.
The area above and below the new 1 1/2 + composite now might be filleted with epoxy gel.
With a gererous curve you still can make very economical use of filler and a end up with a
nice clean coved transition between 90 degree surfaces. A lot of fudging at the stern and bow.
This also will probably have to set. It'll get a medium grit sanding to smoothe and even it out.
What's going to tie this together?
Measure (with a strip of paper) a length from the top of the toerail to below the new cove at the bottom.
Make this the width of the first run of some fiberglass TAPE. Tape is great, it has one continuous width and selveged edges.
(Extra thickness built up on the toerail seems a good idea...per our ghastly example of treacherously thin laminate).
Maybe some 4" wide and 3". A series of widths to amalgamate this sculpture together.
Then drill 1/4" holes thru into the toerail and into the hull, maybe in offset pairs. Probably counterbore the heads flush with the top.
Placing these holes is going to be a PITA, every hole will have to be planed.
The tapes you are using create the line and limit of the sheer on the hull. This could be emphasized or
could be faired away by grinding after set. Remember this expanded structure will make shadows that might show hiccups.
Layer different widths on top of each other. Always keeping them in line. Some suggest pasting narrower tapes on first, and gradually wider.
Others say the other way. Experiment, it depends on your technique and the tapes you use.
How many layers? Depends on weight of cloth...3 - 4 - maybe 5 ?
The tapes might be applied in say five foot strips that are wet out first on the work table. Subsequent layers staggered at joins.
After set, grind and sand, fill and fair til it appears to be part of the original boat
If the hull is painted, why bother to imitate gelcoat? Prime and fill with white epoxy primer & paint. Finish the new standoff with hull paint.
Depending how well it comes out,
screw on a nice rail of mahogany or teak. Rout out the back of the rail a bit so that the wood hugs the standoff and doesn't get peeled off
when you're rail down. Drill some small vertical drain holes close behind the wood , not too close to the hull. Flat or rounded, varnished or plain, it'll be gorgeous and strong.
This is merely a bunch of ideas, not a plan of attack.
I agree that if a 50 year old production boat is planed for a voyage, and if it is known to have problems in any major structural area, the
problem has to be taken care of. Ideas lead to other ideas and so forth. No exuses for BSing!
Last edited by ebb; 11-16-2013 at 08:01 AM.
Ebb wrote:
The pictures are not very clear so it is not easy to verify if the 90 degree turned lip is the weak spot. It certainly is possible. Assume that is the case, I still think that stronger internal tabbings could have saved the boat or at least minimize the extent of the damage. I looked up some of the east coast Triton hull deck joint internal tabbings they appear to be much more substantial. The following pictures come from Tim Lackey's Day Sailor Project website. I "borrowed" the pictures because they are the most clear and relevent that I can find (hope Tim does not shut me off from his websites:-)"OK, so when you look at the photos, the lips coming together wasn't where the separation occured. In this case it tore apart at the angle where the deck flange turned. Easy to see that it was the flange turn that zippered. Probably because the deck is not as strongly laminated as the hull.
So can we agree... the weakness in the join is not where the two flanges come together - but where the two flanges are forced to make hard right turns. One thing we know is that fibeglass doesn't like point loads and doesn't like sudden changes in thickness. The glass fibers in the apex of thse tight turns might be broken. If this is correct, then the sudden out turn of the deck and hull flanges are a weak construct. The way the boat came apart is the clue."
Tim wrote,I discovered that the upper part of the hull was surprisingly thin. Discounting the thickness of the tabbing that had been used to secure the deck and hull together, the upper portion of the hull shell at the gunwale was only about 1/4" or so. The thickness in the bottom, where visible around old through hull installations, is about 3/4". These thicknesses are substantially less than what I have found on #381 Glissando--I found about 5/8" of glass near the gunwale on the port bow when I installed a holding tank vent fitting there, and anywhere from 3/4" to 1-1/4" of glass in portions of the bottom. In the photo, you can see the line between the tabbing and the hull shell, and my finger is there for reference.
Tim is lamenting the thickness of this particular Triton's hull here but we can infer that the tabbings must be close to 1/4" on this particular Triton since they appear to be about as thick as the hull. Although I have not openned up the joint tabbings on Blossom I am fairly certain they are not 1/4" and at several spots they are not even properly bonded to the hull. I will report back once I have had a chance to open it up.
As for the repair I am leaning toward stronger internal tabbing approach, combined with eggcrate idea that Ebb proposed. My main reasoning is that I really hate to take off the mahogany rubbing strakes I installed a few years ago to strengthen the joint from the outside. They look nice and they are functional. Any external tabbing would also be harder to fair and repaint as they would have to be near "perfect". I don't mind taking out the internal shelves and cabinets since I am not too thrilled with them anyway. Taking them out and reinstalling new and stronger shelves and dividers properly tabbed to the hull would make the entire hull deck joint region a lot stronger. Anyway you look at it it is going to be a big job.
Last edited by Triton106; 11-15-2013 at 11:01 PM.
Well, of course, if the joint can be reinforced from inside, that is the best way to go.
It's probably, also, the messyest, dirtyest, dustyest, most awkward and time consuming way to go.
BUT, some people, like me, have a knack for doing things the hard way. You too, huh?
So, you'll still be using glass tape. but not necessaryly. If your're interested, a couple dimes' worth:
Have succesfully over the years used an E-glass (cheaper than S) product called Xmat.
This is a double bias (Biaxial) NON-woven (non-basket weave) cloth with a thin mat backing
held together with very light stitching.
Reinforcements are plain flat ribbons of fibers laid at 45 degrees to the length of the roll.
A second layer of the same under the top layer crosses the other way. Not woven.
The stitching runs lengthwise with the roll. There is a thin layer of mat on the B-side. Can't wet out the cloth from the mat side.
This material usually comes in heavier weights because of its construction.
It is, however, much stronger than woven cloth of same weight. Glass fibers get crimped as they interweave making woven fabric not as strong. There are less fibers in a given area than biaxial - and therfore more epoxy tends to be used in hand lay-up- which makes it more brittle.
Biax is more fiber compact, yet wets out very easy.
The bias lay-out of the cloth off the roll means that 100% of the biaxial fibers cross a seam. Compared to 50% in woven cloth.
Bias tape also has the fibers at 45 degrees. Comes in various widths from 1/2" to 12". Most common are 4-6-8-12" in 12oz-18oz-and 24oz.
These weights make for a rather stiff material as it comes off the roll. Easy to handle, doesn't pull out of shape like woven stuff.
Biaxial tape is unselvaged. Woven cloth tape has an unravelable edge on both sides of the roll. It is very convenient and precise to work with.
Biax needs a light touch when wetting out with epoxy. Can't worry the cloth at all. The brush will start pulling stitching out. Quickly making a mess.
However, with a pliable plastic spreader held at a low angle you can quickly saturate a flat piece. At the same time dragging excess liquid off the cloth. Then pick the wet piece up and place it on the hull (in this case) with hardly a how-do-you-do. Use gloved hands to press the wet fabric onto the hull. Liquid epoxy does not run out of this stuff.
(90% ispropol alcohol from the drug store and paper towels will cut epoxy off nitrile gloves better and quicker than the toxic canned stuff.)
I'd forget the tape and cut strips off a 50" wide roll. Inside the boat it's about the right length to wet out.... and put up.
Bi-metal utility blade pulled along an aluminum edge.
Custom widths is cool. It's exactly the same stuff as the tape - and probably cheaper.
If carefull you'll be able to wet out the pieces on the flat (settee?) Pick one up and place it accurately over the seam - and press it on with the hands - but only ONCE, because you will start picking op threads and getting strings everywhere. Just leave them alone til dry.
You can use pieces of seran-wrap or wax paper to push this very conformable-when-wet material into crannies, around protrusions and turn corners. the film creates surface tension which helps hold the biax in difficult situations. Leave the surface tension where you've used it......it peels off after set.
(Not all plastic film is polyethylene, so watch it, some films will get glued!
A cheat I've had to use at times while laminating is to have some epoxy gel mixed up, paste it on with brush or spreader
to smooth out depressions or fill holes that the wetted cloth wants to bridge. Always use slow hardener, which may be too fast anyway.
Sorry about waxing this subject on$on..... while I know you know how to do this sort of thing
.....but for newbies who maybe can use a few tips. Opinions.
Working inside a boat means using the cleanest epoxy you can find. I use 100% solids (no solvents) low VOC, 2 to 1, premium laminating epoxy from a local West Coast brick$mortar. Haven't bought WestSystem epoxies for more than a decade - they may have cleaned up their act, but I doubt it. If I had to buy epoxy on line I would buy it from smaller outfits who keep their customer's interest foremost.
My stuff is now over $200 for 1 1/2 gal two part. It's not green, but it's clean: no solvents, no formaldehyde.
Imco two layers of 24oz biaxial with a cosmetic layer of 10oz woven cloth to finish would be more than adequate.
I did not do this for A338 - the toerail is filled in and a single layer of 12oz biaxiel Xmat was used as tabbing to finish it off.
Ariel cabin liner does not go all the way to the hull. making it easier to tab the angled connection of the filled toerail to the hull.
Any weight of wet biax glass is conformable.
.................................................. .................................................. .................................................. ................................................
It seems probable that the long rip at the seam of the Triton VentoDea was caused not only by the weight of the comber,
but by the whole boat getting twisted for a second or two. Twist a banana and it'll probably pop open at a skin seam.
.
Last edited by ebb; 11-16-2013 at 05:29 PM.
Hey Ebb, twisting a banana could do it. In addition, it may have been picked up by the freak wave and body slammed on solid water (is it an oxymoron?) I read somewhere that is how Humphrey Barton's Vertue XXXV cabin house was partially torn open. When a boat is body slammed down the force from the impact seeks the weakest link to release the absorbed engergy. In Vertue XXXV's case it is the cabin trunk and deck joint because it is a wooden construction and is fasterned to the deck by mechanical means. In a fiberglass boat like Vento Dea the cabin trunk is molded as a part of the deck so its weak link is the hull deck joint.
Thanks for the tip on biaxial tape that is exactly what I intend to use. It is alot easier to handle than the standard woven cloth tape although it will still be one messy job. Something I am not looking forward to.
I went to my boat today and took some pictures of the existing internal tabbings on Blossom. I focused on the anchor locker and cockpit lazerette areas since the access there are better than the areas behind the cabinets and shelves in the saloon. The first four pictures are from the anchor locker. Please ignore the rusty screws which I know I should have replaced long ago, but hey we are all human beings. I want to point out the obvious that what we can see in these pictures are the final layer of the tabbings. We don't know how many layers there are or how thick they are or how well they are bonded to the hull and deck. What you can see however is that the final tabbings in the second picture are not bonded to the deck properly, probably due to the deck stringer being in the way. The G10 backing plates and the machine screews and nuts are for the bowsprit I added recently to fly a code zero in light conditions.
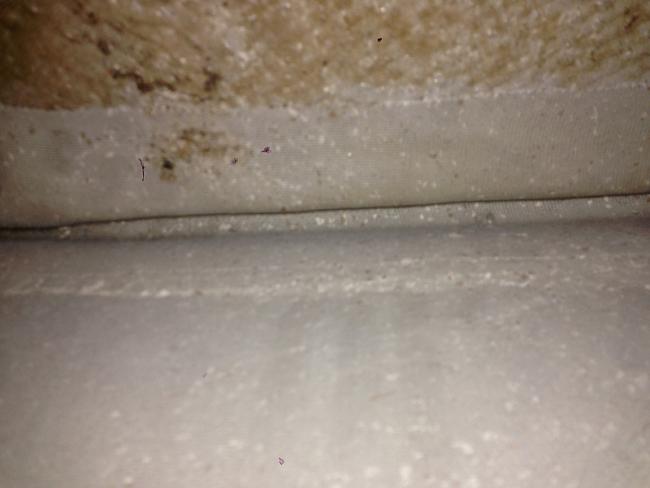
Last edited by Triton106; 11-16-2013 at 10:40 PM.
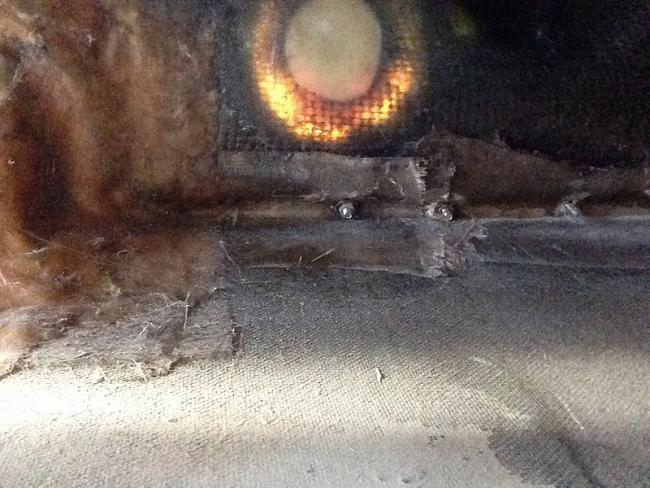
The next four pictures are from the port and starboard cockpit lazerettes. Please pardon the fuzzy quality of the pictures as it was hard to steady the hands to take pictures upside down in the lazerette. As you can see the tabbings in these areas appear to be different than the ones in the anchor locker. For one thing they are not painted. My speculation is that they were added afterward by a PO who clearly needed a little more practice with fiberglass work. The workmanship is not something I wish to emulate. The bonding to the hull and deck are very poor. I will probably have to grind down this area all the way to the hull and deck which is not a bad thing as it will provide me with some clue as to how many layers of tabbings were used and how thick the total tabbings are in this area.
In the Ariel that has me, the predominant factory fabric is mat and woven roving (an irish lament)
When you grind the paint and gunge off the original polyester, revealed is a greenish tone to the plastic. And the the sweet smell of styreen. Epoxy has an amber look sometimes and isn't sweet smelling.
You can recognize the roving by its huge basket weave, and the mat by its translucent and messy look, usually where a prospective boat buyer won't be looking.
The forepeak has some nice work in it - both the factory's and the PO's backing plate.
The backing plates in A338 were easy to recognize squares and rounds of Ariel laminations - all about 1/4" thick.
The Ariel had backing for cleats and hardware. Looks they they forgot plates in your Triton - the bolts do look long enough!
If those rusty bolts are 50years old, they are in great shape! If they are replacements, they
are an inferior grade of stainless like 304. But the rust may be caused by the nut and/or washer being a different grade of steel.
Some of those old repairs look OK, but others look like hurry-ups. Handiwork looks like several different PO's or yard worker's. Some look like epoxy, some polyester. If they are polyester you can probably slip a sharp chisel under an edge and almost pop it off.
If epoxy you might do the same, or at least separate the new from the original with more persuasion.
Can guess there was little prep done previous to pasting the tabs on. Chiseling them off, you'll find, is a lot more fun than grinding. Watch it tho, a sharp chisel can also find a cloth seam in an old Pearson lamination....and before you know it you're peeling the hull!
If you seriously are going to grind on the boat, you have to have tools that aren't going to kill you.
The dust you create will do that. Recommed you cough up some serious cash and get a Festool vacuum, top of the line.
With that get one of their side grinders and also a heavy duty 5" sander.
You have to buy their system, including their sanding disks.
I used a Festool sander for later work in the boat to sand off paint and lamination ridges. The old polyester is tough stuff.
The system draws dust in thru the tool, into the vac, which has a HEPA filter.
You can cook a turkey dinner right next to someone grinding fiberglass. You can work in your boat without a mask ! !
Your tool is wired to the vac - pull the trigger and the vac goes on - release it and the noise shuts down. I see them in the boatyard these days. Fein vacs and tools are a distant cousin to Festool, I wouldn't bother, and they cost too much as well.
The large Festool vac has a huge capacity. You can have the vac in the boat with you, it won't throw glass particles out its exhaust.
Since I'm a curmudgeon, I find the level of German engineering very impressive, but irritating. The worst work on the boat you'll ever do is the prep on the hull.
If you have kids, you'll be leaving the Festools to them in your will. I borrow from the shop at the vineyard here. I've never heard of a problem with any one of them. Treat yourself, your lungs will love you for it!
Would try to forensic the reasons for the obvious repairs in the lazaret.
If you find your hull/deck join is in trouble, and you embark on sealing the seam with tabbing,,,,you will have places you can't get to inside.
I would get an osilating tool with a plunge blade and ream the seam in those places from outside. And refill the seams with epoxy or rubber bonding adhesive.
Last edited by ebb; 11-17-2013 at 06:20 PM.
Quite possibly the worst job one could undertake on these smallish hulls. Dirty, hot, poor visibility, nearly impossible angles, all compounded by the need to achieve adequate surface preparation so your glass job isn't just a recreation of the previous, marginal job. But do it. You will have all that much more confidence when it comes to one of our boats major flaws. Confidence, or maybe prudence is what we are gaining here, because as you pointed out many of these boats have travelled miles without incidence. Furthermore, any other job you will need/want to do on her afterwards will pale by comparison. Ebb's technique in post #53 would be a great way to address the seam and get the beginning of a sexy rub-rail.
Ebb brings up a point not often enough addressed. Pay for the quality tools up front. This job, done properly, will take three or four times longer than you anticipate (unless you are a veteran at this stuff). I opted for the grind and clean method that involved suiting up in tyvek coveralls, bandana, full face respirator, hearing protection, crawling into the worst spot, grinding until I was either out of breath from exertion or it just got so dusty I couldn't see. then try to climb back out after squirming around into a position completely incompatible with the orientation necessary back out of the route taken in, blow off with a compressor making absolutely sure NOT to wipe any sweat or scratch any itch. Take a quick minute to muster the will and then go back into the mess with the extended shop-vac hose to pickup as much dust as possible. Then if you need a closer look at the area give it a good washing with a simple green solution to see if you're going back in with the grinder or acetone. I may have left out a step or two but you get the picture. It is hard to justify the cost before hand, but, if you are going to do more glass work or modifications it will pay off in the end.
As you are probably well aware of, this site has a wealth of knowledge in its threads. even though some of these threads have been quiet for a year or two, this group was so far ahead of its time the information is just as relevant today as it was then.
My home has a keel.
Thanks Ebb, Tony for your timely encouraging words. I just come back from a couple of hours of grinding the worst tabbing job in the Triton history. I was wrong about the tabbings being done by amature PO's. They were done by amature Aero Marine employees! I looked at another friend's west coast Triton (belonging to Rob Heggen). It turns out that the tabbings in his lazarette look similar to mine (i.e. same material and not painted) except his tabbings are done 100 x better than mine and looks the way they should be. Seems like I drew the short straw on the hull deck tabbing.
I figure if I am going to go through this dreary job I might as well start as soon as possible. No sense postponing the inevitable pain. Here are some of the photos I took while I was goint through the port side cockpit lazarette. Starboard side tabbings are in similar albeit somewhat better shape. I noted three types of tabbing problems in Blossom. Firstly, the outer layer is waved cloth. At times they are barely attached to the hull or deck. There is no dbout they have no holding power whatsoever. Secondly, the inner layers are woven rovings that Ebb mentioned above. There are a few spots where I can tell that there are air pockets behind the rovings. I am not just talking about the air pockets in the recess of the toerail. You can see in some of the pictures there are circular shaped voids in the tabbings. Those are results of air pocket after the tabbings covering it has been ground out. Lastly, you can see that the overlap between the tabbings and hull and deck are marginal in my opinion. In some places the overlap is only an inch or two. As for the thickness of the total tabbings I was not able to determine for sure. It appears that there are a couple layers of rovings at least in the lazarette area which is a lot better than I thought. I would like to add two layers of 6 and 8 inch biaxial tape with adequate overlap.
I appreciate the tip on proper tools. I never heard of Festools before Ebb mentioned it. I have not decided if I will get them or not as they are expensive. One question I have is what tool you used and how you grind out the recess under the toerail. There is no way to get into it with an angle grinder. I have not address it. I was thinking of using Dremel tool with some type of sand paper or grinding stone but they don't seem to be the optimal solution. I would like to use something a little more powerful. Any ideas will be much appreciated.
Last edited by Triton106; 11-17-2013 at 07:42 PM.
 Posting Permissions
 Reply With Quote
