Almost time to launch. I have a pretty long list of projects for this off season. I'm just about done. Here are a few highlights
Remove outboard well
Install cockpit scupper sea cocks
Install new nav station with cooler
Install all new electronics including:
Autopilot
AIS Transceiver
Wind, speed & depth
WIFI NMEA
LED courtesy lighting
LED lazzerete and engine compartment lights
Ipad interfaced with WIFI NMEA string with charting, routing and instrument display capability
Almost forgot - New winch pedestals. The old wood ones were clunky and were starting to split at the seams so I made new ones from 3/8" Aluminium. I had a local shop cut the pieces with a water jet including the Commander logo. Then I curved the upright piece with a press, welded the piecestogether and spent a couple of hours grinding and polishing. They are a little rough around the edges but are functional and an improvement over the wood blocks.
I'm aware I'm repeating myself, but you do terrific work and you saved a wreck of a boat and brought her back to life. Warms my heart!
Those winch stands are epic. I missed the May posting of your nav station - which like everything else is top shelf.
Cheers to you and Grace - GG is quite a gal.
These are really handy and pretty easy to make. A nice addition to any Commander or Ariel. They just pop on the combings and you can move them wherever you like - inboard or outboard. All you do is run a piece of 8/4 mahogany stock through a table saw with a dado blade set a little wider than your combings. (it might take a couple of passes) Cut the top piece with a hole saw and a scroll saw and the bottom piece with a table saw. Clean up the edges with a router, glue the three pieces together with epoxy, a few coats of varnish and voila - can holders that look like they are original equipment. A made one large enough to hold a wine bottle and also a removable cockpit table.
Here is one idea that solved several practical issues on my Commander: stairs to the interior; a seat for my new nav station; and storage for my hatch boards. I came up with a fairly simple plan that solves all of these issues. I made a box with a removable top to store my hatch boards. The box slides into guides screwed into the front face of the setees and doubles as the top step and a seat for me when I am at the nav station. The lower step drops into wooden brackets screwed into the setees and is easily removable. The box and lower step slide out so I can access the engine compartment. It works great and was pretty easy to make.
The box and step in place with hatch boards stowed
Hatch boards stowed
The box removed for access to engine compartment behind stairs. Note storage for cup holders built into the nav station.
I've been adding a few improvements to Gail Grace this winter. I removed the original sink when I added the cooler and the nav station last year. This winter I reinstalled the sink and some storage with a removable cutting board forward of the starboard bulkhead. Just for laughs I installed a wine/booze bottle storage area in some dead space port aft. I can access it from the cockpit and the port quarter berth.
Course Correction
I decided to make a new rudder. The old rudder was perfectly fine however, the aperture was too small for the feathering prop I wanted to install. Also, I felt too much correction with the rudder was necessary in moderate to heavy air. I hate to mess with the original Alberg design. It is elegant and compliments the lines of the boat perfectly. However, I suspect my boat may have been delivered with a taller than standard rig. (Perhaps it was a Great Lakes light air modification.) My P measurement is 1′ longer than than standard. Seat of the pants engineering led me to decide I needed to add 15% additional surface area on the trailing edge to help with the increased main sail area.
Initially I planned to open up the aperture and scarf some wood to the trailing edge but this stared to look too hacked together.
Abandoned Modification
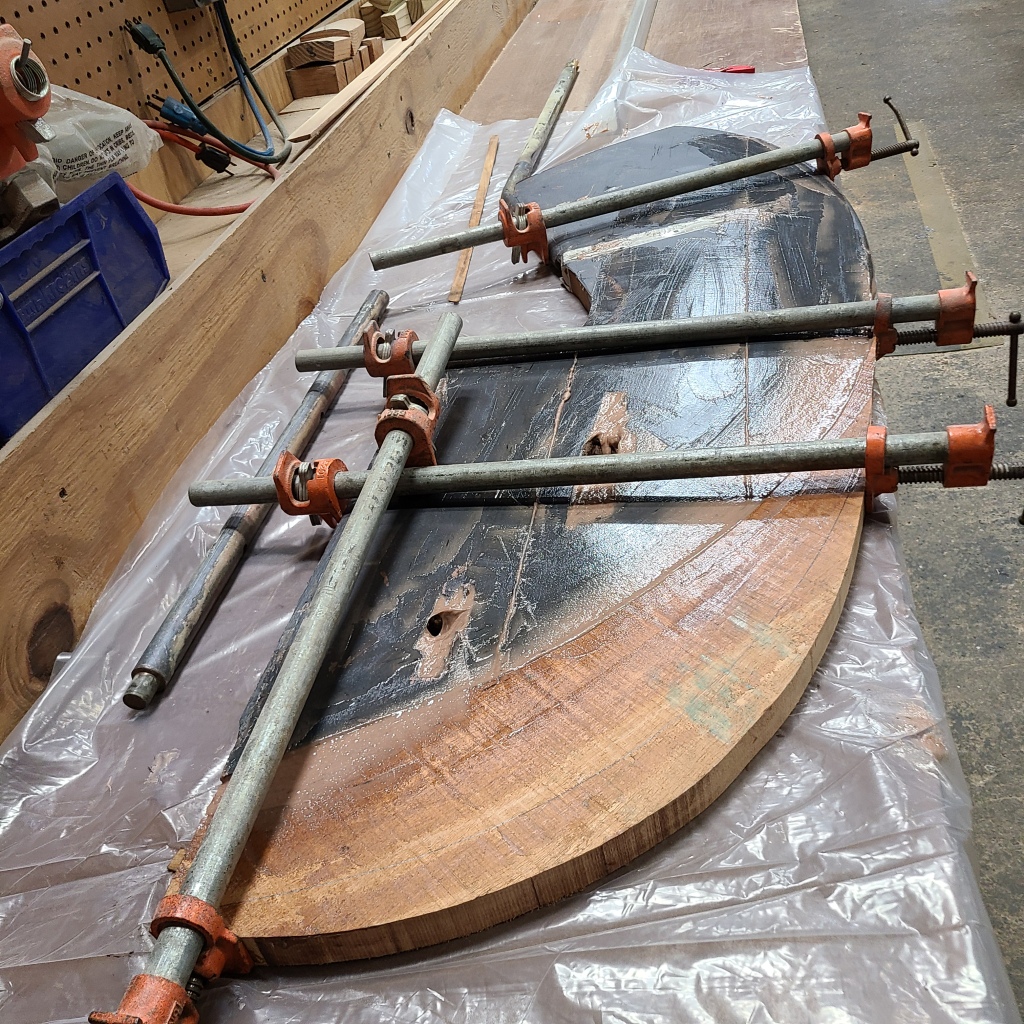
Back to the drawing board. remove the original bronze shafts and build a new rudder. Luckily I happened across a 6/4 x 24″ mahogany board that would allow a one piece replacement. It is a testament to the quality of the bronze that Pearson used that, after almost 60 years, when I removed the nut access windows, the bronze tie rods unscrewed like they were assembles yesterday. Once removed, I used an induction heater to heat up the upper shaft and bend it back 30 degrees to allow for the larger aperture.
Next step is to make a template for the new rudder. I installed the new prop then made a Masonite blank and experimented with shapes that cleared the new prop, had the additional surface area, and looked like they belonged to this classic design.
Once I decided on a shape I cut the plank to the new shape, ran the leading edge through a router with a 1″ rounding bit to accept the upper and lower shafts, drilled holes for the tie rods, then using a 1 1/2″ hole saw made windows for the new nuts.


 Reply With Quote