+ Reply to Thread
Results 1 to 12 of 12

Thread: Chain Locker Ideas

  1. #1
    Join Date
    Jan 2004
    Location
    Scarborough, Maine
    Posts
    1,439

    Chain Locker Ideas

    I didn't find any thread specifically addressing this, so thought I would start one for collecting ideas. Here's mine - I'm the lucky recipient of a boat whose PO had some skill. I like the anchor cut-out which serves as ventilation too.

    I think the pics are pretty self-explanatory.

    Name:  DSCN5486 (Small).JPG
Views: 1494
Size:  36.2 KB


    Name:  DSCN5492 (Small).JPG
Views: 1009
Size:  28.9 KB


    Name:  DSCN5490 (Small).JPG
Views: 992
Size:  31.5 KB

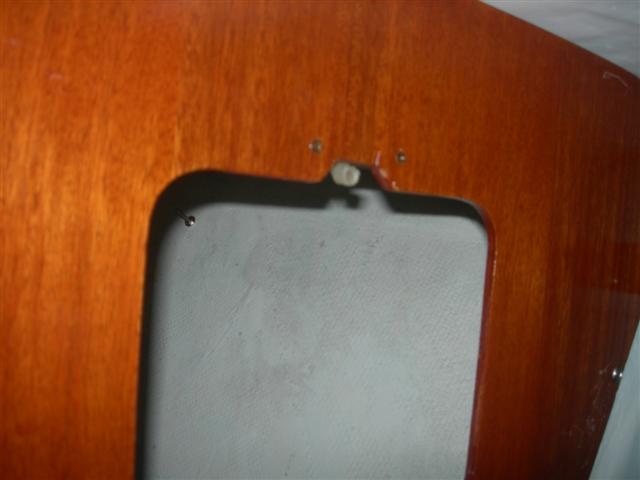
    The back side showing the wood cleat at the base and the attachment doohickey on top.

    Name:  DSCN5491 (Small).JPG
Views: 990
Size:  36.9 KB

    A blurry close-up of the receiving part of the doohickey.

    Name:  DSCN5488 (Small).JPG
Views: 917
Size:  27.8 KB
    Last edited by mbd; 11-20-2011 at 03:51 AM.
    Mike
    Totoro (Sea Sprite 23 #626)

  2. #2
    Join Date
    Sep 2008
    Location
    Brooksville, FL
    Posts
    720
    Mike

    I have always liked the looks of your chain locker. I like it even better now when I see how the access door is held in place and works. Thanks for sharing that. I may attach my access door in a similar fashion.

    For Destiny's chain locker I decided to modify the bulkhead to enclose the top and help to strengthen the deck in that area. You can see the picture of the bulkhead below. Then I made a new access door and the attached PDF file (at the bottom called The Journey) is the design for what I plan to do to the door. Not sure on the font yet but that is the basic design.
    Attached Images  
    Attached Images
    JERRY CARPENTER - C147
    A man can succeed at almost anything for which he has unlimited enthusiam.

  3. #3
    Join Date
    Jan 2004
    Location
    Scarborough, Maine
    Posts
    1,439
    Quote Originally Posted by Commander 147 View Post
    ...I decided to modify the bulkhead to enclose the top and help to strengthen the deck in that area.
    Jerry, as always, that's a great improvement.

    My PO also made coverings for the foot level openings in your pic the same way, with a cleat on the lower edge. But to secure the top of the cover, there are little wooden "latches" that you rotate over the top edge to hold it closed. To pull them off, there is a little finger hole in the top center. I don't know if I explained it very well, but the design is really very elegant in its simplicity.

    I like your bulkhead decoration too. A while back someone on the Plastic Classics forum posted some pics of a table decorated with an inlay that his Dad made for his boat - I liked it so much I saved it to my "ideas" folder...

    Name:  DSC00586.jpg
Views: 1849
Size:  42.1 KB

    It would look great as well, on say ...a chain locker bulkhead. Don't ya think?
    Last edited by mbd; 11-18-2011 at 06:00 PM.
    Mike
    Totoro (Sea Sprite 23 #626)

  4. #4
    Join Date
    Sep 2001
    Location
    Northern MN
    Posts
    1,100
    Mike, I think Sea Glass is just one classy sail boat. And I like your "eye" when it comes to grabbin' pics off the net for ideas.

    Is "The Journey" going to be inlay, Jerry? I see a cutting board and a roller cutter setting i your v-berth. I've seriously consdered some inlay design but have zero experience doing it. I have about 10 years experience as a screen printer and have considered doing that in lieu inlay. If you have any tips or references for picking up inlay send it my way-we are just starting the loooong cooold-d-d winter...ick
    My home has a keel.

  5. #5
    Join Date
    Apr 2007
    Location
    Grand Haven / Muskegon, Michigan
    Posts
    614
    I'm all over copying this job over the winter. Thanks!

  6. #6
    Join Date
    Sep 2008
    Location
    Brooksville, FL
    Posts
    720
    Quote Originally Posted by mbd View Post
    It would look great as well, on say ...a chain locker bulkhead. Don't ya think?
    Mike

    Yes I do think it would look great on a chain locker bulkhead. With the text it might not work as well but it is absolutely a classy look.

    Tony G

    The compass design will be an inlay but part of the reason I have not finished that access door yet is because I have not decided how I want to do the text. I have considered routing it in and then filling the recess with gelcoat and sanding it smooth which would stand out really good against the mahogany panel. I have also considered raised letters which would be a lot of work but I think it would look good also. Do any of you guys have suggestions for me for doing the text?

    Tony as far as tips for doing inlay goes I use a special template guide and a matched router bit. First I make a female template of the shape of the part I want to inlay. Then I use the template to cut the actual part that will be inlayed. After that I use the same template and install a collar on the template guide that offsets the router bit by the diameter of the bit itself. Then I route the recess for the inlay to go into. By using the same template to cut the part and the recess the part is going into you get a perfect fit. Here is a discription of the process I found on the web.

    http://www.newwoodworker.com/rotrinlays.html

    Kyle

    When you copy Mike's access panel you do plan to show us pictures don't you????????????
    JERRY CARPENTER - C147
    A man can succeed at almost anything for which he has unlimited enthusiam.

  7. #7
    Join Date
    Jan 2004
    Location
    Scarborough, Maine
    Posts
    1,439
    Looking forward to seeing more projects on "The Dog", Kyle!

    Jerry - what if you made a nice cockpit/cabin table, i.e. larger and more room to work with, then your chain locker bulkhead becomes the storage spot/display area? You could put a simple curtain behind it so when you're using the table, the chain locker is still concealed. Maybe cut a couple of round vents in the areas not covered by the table so the chain locker could still breathe when the table is stored...
    Mike
    Totoro (Sea Sprite 23 #626)

  8. #8
    Join Date
    Sep 2008
    Location
    Brooksville, FL
    Posts
    720
    Mike

    Actually I really like your idea. A small moveable table that could work in either the cabin or the cockpit and still be completely out of the way when stowed is a great double duty use of something you need anyway. I need to give that some serious thought. Thanks for the idea.
    JERRY CARPENTER - C147
    A man can succeed at almost anything for which he has unlimited enthusiam.

  9. #9
    Join Date
    Apr 2007
    Location
    Grand Haven / Muskegon, Michigan
    Posts
    614
    Hey Mike,
    Is the cleat (in the fourth picture in post #1) just epoxied in place? And, is the "doohickey" a piece you've seen in a hardware listing somewhere? When I had seen this before without the exploded view, I hadn't imagined a doohickey - just intended to design the back of the removable face to be just like the in-and-out configuration of the outboard well cover on the stern bulkhead. (I don't have a back view of that piece in my picture collection)
    KW

  10. #10
    Join Date
    Jan 2004
    Location
    Scarborough, Maine
    Posts
    1,439
    Cool Jerry! I can't wait to see what you come up with - it'll be very nice I'm sure. Right now, my intent is to rig up stowage for my table on the ceiling of the v-berth like the Albin Vegas.

    Kyle, I haven't really looked for the "doohickeys", but I'd wager you could find something suitable at a store that sells cabinet supplies. (?) It's really just a simple plastic knob that snaps into a receiving plastic piece.

    Here are a couple of pics of one of the covers for the foot level storage areas in the v-berth. It is made from .25" plywood and measures 19.5" x 9.5".

    Name:  DSCN5530 (Small).JPG
Views: 814
Size:  26.0 KB

    There are 2 spongy gray pads on the top corners (weather stripping?) to keep it snug and rattle-free when in place. A little wooden lever is installed above the center of each of the covers on the footwell bulkhead that just flip down over the top edge of the covers when they are in place.

    Anyway... all of this was really just to show you another cleat! As you can see, THIS one has a couple of bronze screws for a little extra support, but they are really held on there with glue.

    Name:  DSCN5532 (Small).JPG
Views: 898
Size:  62.7 KB

    (Those are bite marks on the back. A squirrel found its way inside a couple of years ago when I was doing the recore, wreaked havoc and had babies in one of the v-berth storage ares. This is one of the good covers - the others didn't fair so well...)
    Last edited by mbd; 11-30-2011 at 07:53 PM.
    Mike
    Totoro (Sea Sprite 23 #626)

  11. #11
    Join Date
    Jan 2004
    Location
    Scarborough, Maine
    Posts
    1,439

    Variation on a theme

    Here is a pic of another chain locker (Triton 318) that was posted on another forum:

    Name:  Triton318chainlocker.JPG
Views: 806
Size:  25.5 KB
    Mike
    Totoro (Sea Sprite 23 #626)

  12. #12
    Join Date
    Apr 2007
    Location
    Grand Haven / Muskegon, Michigan
    Posts
    614
    Maybe it goes without saying, but I like your configuration much more.

+ Reply to Thread

Posting Permissions

  • You may not post new threads
  • You may not post replies
  • You may not post attachments
  • You may not edit your posts