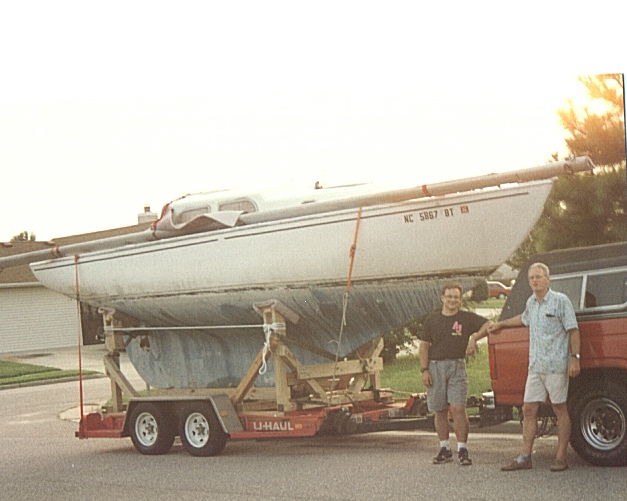
Many moons ago I helped A-243's Capt move her. It might have found great favor in Rube Goldberg's eyes.... but it worked.
The boat was loaded with a travel lift, but to remove it we anchored the trailer (with a danforth) and used bottle jacks to lift the cradle and place short pieces of black iron pipe under if. We then lowered it onto the pipe and SSSSSLLLLlllooooowwwwlllllyyyyyy...... drove the trailer out from under it. The cradle was then blocked as it rolled clear.
Not recommending anyone try this at home, just saying it is possible.
I finally got the backstay chainplate knee epoxied in and will follow with glass layup. I performed an initial dry run and marked where the five bolts will be. I then drilled these locations out to 3/4 of an inch and filled with high density epoxy (now seen in the photo). Later when I conduct the final mounting and bolting in of the new chainplate, I will redrill through the epoxy and glass, thus sealing off the Okoume marine ply from any potontial water intrusion. For me, I can finally say I have made a bit of progress in the right direction. So far I have been grinding, sanding, probing, and the likes.
Commander 227: I posted a reply to your gallery page, in regards to extreme interest in the hinges, clam shell ventilators and any gasket you can salvage. Thanks, Chance Smith, 472 N. Trotman Road, Camden, NC, 27921
Craig, Amazing! Can see that a longer frame might have made bottle jacking easier. Must have been a bit hairy... have to write the book on the subject!
Nice clean filleting there, Chance!
Years ago I found my favorite fillet tool in a take-one bucket at the Buttercreme Bakery in Napa.
It's a bit small, a precise piece of plastic maybe a little bigger than 2 1/2" square with a different radius on each corner. Translucent plastic like nylon with very SHARP edges that drag very clean coves. Never understood why a bakery would give away something like this or what anyone who bought their jelly donuts there would need one for.
No plastics supply store has anything like it.
Okay, the cockpit has seemed to shrink. Competeing for the same space, my little body, masses of tools, and related stuff, shop vac, trash, and everthing else! Someday, I too, will be able to enjoy the breadth of the Commander's cockpit, but for now, I'll just be contect on working on her and putting new life into her.
Ebb, Thanks for the compliment. I know exactly what your talking about. The "special tool", though I have several, they don't have a great history as yours does. For me, it does pay to know when to stop fiddling and leave the fillet well enough alone. The more I mess with them, the worse they seem to get. The right consistancy of the thickened expoxy is a big factor as well.
Respectfully,
Chance
Here's another view. The axles are each rated for 3500 pounds, for a 7K total GVWR. I utilize a weight distribution hitch and load the tongue upwards of 800 pounds (safely only possible with this type of hitch system). The keel rest on 2 1/2 inches of treated wood, instead of dirrectly on the iron channel. If I were to weld all the tubing and braces again for the screw jacks, I would have made them six inches shorter, well at least the amidship and forward ones. The aft, I would shorten only four inches, as I already have threads exposed. She towes well. Now it's semi permanently parked, waiting for her vessel to play catch up with some much needed TLC, and structural repairs.
Here is the knee glassed in. Today, I filled the weave with unthicked epoxy and also worked in other areas of the lazarette locker playing recovery from the myriad of holes PO's put in her.
Hello folks,
Yes, it's been awhile, I know. One would think that lively in N.E. North Carolina it would be epoxy working weather year around, but..... it's been cold these past couple of months. We'll in the low 40's and 30's, which makes me resort to planning and waiting for warmer weather to press on with my work in store for "Ceili", Commander #256.
Attached is what I have elected to do to modify the forward bulkhead. I choose to bridge the top to for a couple of reasons, I believe it gives a more finished appearance and like the profile better, and secondly it provides a source to reinforce and further stiffen the foredeck area.
I have been addressing other areas as well....like filling in the old cockpit instrument holes following the removal of said gear, filling in holes in the hull left by two transducers I have removed, as well as a garboard drain.
I'll try to keep a better update for those who may be interested in my progress.
As to you all, thank you all for the continued inspiration, expertise and resource how to information. Quite frankly, the two most beautiful boats ever produced by Pearson, Commanders and Ariels.
Here's an inside view of the closing off of two old instrument holes. I tapered both sides and worked at patching from both sides. I choose this way so that my scarf taper would not have to be so big on just one side.
Very nice work Chance, It seems that bridging the forward bulkhead is so simple that Pearson would have done this to brace the foredeck. This is something I had planned on doing also. If you decide to add a Sampson post the deck is now well braced for one.
Carl,
Thank you. I believe the reason why Pearson did not do the same in regards to bridging the forward bulkhead, comes down to economics mainly. I'm sure they (Pearson Yachts) like all others build a specific model with a price point and corresponding profit margin. Easy to do, add the bridge or do it from the onset, but it takes that much more time and material for what many may consider "little gain". Just like other areas of our fine Alberg designed Commanders and Ariels, when Carl was commisioned to design a specific model, he most likely was given parameters, final production cost, being one of them. I think the fitment would have been problematic if they had added the full forward bulkhead and then attempted to lower the deck / cabin roof assembly. Look at other areas of our vessels and you'll see, and like others will attest to, where fitment of ajoining components has a lot to be desired and could have been much better.
But then there are us on this site and all those who seek to "Better" or "Improve" or are striving for the ultimate in "Attention to the Details" and annointed perfectionest that are equally talented to do what Pearson and their factory boat yard assembly builders did not do. It really comes down to "time" and "money" and they are both inter-related.
I'm sure Mr. Alberg and all the folks who contributed to our aging vessels birth would be amazed, and surprised that "our" Commanders and Ariels have such a dedicated following, with owners / Captains that desire the very best for their corresponding "sailing yacht".
To all those on this site, I salute you for your inspiration, talent and most of all sharing your expertise and thoughts.
For reasons I now would never do again, I have been addressing the rotten core under the mast step, from you guessed it, inside the cabin. What was I thinking? My next recore of any sort will always rely on gravity and working upright, if...I have a choice in the matter.
This area of my rehab has been slow going, and an adventure to say the least.
I have at this time, addressed all rotten core in the cabin roof, and am in the final stages of glassing the inner skin. Here's what I call my arsenal of "spring sticks" in use.
On A338, was lucky and only had the mast step area to redo.
But I saw then that the inside of the sandwich was very thin.
If I had to do it now I would make a version of what you have BUT as support for the thin interior layer in case it wanted to sag or tear or something.
THEN do the recore from the top.


 Reply With Quote

