


Chance
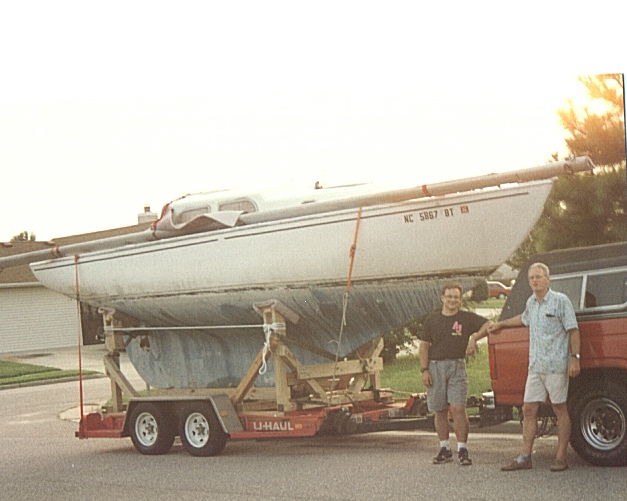
nice trailer... can we talk you into posting a drawing package?

Chance
nice trailer... can we talk you into posting a drawing package?
Originally Posted by bill@ariel231

Bill, See Post # 11 on The Mephisto Cat's thread...
http://www.pearsonariel.org/discussi...ead.php?t=1552
For trailer / Cradle dimensions. This may give you what you need...
chance & rico
i'm mostly curious about the dimensions of the frame members, the ratings on your axle setup and the tongue load of the system when ready to tow... it's getting harder to prep a boat for the season while in the boatyard (DEM talked about treating city water as a hazardous material until some measure of sanity prevailed). Building a trailer may be in my future a season or two down the road. I've already welded up a set of jackstands suitable for trailer installation.
cheers,
bill@ariel231
As a curmudgeon there are certain responsibilities that cannot be ignored.
Take the first photo in this thread.
Imagine Ceilli sitting on a FRAME with jackstands.
Imagine that frame sitting on the trailer.
A duo.
Why couldn't a transport trailer be designed for Ariel/Commanders
- and for that matter any number of 8' wide keeled sailboats -
upon which the boat on a 'standard' frame could be loaded.
How might it be loaded?
The frame would be lifted with bottle jacks - and the trailer carefully, by repositioning the jacks, backed under the frame.
With the boat on its frame - all 6000# of it - lifting and lowering would be equally..... careful.
With some development screwjacks might be permanently attached to the frame, or perhaps brackets provided for rentals to be secured. Other endless possibilities.
Wouldn't it be possible for a bunch of sailors to get together and design something like this?
This is of course only for transport, not self-launching.
Would it give versatility to storing or working on the boat at any location
and moving it to a harbor for strap launching?
If there were a single trailer made specifically for hauling A/C boats with jackstands on a frame, then that trailer might be shared by all who wanted to borrow it.
Of course who licenses it, does the maintenance and researches the codes and so forth
is another kettle.
Just an idea....
Last edited by ebb; 11-12-2008 at 08:52 AM.
Ebb,
Many moons ago I helped A-243's Capt move her. It might have found great favor in Rube Goldberg's eyes.... but it worked.
The boat was loaded with a travel lift, but to remove it we anchored the trailer (with a danforth) and used bottle jacks to lift the cradle and place short pieces of black iron pipe under if. We then lowered it onto the pipe and SSSSSLLLLlllooooowwwwlllllyyyyyy...... drove the trailer out from under it. The cradle was then blocked as it rolled clear.
Not recommending anyone try this at home, just saying it is possible.
I finally got the backstay chainplate knee epoxied in and will follow with glass layup. I performed an initial dry run and marked where the five bolts will be. I then drilled these locations out to 3/4 of an inch and filled with high density epoxy (now seen in the photo). Later when I conduct the final mounting and bolting in of the new chainplate, I will redrill through the epoxy and glass, thus sealing off the Okoume marine ply from any potontial water intrusion. For me, I can finally say I have made a bit of progress in the right direction. So far I have been grinding, sanding, probing, and the likes.
Commander 227: I posted a reply to your gallery page, in regards to extreme interest in the hinges, clam shell ventilators and any gasket you can salvage. Thanks, Chance Smith, 472 N. Trotman Road, Camden, NC, 27921
Respectfully,
Chance Smith
(Formerly) Sea Sprite 23 #760 (Heritage)
(Formerly) Commander #256 (Ceili)
Craig, Amazing! Can see that a longer frame might have made bottle jacking easier. Must have been a bit hairy... have to write the book on the subject!
Nice clean filleting there, Chance!
Years ago I found my favorite fillet tool in a take-one bucket at the Buttercreme Bakery in Napa.
It's a bit small, a precise piece of plastic maybe a little bigger than 2 1/2" square with a different radius on each corner. Translucent plastic like nylon with very SHARP edges that drag very clean coves. Never understood why a bakery would give away something like this or what anyone who bought their jelly donuts there would need one for.
No plastics supply store has anything like it.
Last edited by ebb; 11-13-2008 at 12:12 AM.
Here is the knee glassed in. Today, I filled the weave with unthicked epoxy and also worked in other areas of the lazarette locker playing recovery from the myriad of holes PO's put in her.
Respectfully,
Chance Smith
(Formerly) Sea Sprite 23 #760 (Heritage)
(Formerly) Commander #256 (Ceili)
Another area of the locker that I have been slowly making right.
Respectfully,
Chance Smith
(Formerly) Sea Sprite 23 #760 (Heritage)
(Formerly) Commander #256 (Ceili)
Now, the question is: where do I sit?
Respectfully,
Chance Smith
(Formerly) Sea Sprite 23 #760 (Heritage)
(Formerly) Commander #256 (Ceili)
For reasons I now would never do again, I have been addressing the rotten core under the mast step, from you guessed it, inside the cabin. What was I thinking? My next recore of any sort will always rely on gravity and working upright, if...I have a choice in the matter.
This area of my rehab has been slow going, and an adventure to say the least.
I have at this time, addressed all rotten core in the cabin roof, and am in the final stages of glassing the inner skin. Here's what I call my arsenal of "spring sticks" in use.
Respectfully,
Chance Smith
(Formerly) Sea Sprite 23 #760 (Heritage)
(Formerly) Commander #256 (Ceili)
congratulations on an impossible job!
On A338, was lucky and only had the mast step area to redo.
But I saw then that the inside of the sandwich was very thin.
If I had to do it now I would make a version of what you have BUT as support for the thin interior layer in case it wanted to sag or tear or something.
THEN do the recore from the top.
NICE wood for props there. buddy!
Ebb, your are so right. At times I contemplated on how I was going to tackle the recore from down under and looking back, should have kicked myself before removing the inner skin. All along it would have been so much more pleasant (if you can call the recore process pleasant) to do it from the outside.
Here is two shots of a smaller recore area I had to address due to rotten balsa core. The cause: (like so many other areas I'm taking care of) an inproperly mounted cabin top winch.
Respectfully,
Chance Smith
(Formerly) Sea Sprite 23 #760 (Heritage)
(Formerly) Commander #256 (Ceili)
Here's the assembled rudder shaft assembly. Next phase, rudder core fitting.
Respectfully,
Chance Smith
(Formerly) Sea Sprite 23 #760 (Heritage)
(Formerly) Commander #256 (Ceili)
Wow I don't know how I missed your post yesterday. But I have to agree with Ebb and Ben That the work looks great. I'm very interested in following your progress on this project so please keep us up to date.
JERRY CARPENTER - C147
A man can succeed at almost anything for which he has unlimited enthusiam.
 Posting Permissions
 Reply With Quote