+ Reply to Thread
Page 36 of 42 FirstFirst 1 2 3 4 5 6 7 8 9 10 11 12 13 14 15 16 17 18 19 20 21 22 23 24 25 26 27 28 29 30 31 32 33 34 35 36 37 38 39 40 41 42 LastLast
Results 526 to 540 of 619

Thread: Fruits Of My Labor (A-113)

  1. #526
    Join Date
    Jan 2004
    Location
    Scarborough, Maine
    Posts
    1,439
    Tony, your first toe rail mockup made me think of the BCCs...

    Name:  _mg_5447.jpg
Views: 1332
Size:  38.9 KB

    This particular one opted to go the paint-it route - looks good too!

    Name:  5659763106_88b475f112_b.jpg
Views: 1132
Size:  38.2 KB

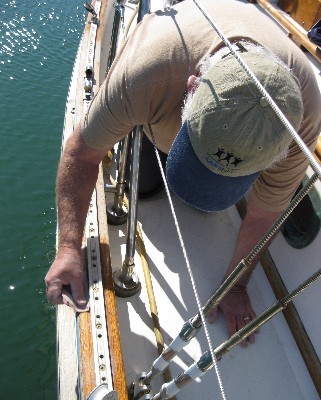
    Nice secure deck with those bulwarks...

    Name:  sideWave.jpg
Views: 1169
Size:  59.2 KB


    ...Then you pulled out those bronze rail chocks. You should definitely design around those babies!

    How about a toe rail treatment similar to your coamings? Build them up with fiberglass - you wouldn't have to worry about thru-bolting. Then, you could top them off with a nice mahogany cap so you'd still have something to varnish.

    Name:  gyatso_spring_maintenance02.JPG
Views: 1978
Size:  52.7 KB
    Mike
    Totoro (Sea Sprite 23 #626)

  2. #527
    Join Date
    May 2008
    Location
    Excelsior, Minnesota
    Posts
    326
    Tony,
    I have very strong opinions on rub rails...here, let me share them with you. If you do not agree with my opinions it is because you are wrong.
    The rub rail is there to protect the finish on your boat and act as a bumper. It should stand proud of the freeboard and be able to take some abuse. It should be something you are comfortable using. Tough. Plastic or rubber with stainless. Not pretty and fragile. You have a full keel and a small rudder, you may need to put that rub rail up against a piling to pivot your boat out of a slip. (you know it won't turn in reverse against any kind of wind.) Wanna stop in somewhere against a concrete or rusty sea wall? Fenders are fine but tend to flip out of the way when you really need them. Don't put soft wood under glass, you will crush it. Use oak if you must but know it is sacrificial and will look like crap in a few years, it's pretty hard to maintain bright work that is bolted up against your hull. Look at the plastic rub rails on the Com-PAC 27 and 35. Alot like what you have but tough and usable.
    Mike

  3. #528
    Join Date
    Sep 2001
    Location
    San Rafael, CA
    Posts
    3,621
    Nah, I think Tony should stick with the styrofoam.
    It's cheap and a pretty color and easily replacable.

    Could upscale to a WalkerBay inflatable tube type bumper.....
    Last edited by ebb; 03-20-2012 at 04:05 PM.

  4. #529
    Join Date
    Sep 2001
    Location
    Northern MN
    Posts
    1,100
    Ebb, sir. The toe rails will be unglassed and finished bright. I was thinking about glassing the rub rail to the hull, or, here's a thought, maybe just the base of the rub rail. And add the real sacrificial wood outside of that with the stainless half round cap(???) But I had intended all along to keep the toe rails varnished wood even after I decided to reduce the exterior maintenance as much as possible, or, maybe as much as allowable.

    Mike D., I really, really like the channel cutters. From the Falmouth cutter all the way up. They are the most simple and elegant in design. If there wasn't so many strikes against my adaptaion of that design I would just sell the bronze chocks and go for it. Safety and drainage. Two of the most important characteristics I'm striving for. (yeah, a smidgin of looks too)

    Mike M., Is this a classic example of bullying? You know I'll be using them. For all of those reasons and more I'm sure. What did NAs use before vinyl and rubber became common? Now don't think for a second that I think I'm an Alberg, Hess or Hinkley. It's just that I see all of these older hulls out there with rub rails for, what I imagine are the very reasons you mentioned above and I think, sure looks "shippy" but in reality it is for the added protection that I want to add to my hull. How about this, what if the rub rail is made from white oak, for destructinve resistance, bolted on with all of the same hardware isolating measures, but bedded in a flexible compound and then painted to match the hull?
    My home has a keel.

  5. #530
    Join Date
    Sep 2001
    Location
    San Rafael, CA
    Posts
    3,621

    IPE is the stuff you want!

    Tony,
    I've got some Ipe that I milled for caprail for the toerail-arks on litlgull, didn't like the profile, (another story..)
    They are quite thin and have just been hanging around - totally unchanged - under the boat.
    They aren't cracked, broken, bent, split, haven't changed color much either.

    Next door on the farm here they have an unshaded deck made from Ipe - 4X4s for the railends - steps... it all recently has been professionally oiled to give the painter some income. But the oil in recent rains I swear has washed off! Nothing soaks into ipe, it has no pores.
    But the decking grayed to a light bleached tone and showed the slightest shrinking and weathering imaginable for a totally eposed wood. No splits and the smallest shortest non-connecting surface cracks I've seen. For the time it's been there, 5 or 6 years maybe more, teak would have fried and summer wood caved, and the surface would have had to be sanded to be saved.

    Except for the color the Ipe is essentially unchanged since it was put down.

    Ipe loves water, is perfect for the marine environment, doesn't rot, doesn't mold stain, nothing eats it. It's other name is ironwood and has the brown tone of teak when kept bright and varnished, and looks like classic teak when gray. Ipe is FOUR times harder than teak, and twice as hard as oak.

    I'm still going to use it on the boat for the rub rail, partial caprails in the bow, coaming caps and samson post. It is a filthy wood to mill and rout. It's only bad side. It's harder than hell but tools beautifully. All Ipe on litlgull will be left bare.
    I think Ipe is the wood you could use BARE, no maintenance, on your topsides rubrail. And you might give it some thought for your bulwarks.
    Your guy might have it if he supplies material for decks. I found a local that has different plank thicknesses.
    So you could get your rubrail out of a single thickness - wouldn't consider gluing this stuff, maybe the scarf joint w/ resorcinol, but haven't looked into that.
    I bet that's the stuff you've been looking for.
    Last edited by ebb; 03-21-2012 at 12:36 AM.

  6. #531
    Join Date
    Sep 2001
    Location
    Northern MN
    Posts
    1,100
    Ipe would do. I can handle that unfinished teak silver color. But if it doesn't like liquids, how the heck do we glue it? I still would like to know how White Oak likes paint. I've found several web sites where owners have put on rub rails made of oak but they have all been bright wood finished. Not a painted rail in the bunch.
    My home has a keel.

  7. #532
    Join Date
    Sep 2001
    Location
    San Rafael, CA
    Posts
    3,621

    To Glue Ipe or Not To Glue Ipe*

    [TONY, this post has grown like mushroom...Tell me to remove it and I will... Really!]
    Nobody has ever glued Ipe successfully. Nobody on the woodforums knows how to use Resorcinol
    much less how to spell it. Wouldn't attempt gluing pieces together longways.
    But why we can't have a rubrail with one strip riding on top of another and mechanically bolted to the hull - it won't matter at all.
    In fact you can plan for the future renewable by just replacing the outer piece, leaving the thru-bolted stuff in place!
    Bed the bottom strip onto the hull and the second strip on top, both with butyl tape. Bolt in the first, screw on the topper.

    Another unknown is whether Ipe eats stainless (acidic) so I'd use bronze - carriage bolts for the inside rail.
    Somewhere I've gotten bronze flat-head cut-thread screws that have Frearson heads. Deep, sharp phillips' crosses that uses one special driver for all screw sizes. Frearson cross won't slip the driver bit. Could break the screw. Exposed bronze will patina, lose their bling, and disappear better than s.s.
    [EDIT. Jamestown has them, you'll find them cheaper elsewhere.]
    Bronze, being softer, will require careful predrilling, a generous hole for the threads and a separate chase for the body, plus a chamfer for the head. Tube butyl might work as a driving lube and guarantee removal later. Jamestown has a special lube with a trick name. I'm looking for oval head frearsons.

    Make the 8 to 1 scarf joints diagonal across the face of the strake. So that when we're looking for it, it will be staring at us. Don't want the other scarf that ends up looking like a fish head on top with the thin point exposed. The joint will be a good fit. I would butyl the scarf joint as well, clamp the hell of it to squeeze 95% of the rubber out. And use the same surface screws close to the joint to keep it together.

    We have choice of white, gray, and black butyl tape. If we varnish I guess go with black. Against the hull, if white, go with white. Between layers go gray especially if you're keeping the rubrail natural. But we will be squeezing nearly all of the compound out of the joints.
    We want to slightly cove out the back of the strakes that bear on the hull to capture the bedding compound. Do it to the one on top too. And chamfer all holes going thru the rail to hold compound so they won't capillary water. Tube rubber can't keep the water out better than butyl, so find ways to keep butyl in the joints. The only downside with butyl is that it stays sticky forever, so if any seam is exposed it will collect hitch-hikers.
    You may like tube butyls better, they are a thinner consistency, easier joint squeeze out, compatible with b.tape in my experience, and also tend to skin over better than the tape material which doesn't. Not all tube butyls are created equal. If interested let me know.

    That is my methodology for putting Ipe on litlgull. However WEIGHT should be considered. Here are some for durable/moderately durable softwoods. Boardfoot weight (12X12x1 OR 7.5'L x 2"W x 3/4"H - as rubrail example) - DougFir 2.75lbs, SCypress 2.8lbs, YellowCedar 2.7lbs, PortOrford 2.5lbs. Mod durable/durable hardwoods: Elm 3.1, Honduras 3.5, Philippine 3.9, Yellow Pine 3.5/4.2, Teak 4.1, White Oak 4.2, IPE 6lbs.
    A 2" wide, 3/4" thick, 7.5 foot long piece of Ipe weighs in at SIX pounds. That's amazing. And may be too much weight to add to a boat on its deck and ends. Mahagony looks like the right wood for the job, capped with a bit of Ipe ! ! ! [Boardfoot of Aluminum = 13.75lbs. Potatoes 4lbs. SeaWater 5.3lbs.] Of the softwoods AlaskaYellowCedar or PortOrford are nice dense woods to work with, and may be available in your neck of the woods.


    RESORCINOL makes a dark purple glue line. Your ipe joint will be tight, maybe it will just disappear. Make up an 8to1 scarf test piece and glue it under controlled comditions. Maybe you're the chosen ONE! And prove to us it can be done!!!
    High pressure clamping, strict mix proportions using the gram scale, The right temp - AND add a bisquit or a spline of 1/8" Ipe in edge slots joining the two pieces with the purpose of getting absolute register, less slippin and slidin - and addin more glue surface.
    Scrape the faying surfaces - taking thin micro shavings off - just prior to gluing. Right! Literally just befor glue up. Use only denatured alcohol to do a final de-oiling, defingerprinting.
    Wouldn't use strong solvents like acetone & toluene which imco can draw oil out of the wood onto the surfaces, actually contaminating them.

    If you are in a testing mode I would try Titebond III, for the hell of it, just to see if it works. White Oak too,
    Doubt it. Wouldn't use it for the rubrail on the hull. TitebondIII would leave no visible glueline. But it may also get squeezed too thin to be glue.
    Rather than a glue, Resorcinol is a chemical reaction, which is why it might not work on a strange wood as dense, oily & acidic as Ironwood.
    I'd check it out anyway. Imco none of those 'white' glues are any use for hardwoods anyway. Gorilla Glue is not an option. All my opinion.

    Ipe creates dirty, sticky, pervasive, toxic dust. http://www.woodweb.com/knowledge.../..._with_Ipe.html There are two/three more articles [Type Ipe into Search: "Gluing Ipe in Harsh Outdoor Environment" imco ONLY Gene Wengert really knows what he is talking about!]
    / www.Earthpaint.net Blog http://www.earthpaint.net/blog/how.....cal-hardwoods/ Persuasive opinions!
    __________________________________________________ __________________________
    *That Is the Question. attributed to William Shakescrewgun

    Pluck a feather from every passing goose, but follow no one absolutely..
    Last edited by ebb; 03-27-2012 at 10:43 AM.

  8. #533
    Join Date
    Jan 2004
    Location
    Scarborough, Maine
    Posts
    1,439

    Coamings

    Saw this pic today and it reminded me of what I imagine Tony's coaming treatment will look like:

    Name:  bristol31-coamings.jpg
Views: 1059
Size:  56.3 KB

    I like those stern chocks too!

    Been awhile since an update Tony! Hopefully you're so busy with your final punch list and getting A-113 ready to splash that you just haven't had time to update us!
    Mike
    Totoro (Sea Sprite 23 #626)

  9. #534
    Join Date
    Sep 2001
    Location
    Northern MN
    Posts
    1,100
    Those chocks are beauties, Mike. That's a clean lookin' boat. Probably not an active cruiser :0 Our coamings don't look like that. I'd be happy if mine were all the same color. I was planning on a wood "cap" from the sheet winches forward with a couple of raised non-slip strips inset to act as "place your foot here when stepping" spots.

    I have been incredibly busy this summer. Oldest daughter got married. The missus and I bought a wee little 1930's, stucco bungalow that needed a lot of work. A lot of work. I haven't screwing off enough at work so they promoted me...promoted?? naw, just made my job more difficult.

    As far as the boat goes the only thing I've done is bought a Taylors 029 stove. It's kind of heavy weighing in at close to thirty pounds but it is such a beauty I'll make an exception. A little bigger than the Atom stove I was planning for but it has the "warming oven" and two burners. Oh the culinary miracle worker... I've been meaning to post pictures. We need more pictures here.
    My home has a keel.

  10. #535
    Join Date
    Sep 2001
    Location
    San Rafael, CA
    Posts
    3,621

    Congrats on daught leaving home!

    AND you and your partner getting your own cottage!

    The IPE deck next door here has another anomally that you may have alluded to in your post above .... it's a bloody dark and heavy wood.
    The wood used as an exposed deck material at another structure on the property here has never been coated and gone grey. The deck next door was, as I said, oiled. The house-keeper for the estate lives there and the sliding glass wall-doors, year round, were kept totally covered inside and out in an attempt to ward off heat generated by the wood! The dark non-porus wood blasts heat like iron metal when the sun beats on it. The owner called in his favorite contractor and most of the decks have now been covered with roof and tinted polycarbonate panels. Good landlord!
    You could stand on the deck in the spring sunshine and feel the heat growing underfoot, like standing on a stove burner.
    The other grayed-out Ipe deck produces nowhere near the same noticable heat.

    So, those varnished trim pieces on the boat in Mike's pic - in hot sun - would be rather uncomfortable, IF they were any darker.
    The blond trim looks right-on.
    Wonder if there's any varnish that has reflective flecks in its formula, looks the same but bounces some of the sun away?

    Tony, It would not be amiss to see befor and afters of your '30's bungalow !
    Your next home should have a keel.
    Last edited by ebb; 07-09-2012 at 11:45 AM.

  11. #536
    Join Date
    Sep 2001
    Location
    Northern MN
    Posts
    1,100
    It's been a while so I thought a general message was in order. I haven't forgotten this sailboat site,or, that it is a sailboat site. Because so, I'll keep it brief.

    Things haven't slowed down one bit here with work and the house taking all of our time and money. There was a list of projects that had to be done before winter and a recent cold snap followed by an early snow threw a monkey wrench in the machine. It isn't going to stick around but the furnace now takes priority over the dash coat on the stucco. I have been in the shop recreating some trim pieces and profiles and what not but not a lick of boat work. It hurts to see her there and not do anything more than run my hand along the curves and admire the inherent beauty in front of me. The pangs are only eased by knowing this house fits into the master plan as a home base and income for future cruising. And this house is a beauty in its own right too weighing in with little more than 700 sq.ft. per floor. As a household we are trying to decrease our footprint more and more and liking it. Like so many have said before, with everything we "give up" it seems we get so much more back.

    Once the snow comes to stay we will have a chance to filter through the myriad of pictures and find some that will hopefully capture the character of this house and post one or two. Until then, we must press on...

    Everyone, keep posting and adding pictures and links to this site.
    My home has a keel.

  12. #537
    Join Date
    Sep 2001
    Location
    San Rafael, CA
    Posts
    3,621

    plum of a cottage, apple of your eye?

    Cottage that supports cruising? Ah, yes: Breadfruit!

  13. #538
    Join Date
    Apr 2004
    Location
    Pensacola, FL
    Posts
    724
    Do not despair Tony! You will launch one day... We will all celebrate with you, and I look forward to toasting your achievement while in some warm tropical anchorage some day.

    until then, may the vision sustain you through another winter... May your spring, and your launch date arrive before you know it friend.

    Fair winds,


    s/v 'Faith'

    1964 Ariel #226
    Link to our travels on Sailfar.net

  14. #539
    Join Date
    Sep 2001
    Location
    Northern MN
    Posts
    1,100
    Quote Originally Posted by mbd View Post

    How about a toe rail treatment similar to your coamings? Build them up with fiberglass - you wouldn't have to worry about thru-bolting. Then, you could top them off with a nice mahogany cap so you'd still have something to varnish.

    Attachment 8238
    Mike you are a genius! I don't know why, or how many times, I have read that and it just didn't sink in...I are a idiot...well, a dolt, at the very least. That sure would make things easier as far as maintenance goes, with the exception of varnishing. Plus we could make them as high as we wished. Toe rails could be bulwarks if we want! The only substantial bolting needed would be where the chocks get mounted, and that would have to be worked out being they are pretty skinny lengthwise. There is one wrinkle though. I cut the mahogany into those 2" to 2.5" strips years ago anticipating attaching them on their edge. I don't know if I could steam them enough to pull them into a flat "cap"...

    But I like this idea! Mucho gracias senior Mike!
    My home has a keel.

  15. #540
    Join Date
    Sep 2001
    Location
    San Rafael, CA
    Posts
    3,621

    new rail up

    Tony, those already milled mahogany strips are nearly 'square' at 2"X2.5".

    Bet you can bend them cold on the sheer.
    At the very most you'd only have to steam the foreward lengths where the wood has to make the tighter curve right to the stem.

    Way to do that is to lever over-long pieces so that the curve is continuous.
    So that when you cut to fit the wood has a full curve memory. Maybe only steam can do this.
    Tried to do that with the rather huge bull toerails on litlgull.
    But ended with the very front ends running outboard (running straight) not following the molded toerail as I wished.
    The curve on an Ariel gets more radical approaching the stem.
    Honduras mahogany is not known for steam bending well. (see Steam bending mahogany, woodenboat forum.)
    Determine the easy bending side of your strips - there will be one - scarf these sides so that the full run length wants to naturally curve that way.

    No doubt you have to scarf pieces to get your 30' length.
    The scarf can be in the chainplates area.
    So if you determine you actually need to steam the rail, only the pieces forward of the plates need it. Am positive the remaining run aft can be bent on cold.


    Cut maybe 30 or 40 L shaped pieces of good quality plywood. Screwed one leg right angles to the deck all along the toe rail, stem to stern.. And clamped the rails to the up leg. Because the deck has a crown, to get the rail to stand up right (say, 90 degrees) the L pieces are less than ninety. Didn't have near enough clamps for each helper, but it doesn't matter since the mahogany is pulled against them and won't need clamping.

    All kinds of adjusting, shimming and drilling can be done this way: Violating the deck with hundreds of
    screw holes. That's what epoxy is for. The rail can be fitted tight and predrilled for fastening & then suspended in place (if your up legs are tall enough) this way for final gooping, allowing the underside of the rail to be gunned standing below!!!.....then lowered into place, easy as pie.
    Think the L jig pieces make control of the new rail additions much easier. Allows total removal if necessary (chamfering holes and/or priming) while working them.

    Milled a mild concave into the bearing surface of the mahogany using a table router.
    I believe it helped to 'register' the rail onto the fiberglass toerail.


    Have now been looking for too long at litlgull's bullwarky toerails.
    Certainly know that mahogany looks gorgeous when varnished.
    Also know that tomorrow I'm not going to want to get on my knees to do the honors.
    After initial varnishing, the toe rail extension can be painted like the deck, up to the varnished cap.
    Or that cap, if teak or ipe, left to gray out.

    Varnishing the new rail outside would continue until patience ran out.
    If you end up with a cap rail AND a rub rail (to cover the seam) they could remain varnishable
    and the new rail addition outside coated to the color of the hull. I'll probably end up doing that on litlgull.
    Because I got no time to VARNISH!


    If you are not working on the boat, but have some long benches set up (or use the vertical two-by studs on the shop wall), would it be possible
    to jig the tables to start cold pre-bending the deck curve into the pieces?
    [Don't remember if I yattered about this: but I made up litlgull's rails scarffed full length
    and steambent only the front of the rails in the steambox at the shop. Only partially successful, as mahogany never gets actually limp like oak.
    And after dry trundled them down to the boat on the Yakima racks for fitting.
    I must have had some springback after taking them out of their bending jig
    - because I didn't get the front bends radical enough. BUT, only you and I know that!!!]


    Rail ends at the bow are a problem: I see you may be using the 2X2.5 pieces as cap rails. If most of the shaping & rounding is done prior to mounting
    there would be less wood to bend and therefor more easy a cold bend onto the toe rail curve, even if bent on the wide.
    If the pieces won't bend up at the end in the bow, then perhaps they could be left rough and shaped/carved to the perfect curve
    with the new rail fastened in place?
    Better may be special shaped pieces for the bow, scarfed on to the ends of the new rails, carved on the bottom to fit the tight toe rail curve
    - with custom built-in fairleads and chocks.

    Sorry for the length of this.
    Last edited by ebb; 11-28-2012 at 02:13 PM.

+ Reply to Thread

Posting Permissions

  • You may not post new threads
  • You may not post replies
  • You may not post attachments
  • You may not edit your posts