+ Reply to Thread
Results 1 to 15 of 334

Thread: Commander #65 "Lucky Dawg"

Hybrid View

  1. #1
    Join Date
    Apr 2007
    Location
    Grand Haven / Muskegon, Michigan
    Posts
    614
    A bit of progress. Removed old varnish with heat gun and followed up to remove any residue with Jabsco stripper. Bleached with oxylic acid from Ace Hdwr. Sanded with 40/60/80. Last pic is Interlux InterStain - brown mahogany. Will follow that in a couple days with Interlux InterPrime Clear Sealer and then Epifanes Clear gloss varnish. Tedious work, but looking forward to outcome.

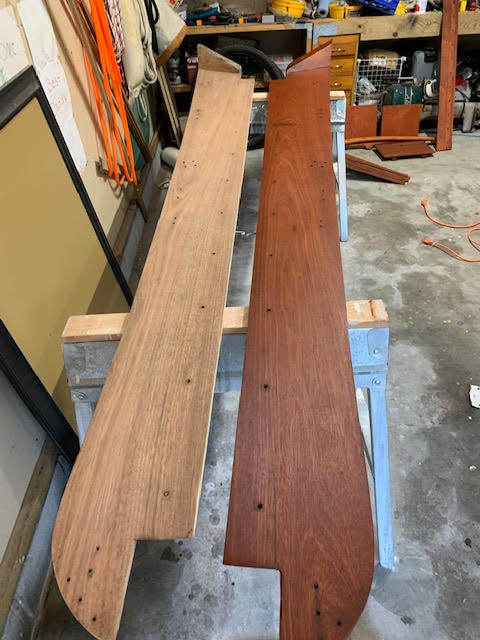
    Bleached. Left is sanded to 80. 40 grit to get some of the black streaks out.

    Name:  bright1.jpg
Views: 1957
Size:  64.3 KB

    Cool pic! In the bottom right corner, you can see the diagonal seam repair I made 10 years ago with epoxy thickened with mahagany sanding dust. Still holding up and still dark brown - didn't know if it would bleach out somehow.

    Name:  bright2.jpg
Views: 1989
Size:  54.0 KB

    All bleached and sanded

    Name:  bright3.jpg
Views: 1957
Size:  63.8 KB

    InterStain. 80grit recommended final pass so that the product has adequate tooth to hold on to. "Thick housepaint" consistency that is rubbed across the grain and as much rubbed off in that way as will lift for final appearance. Process of rubbing/removal is pretty quickly underway after application. If you let it flash/dry, it is really difficult to rub down adequately. I used the same process/staining on my companionway brightwork a couple years ago and it looks great.

    Name:  bright4.jpg
Views: 2015
Size:  58.4 KB

  2. #2
    Join Date
    Apr 2007
    Location
    Grand Haven / Muskegon, Michigan
    Posts
    614
    I needed to bow the 3/8" mahogany plank that goes beneath my traveler. The bow above the lazarette bulkhead is pretty minimal, but I didn't successfully bow it when I created it and the athwartship ends of the piece lifted up a bit off the deck.

    So, I successfully used this method - https://youtu.be/--iPQIwSEJM*- making a steam bag out of tarp material and duct tape coupled to a home/laundry steamer.

    Because of COVID, the storage shed at my boat yard is closed, so I couldn't get the exact radius off of the top of the bulkhead. By my guess-timation, the radius on the trim piece above our fireplace seemed about right.

    Name:  radius.jpg
Views: 1961
Size:  30.3 KB

    Made a box out of 3/8" plywood and 2x4 scrap to match that radius.

    Name:  form.jpg
Views: 1998
Size:  94.9 KB

    Steamed it for about an hour clamped to my form. Let it cool in place. It got plenty hot with the laundry steamer.

    Name:  bag.jpg
Views: 2035
Size:  63.4 KB

    Finished product!

    Name:  completedbend.jpg
Views: 1920
Size:  64.8 KB

    This is a good video on building an actual steam box https://www.youtube.com/watch?v=NMvc2tuVGcQ* Just didn't seem worth the trouble for potentially the only time I will find myself steam-bending wood.

  3. #3
    Join Date
    Apr 2007
    Location
    Grand Haven / Muskegon, Michigan
    Posts
    614
    Splashed a couple weeks ago. A couple pix of rehabbed brightwork, etc. New sail and tiller covers

    Name:  cockpitrevival.jpg
Views: 1908
Size:  93.7 KB

    Name:  newsailcover.jpg
Views: 2059
Size:  81.9 KB

    Name:  crew062220.jpg
Views: 1778
Size:  59.0 KB

    Name:  dogonthehard.jpg
Views: 1925
Size:  85.4 KB

+ Reply to Thread

Posting Permissions

  • You may not post new threads
  • You may not post replies
  • You may not post attachments
  • You may not edit your posts