+ Reply to Thread
Page 2 of 3 FirstFirst 1 2 3 LastLast
Results 16 to 30 of 31

Thread: Mount Pads

  1. #16
    Join Date
    Jan 2004
    Location
    Scarborough, Maine
    Posts
    1,439

    That's it!

    Thanks Al. Nice site. I've been wondering about prefab plastic sheets not only for the pads, but also for backing plates. I'll have to look into that a bit more. Though, I must say I prefer Admin Bill's functional and decorative teak backings for the cabin. (I'd still like to know how he mounted the handrails opposite each other - one outside and one inside)

    And yep! That's what I'm talking about Bill. Though, I was thinking I'd make a mold, then sand down the the piece and glue it in place. But, your way is more straightforward. Nice results too.

    2 questions: 1. Do I need high densitiy filler? I'll be recoring under the mast too, methinks. and 2. Did you reuse your deck skins on your recore, of glass and new skin on top? OK, 3. What did you use for core material?

    PS. I didn't even consider trying to mount the stern rail on the taff rail. Nice and out of the wet deck area, but how on earth did you back those? Must've just used washers?
    Last edited by mbd; 09-16-2006 at 10:33 AM.
    Mike
    Totoro (Sea Sprite 23 #626)

  2. #17
    Join Date
    Nov 2005
    Location
    Narragansett Bay, R.I.
    Posts
    597
    Mike

    a couple of answers in no particular order.... Much like your side deck recore, both the top and bottom skin was reused on A-231. On the my foredeck, I recored from below saving the outer skin. the whole deck was finish off with two layers of 6 oz cloth. Under the mast step... the original balsa core failed. I've replaced it with solid mat & cloth.

    As for thickeners.. I've used West 406 for almost everything except fairing.

    core material... forgive me, I confess A-231 is using 1/4in ply on the decks & balsa in the coach room (I've grown to like divinycell after using it on a friends boat).

    backing plates... 1/8th inch stainless for the side decks, fender washers for the bow & stern rails.

    cheers,
    Bill
    Attached Images  

  3. #18
    Join Date
    Jan 2004
    Location
    Scarborough, Maine
    Posts
    1,439
    Quote Originally Posted by bill@ariel231
    On the my foredeck, I recored from below saving the outer skin.
    Why from below? To save the shape of the foredeck? I was thinking I may do one "panel" at a time on the foredeck for the same reason. Still not sure how extensive that portion of the recore will be.

    Have you got any more pics of your mount pads? You can send 'em off-line if no one else wants to see them...
    Mike
    Totoro (Sea Sprite 23 #626)

  4. #19
    Join Date
    Nov 2005
    Location
    Narragansett Bay, R.I.
    Posts
    597
    recoring from below wasn't entirely my choice. A-231's foredeck was in pretty bad shape after the work of previous owners. the deck had delaminated to the extent that a previous owner tried to "fill the core" with spray foam insulation and reseal the deck with tile grout. the result was a deck swollen to 6 inches deep in a couple of spots. only the upper skin retained any hint of the original dimensions. If you have the option of recoring from above that is always preferable.

    I don't have any other pictures of the backing plates on file. I'll see what I can do about that..

  5. #20
    Join Date
    Jan 2004
    Location
    Scarborough, Maine
    Posts
    1,439
    Thank Neptune for my PO's! Holy smokes what a mess... Periwinkle is one lucky little boat to have found you.

    Not pics of the backing plates - your mount pads and your process.

    Have you had trouble witht the stainless plates corroding or rusting or anything? (Is that a stupid question?)
    Mike
    Totoro (Sea Sprite 23 #626)

  6. #21
    Join Date
    Nov 2005
    Location
    Narragansett Bay, R.I.
    Posts
    597
    no problem with the Stainless backing plates (they still show a mirror finish).

    sorry, I don't have other in-progress pictures of the installation of stanchions and rails.
    Last edited by bill@ariel231; 09-18-2006 at 06:53 AM.

  7. #22
    Join Date
    Jan 2004
    Location
    Scarborough, Maine
    Posts
    1,439
    Here we go: stanchion repair (From the Triton Association Maintenance page)
    Attached Images  
    Last edited by mbd; 09-18-2006 at 05:09 PM.
    Mike
    Totoro (Sea Sprite 23 #626)

  8. #23
    Join Date
    Apr 2004
    Location
    Pensacola, FL
    Posts
    725

    Another idea for a pad.

    FWIW,

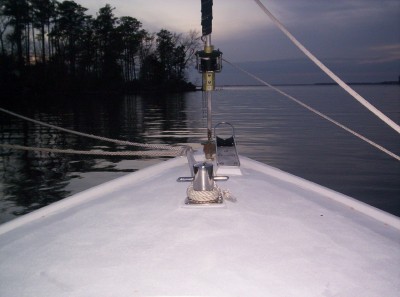
    I used a salvaged piece of deck skin to make the raised pad I am mounting the bit on.

    The rise is only about 3/8" but I like the idea of getting the mount up off of the deck.... I wish I had saved the skin from the starboard side...

    I will try to remember to bring the camera to the marina and take a picture.


    s/v 'Faith'

    1964 Ariel #226
    Link to our travels on Sailfar.net

  9. #24
    Join Date
    Jan 2004
    Location
    Scarborough, Maine
    Posts
    1,439
    Craig, you've gotta post some pics, man! You're killing me over here. Recore, mount pads, new anchors,etc. ... Yowza!

    FRP has been recommended for this purpose and backing plates when I remount the hardware. Anyone know a good source?
    Mike
    Totoro (Sea Sprite 23 #626)

  10. #25
    Join Date
    Jul 2004
    Location
    Winyah Bay, SC
    Posts
    607
    Mike -

    We used to lay up solid slabs - maybe 4' x 18" x 3/8" - to make surfboard fin blanks. If it comes to it and that is your only or best option, it is fairly simply to do: Get a piece of glass plenty larger than your eventual slab. Cut *a bunch* of pieces of glass cloth, and inch or two bigger than you'd like your final slab to be. Laminate them to the glass, 2-3 pieces at a time, all at once. Use plenty of resin; what you squeegee out of your laminations can be squeegee'd right back in the bucket and used to wet the next pieces, and so on. Once it cures it'll lift right off the glass, and be of a fairly uniform thickness.

    A few tips:

    Get a nice thick rubber squeegee, the kind you can buy at a auto-body supply store. They sell it by the inch or foot. Get extra - you can custom make a few sizes of squeegee for future projects with any excess.

    Kick your resin (polyester) medium-slow, because the thickness of the slab will generate heat when it starts curing, accelerating the process. Too much catalyst and it'll burn, so be conservative if anything. If you can get some UV-activating catalyst, that would be great - pick a sunny day, lay it up in the garage, once it's nice and ready, open the garage door.

    You can use a run of the mill polyester resin from a hardware store, nothing fancy or expensive needed.

    I'm with you - pics, Craig, pics!
    Kurt - Ariel #422 Katie Marie
    --------------------------------------------------
    sailFar.net
    Small boats, long distances...

  11. #26
    Join Date
    Apr 2004
    Location
    Pensacola, FL
    Posts
    725
    Most of the pictures I took last night did not come out very well.....

    Kinda like my progress laying on my back with my head in the anchor locker... messing with fairing the backing plate for the roller.

    Here a picture of the bow, you can kind of see the mount pad on the bit;


    s/v 'Faith'

    1964 Ariel #226
    Link to our travels on Sailfar.net

  12. #27
    Join Date
    Jan 2004
    Location
    Scarborough, Maine
    Posts
    1,439
    Kurt, that sounds like it would do the trick. Unfortunately, time is not my friend these days, or rather, I have very little extra so I'll probably go the "quick" route and buy something...

    Craig, very nice! Looks great! 3/8" looks just about right. Nice clean looking foredeck, did you recore it? Hmmm, no bow pulpit? I'd like to get a mooring bit too. How big is yours? How do you like it? Where'd you get it?
    Mike
    Totoro (Sea Sprite 23 #626)

  13. #28
    Join Date
    Apr 2004
    Location
    Pensacola, FL
    Posts
    725
    Quote Originally Posted by mbd View Post
    Hmmm, no bow pulpit?.....?
    The deck was recored, and the bow pulpit is sitting in my dingy right now....

    I feel like I am making NO progress as of late.


    s/v 'Faith'

    1964 Ariel #226
    Link to our travels on Sailfar.net

  14. #29
    Join Date
    Jan 2004
    Location
    Scarborough, Maine
    Posts
    1,439
    Are you planning mount pads for the stanchion and pulpit bases as well? Given the stresses regularly imposed on them, I would think those are the most crucial locations for raising their attachment points above the normal water level on the deck with mount pads... If/when you do, feel free to regale us with plenty 'o pics of your process!
    Mike
    Totoro (Sea Sprite 23 #626)

  15. #30
    Join Date
    Apr 2004
    Location
    Pensacola, FL
    Posts
    725
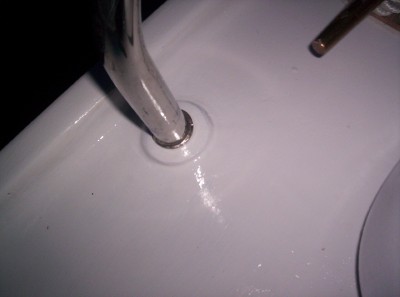
    I made up mounting pads for the stern pulpit from fiberglass

    I did not have any more used deck skins to recycle, or the fancy stuff form McCallister-car so I just laid up some layers and used a hole saw to get the 3" cicrles I wanted;


    THese were bedded in thickened epoxy. I used my gloved finger to radius the edges and sanded them once they dried.


    The finished product not only helps keep the water from collecting around the mount, but actually works as a kind of external backing plate to help distribute compressive force applied to the pulpit.


    s/v 'Faith'

    1964 Ariel #226
    Link to our travels on Sailfar.net

+ Reply to Thread

Posting Permissions

  • You may not post new threads
  • You may not post replies
  • You may not post attachments
  • You may not edit your posts